Welcome to PicMonkey Basics: Touch Up a Photo, the 3rd post in a five-part series about the basics of working in PicMonkey. If you missed the first two in the series, you can catch up now:
As I shared in my first post, PicMonkey is a free photo editing website with the option to upgrade to “Royale”. Upgrading to “Royale” allows access to all PicMonkey features for a small monthly fee or an even smaller annual fee.
But, with just the free features available on PicMonkey, you can take your photos up a notch. Plus it’s so much fun! Even the young budding photographers in your family will love using the monkey, with its easy-to-use interface and infinite selection of editing tools.
Now that you’ve had a chance to review the basics of getting started with the monkey, plus have had a opportunity to edit a photo with some of the basic editing tools available on PicMonkey, it’s time to get serious and have some real fun!
Don’t most women want to touch up a portrait-type photo that has been taken of them? Or a selfie? Our built-in vanity meter wants us to look our best in a medium designed for posterity.
If we have wrinkles and blemishes, zooming in for a close-up is a frightening experience for most of us! And, if you are anything like me, once a photo of yourself is taken by someone else, you are probably wheedling them to delete the photo!
But, with PicMonkey, now you can have them send it to you and you can work magic!
The Touch-Up toolbar in PicMonkey has a plethora of options to tempt us to make our selfies better! Here’s the list of magical features available under Touch-up:
- Blemish Fix
- Airbrush
- Wrinkle Remover
- Shine Reducer
- Blush Boost
- Spray Tan
- Teeth Whitener
- Lip Tint
- Eye Brightener
- Eye Tint
- Mascara
- Eyeliner
- Eyebrow Pencil
- Eye Shadow
- Red-eye Remover
- Nip Tuck
- Weight Loss
- Whisker Grow
- Highlights
- Clone
Now, there is no way that we can cover every single one of these editing tools in this post and keep your attention! So, we are only focusing on a few.
Let’s get started…
The first thing you do is upload the photo you’ve chosen to touch-up:
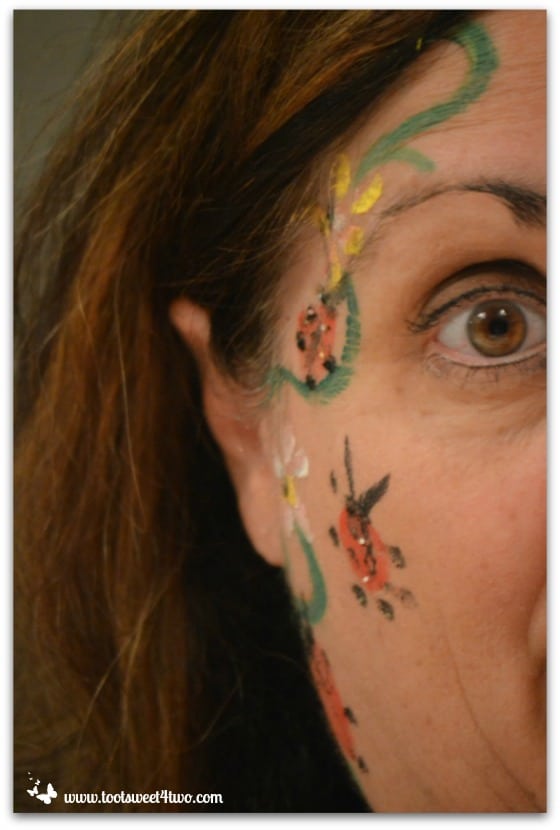
The above photo is of half my face! Wrinkles, blemishes, smudged eye makeup and, wait – ladybugs and flowers? What’s up with that? And, why would I show you only half my face?
Well, last October I went with my family to a local pumpkin patch and they had a face painting booth. Well, I’ve never had my face painted, ever, in my entire longgggg life.
I know! What planet have I been living on {grin}?
So, I decided “why not”? Here’s a link to the post, with other magical face-painting artwork on my beautiful nieces and sister – Scarecrows, Sunflowers and Face-painting: Another Story from the Farm.
When I got home, I wanted a picture of my face before I washed off the face-painting, so that I would have it for posterity. So this is what I did…
Picture this scary scenario in your mind: I’m facing our bathroom mirror with my fancy, dancy camera on my face. I’m trying to focus on the left side of my face and keep the camera only on my right side. I turned the camera vertically, zoomed in and took the shot. Then, I cropped the camera (and the right side of my face) out of the photo in PickMonkey!
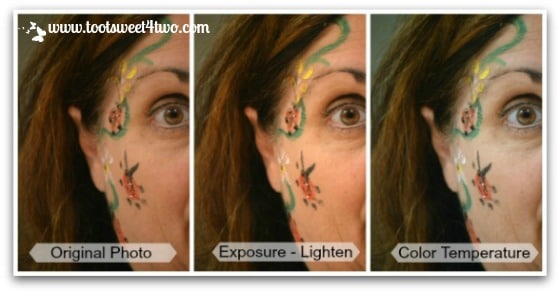
So, the photo on the left is me attempting to take a picture of my face in my bathroom mirror! Silly girl, I know, but I now have this photo of my face-painting!
Anyway, back to the photo on the left – this is the totally untouched photo. But first, before starting the touch-ups, I’m applying some of the basic editing tools.
In the middle photo, I’ve lightened the photo by clicking on “Exposure” in “Basic Edits”, then “Auto Adjust”. I always try the “Auto Adjust” feature first, because I figure that the monkey knows more about photo editing than I do!
If I feel the exposure needs additional tweaking after I’ve applied the “Auto Adjust”, then I’ll play with the other “Exposure” features in “Basic Edits”, such as:
- Brightness
- Highlights
- Shadows
- Contrast
In the photo on the right in the above collage, I’ve corrected the “temperature” of the photo (after all, it was taken indoors in my bathroom!) by clicking on “Colors”, then “Auto Adjust”, also in “Basic Edits”. Many times, I’m not happy with the “Auto Adjust” feature in “Colors” and will just play with the “Saturation” and “Temperature” myself. In this instance, I thought the temperature and color the “Auto Adjust” feature applied was more “real” than my bathroom lighting!
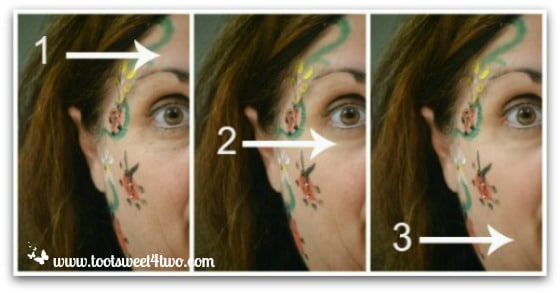
Now the fun really begins! I get to remove my wrinkles! Woohoo! Wrinkle-free in seconds!
In the first photo above, I’ve applied the “Wrinkle Remover” under “Touch Up” to my forehead. Look closely at my forehead compared to the rest of my face. You’ll notice a definite “softening” of my skin and the wrinkles have faded.
In photo number two, I’ve applied the “Wrinkle Remover” under my eye and in photo number three, I’ve applied it to the smile lines around my mouth, as well as the ones leading down my neck. Magic! In the blink of an eye, I’m ten years younger!
You know what? With the exception of one of my nieces, I’m the only brown-eyed person in my entire family! All of the rest of my family have either gorgeous bright blue eyes or hazel eyes! Even my husband has the most beautiful bright blue eyes! Oh, let’s not forget my cat Coco – he has the most beautiful blue eyes on the planet! Check out these posts about Coco to see the evidence (yes, I’ve written about Coco quite a few times {grin}):
- And the Winner is…
- Call of the Wild
- Herding Cats
- Sweet Baby James
- The Cheshire Cat’s Grin
- The God Complex
- The Squish Factor
There’s more…this is just a partial list {grin}.
Back to the fact that I don’t have blue or green eyes in a family that runs rampant with this genetic trait…
Don’t know how that happened (actually, I do – my grandfather had brown eyes), but I’ve always wanted green eyes!
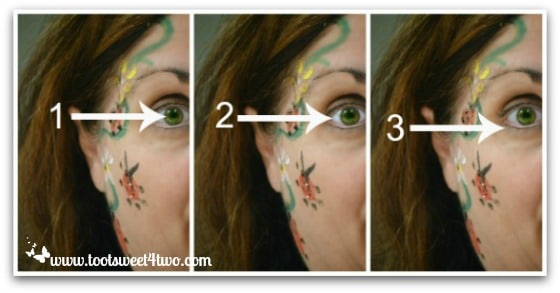
Now I do…by choosing the green eye under “Eye Tint” and adjusting the “Brush Size”, I magically get my wish in photo number one!
In photo number two, I’ve brightened the whites of my eyes by choosing “Eye Brighten” and again, adjusting the “Brush Size”. In photo number three, I’ve added some additional “Eye Liner” under my eye. If you look closely at photo number one, you will notice that some of my eye liner was smudged and faded away. So, I added some back!
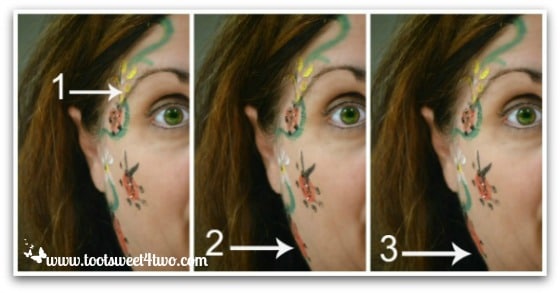
My eyebrows are a little sparse at the bottom edge of my brow. So, in photo number one above, I’ve applied additional “Eyebrow Pencil.”
I could definitely lose some weight, so in photo number two, I applied the “Weight Loss” tool – all the way over to the right on the weight loss bar, to the maximum amount!
In photo number three, I applied the “Nip Tuck” tool to give my neck more definition.
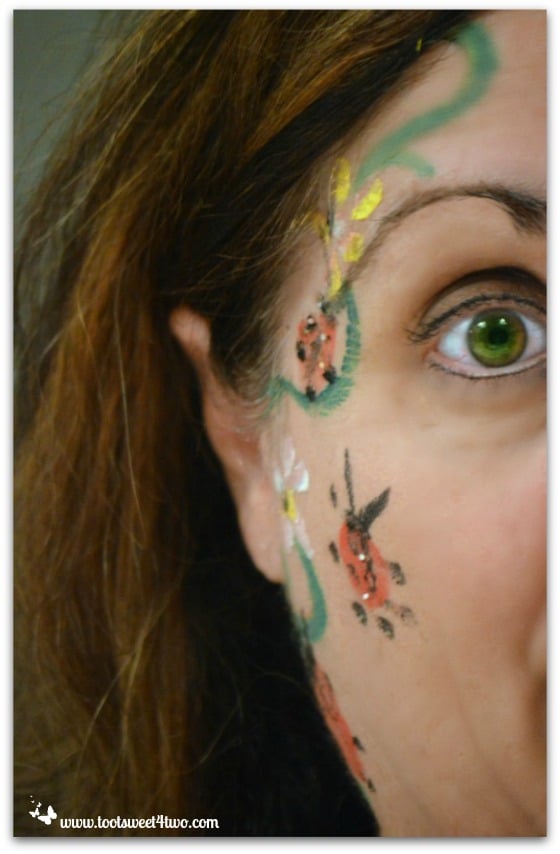
Me – 10 years younger, 10 pounds lighter and with green eyes!

Lost track of what we’ve done? Here’s the “Before” and “After”. Quite a difference, right?
Now how much fun was that – I got rid of my wrinkles, acquired green eyes (without sticking things, like contacts, in my eyes) and lost a few pounds without giving up chocolate!
I’m a happy girl…
Stayed tuned for the rest of the series:
- PicMonkey Basics: Design Your Own
- PicMonkey Basics: Create a Collage
Tootles,

Related Posts:
(other post with PicMonkey tutorials)
- Call of the Wild
- DIY Valentine Bookmarks
- Here Comes Peter Cottontail – A PicMonkey Tutorial
- How Did You Do That? A PicMonkey Halloween Tutorial
- How to Make a Horizontal Photo a Pinterest-friendly Vertical Photo in PicMonkey
- How to Make Easter Placecards for Your Holiday Table in PicMonkey
(and a gift to you from PicMonkey)
Leave a Reply