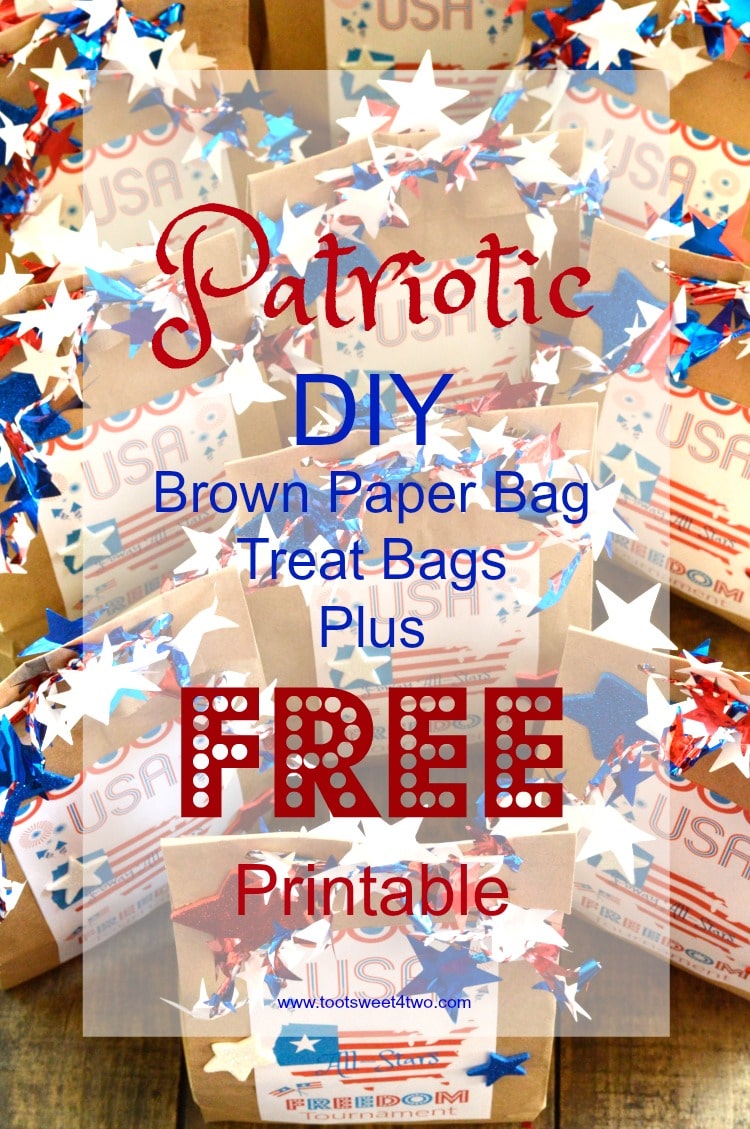
These Patriotic DIY Brown Paper Bag Treat Bags came together at the last minute. My sweet, adorable great-niece, known as Princess P on this blog, is on an All-Star softball team. They are in the playoffs and we are down to the last set of tournaments. And, guess what? This last tournament day is on Princess P’s 9th birthday! So, in order to make her feel a little special on her special day, I asked if I could make treat bags for the team.
But, I didn’t want to run out to the store to see if I could find something appropriate. I thought in the time it might take me to go store-to-store to find something, I could probably make it. And, I already had all kinds of sweet treats around the house for 4th of July and 4th of July decorations and brown paper bags, so an idea came together!
Make 4th of July treat bags from brown paper lunch bags! Step-by-step instructions plus a FREE printable! #4thofjuly Click To Tweet
Fair Warning: this tutorial on how to make paper bag treat bags is a long post! It’s literally step-by-step! So, if you are already familiar with some of the things I’m teaching you, just scroll through quickly until you get to a part you don’t know how to do!
I think they turned out pretty darn cute, so I decided to share them on the blog at the last minute, superseding other 4th of July stuff I had in the queue! So, you’ll be getting other 4th of July posts AFTER the 4th of July, too; but, hey, they’ll be good for next year’s party celebration think tank, right? First, let me share a list of supplies and materials you’ll need for the brown paper bag treat bag project.
SUPPLIES AND MATERIALS NEEDED FOR PAPER BAG TREAT BAGS
This post contains affiliate links for your convenience. Click to read my full disclosure policy here. Here’s a list of supplies and materials needed to make my Patriotic DIY Brown Paper Bag Treat Bags:
PicMonkey (FREE photo editing site)
Various sized, adhesive-backed red, white and blue glitter stars
Plastic sandwich-size and snack-size bags
STEP-BY-STEP INSTRUCTIONS FOR MAKING PAPER BAG TREAT BAGS
Now, let’s get started. The first thing you will want to do is design and print your special label. This is so easy to do in PicMonkey, a FREE photo editing site. While the majority of PicMonkey’s features are free, for this project I did choose the “Stars & Stripes” overlays as well as one of their fonts which are both “Royale” features. “Royale” features are available for a small monthly fee or a very reasonably priced annual fee that is discounted. Of course you don’t need to use the “Royale” overlays or fonts I chose to create your own treat bags using all their free features, but you won’t be able to make Patriotic ones!

Step #1: go to PicMonkey’s website.
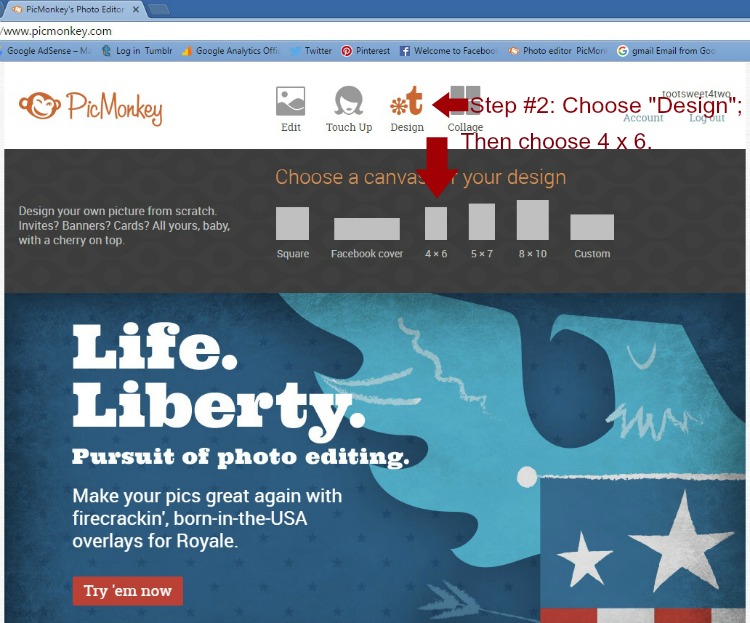
Step #2: Choose “Design,” which opens a drop-down list of choices when you hover over it. Then choose “4 x 6.”
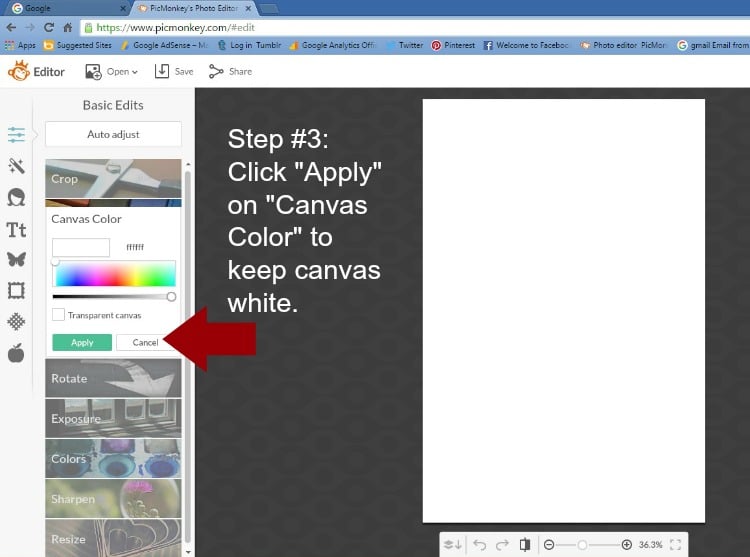
Step #3: Your dashboard opens and places a blank 4 x 6 canvas on it. It also opens the “Canvas Color” under “Basic Edits” automatically. At this point, you can choose the background color of your canvas or leave it white. To leave it white for this project, just click on “Apply.”
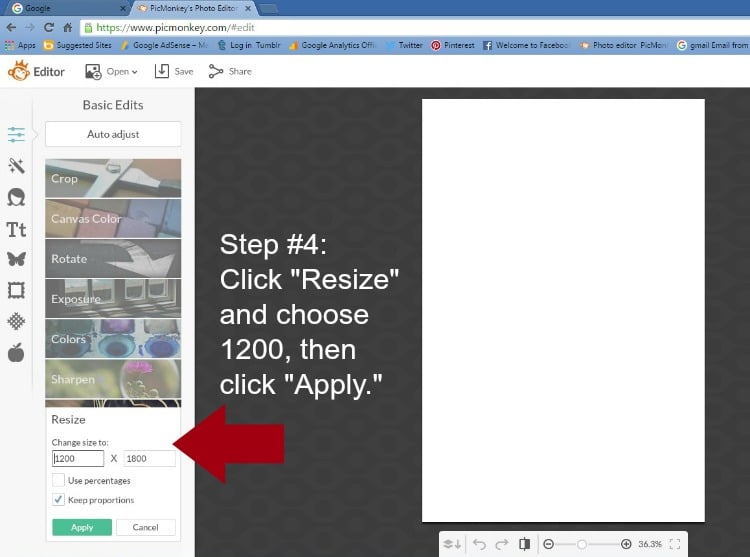
Step #4: I want to take a moment to explain resizing. If you are working with an image taken from a DSLR camera, if you leave your image the original size, PicMonkey’s photo editing features will slow and it will pop up a box asking you to consider another size. To avoid this, “Resize” your image or canvas from the start. The size of the 4 x 6 canvas defaults to 1200 x 1800. If you are making your design into a printable image to place in an 8″ x 10″ frame, you will need to resize your canvas to 2400 x 3000 (pixels). For this project, the “default” of 1200 x 1800 is fine, so click on “Cancel.”
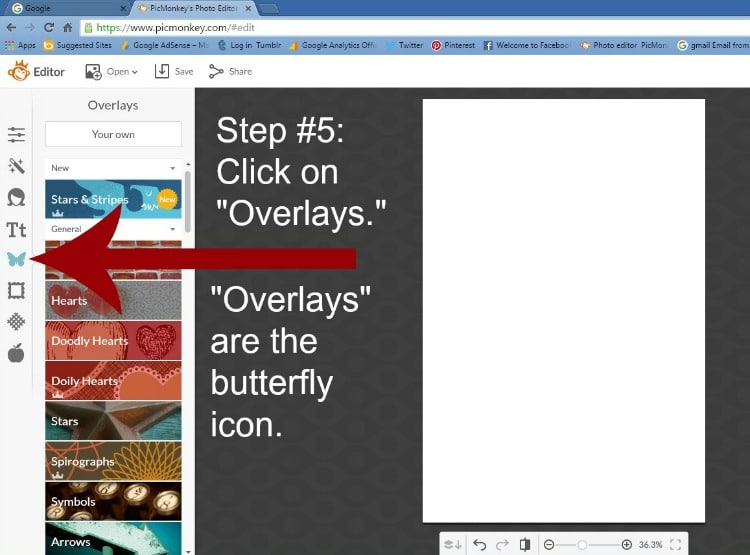
Step #5: Click on “Overlays,” the butterfly icon on the far left. This opens what seems like zillions of choices, most free! Because the “Stars & Stripes” are a new feature just added by PicMonkey, it appears at the top. Sometime in the near future, you will need to scroll down the scroll bar in the “Overlays” section to find this set of Patriotic overlays.
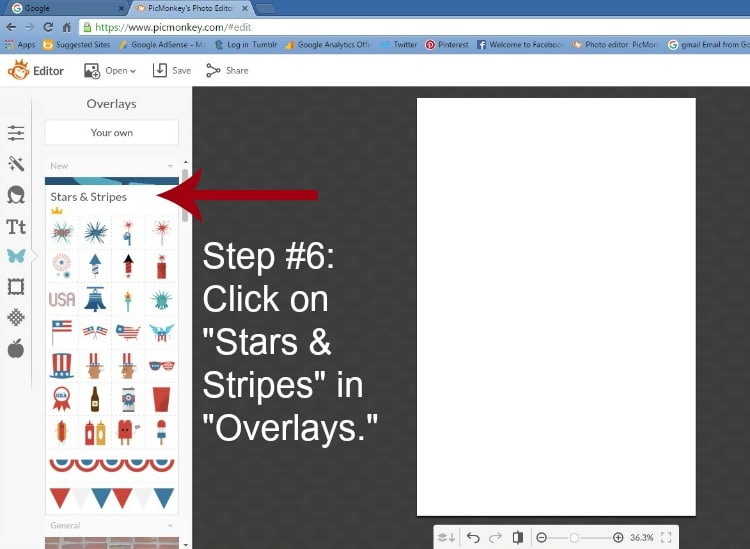
Step #6: Click on “Stars & Stripes” in “Overlays.” This will open all the cute and fun overlays PicMonkey has created for your use. You’ll see that “Stars & Stripes” is a “Royale” feature, so you’ll need to either pay a monthly fee to use this feature or decide on an annual subscription before you’ll be able to use these overlays.
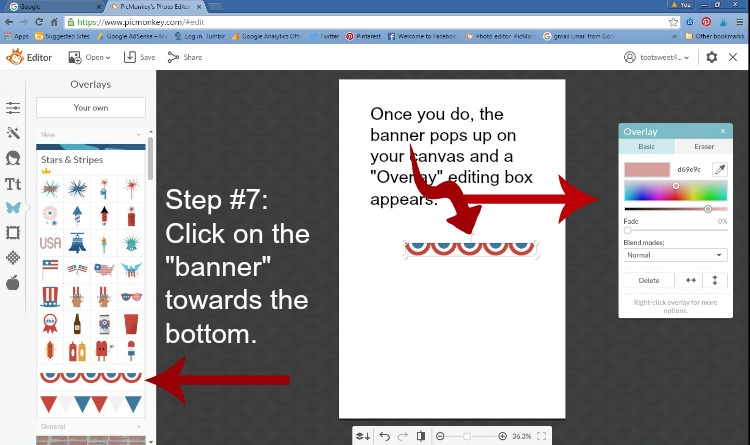
Step #7: Click on the bunting banner towards the bottom of “Stars & Stripes.” PicMonkey will automatically place the bunting on your canvas and an “Overlay” pop-up box will appear on the right side of your dashboard.
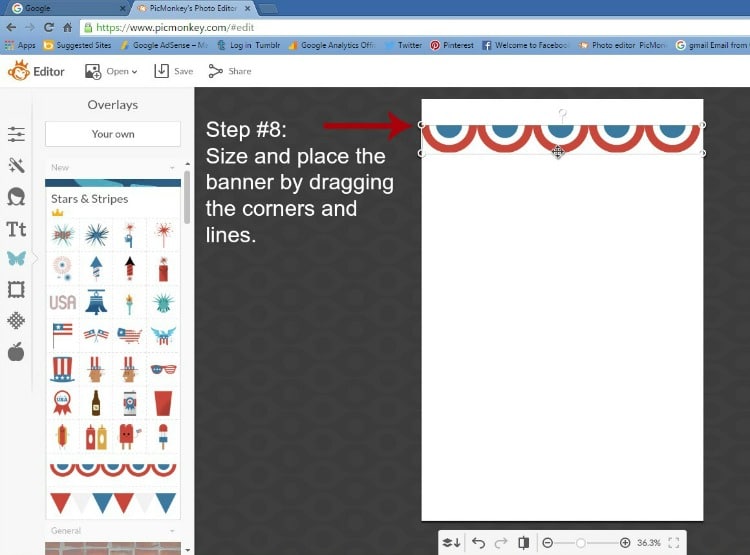
Step #8: Size and place the bunting banner on your canvas by dragging the corners and lines.
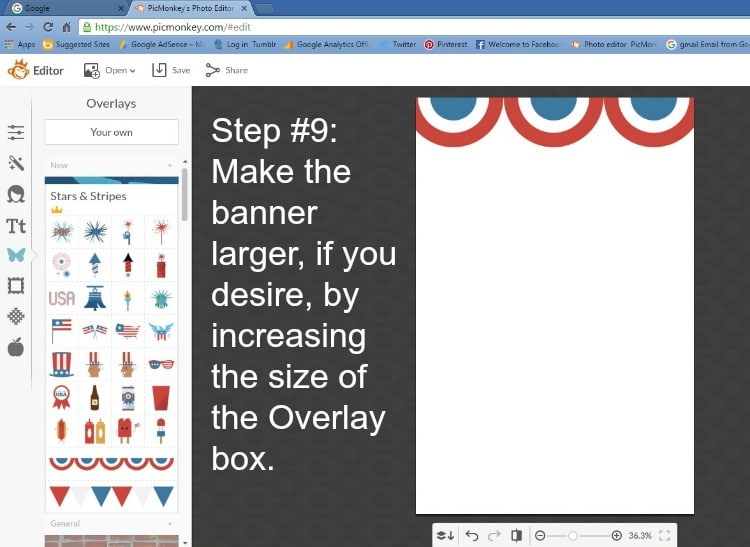
Step #9: You can make the banner larger, if you desire, by increasing the size of the overlay, again by dragging it from its lines. For this project, I decided I liked to see 5 bunting swags instead of 3, so resized it back down to 3 and moved it to the top of the page by dragging it.
![]()
Step #10: Choose the US Map icon and it pops up on your canvas and an “Overlay” dialog box appears again on the right.
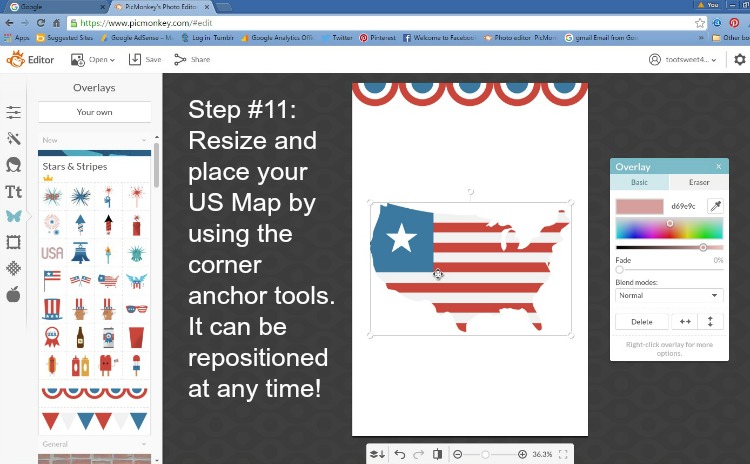
Step #11: Resize the map by dragging the corner anchor tools, then re-position it by dragging the box into place.

Step #12: Choose the “USA” overly. It will appear on your canvas and an “Overlay” dialog box will also appear.
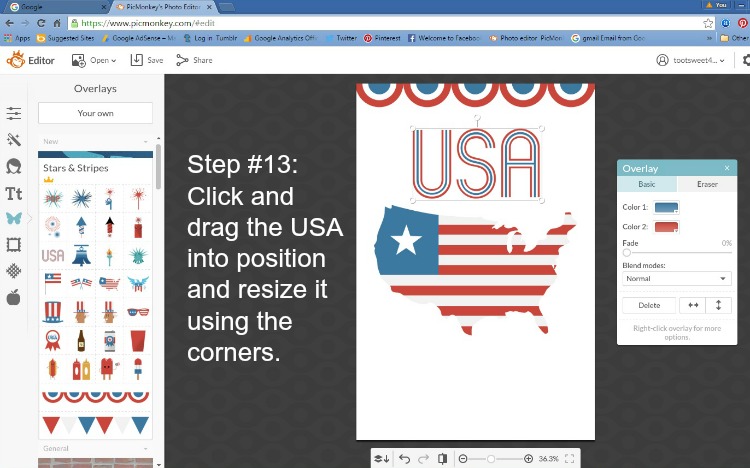
Step #13: Click and drag the USA into position and resize it using the corners.
![]()
Step #14: Choose a “Fireworks” icon and it will pop up on your canvas.
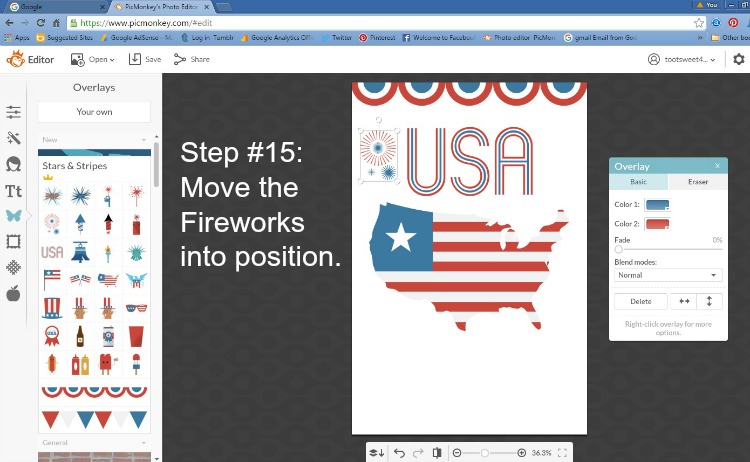
Step #15: Move the Fireworks into position.
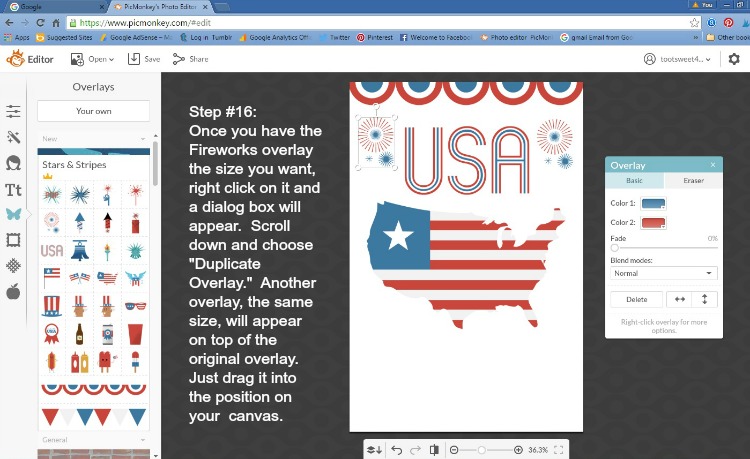
Step #16: Once you have the Fireworks overlay the size you want, right click on it and a dialog box will appear (not shown). Scroll down the dialog box and choose “Duplicate Overlay.” Another overly, the same size, will appear on top of the original overlay, slightly offset so that you can see the original one underneath. Just click on the duplicate overlay you just created and drag it into position on your canvas.

Step #17: Tweak the fireworks any way you want. Use the top handle to make them off-center and/or use the “Front/Back” arrow or the “Up/Down” arrow to change their direction.
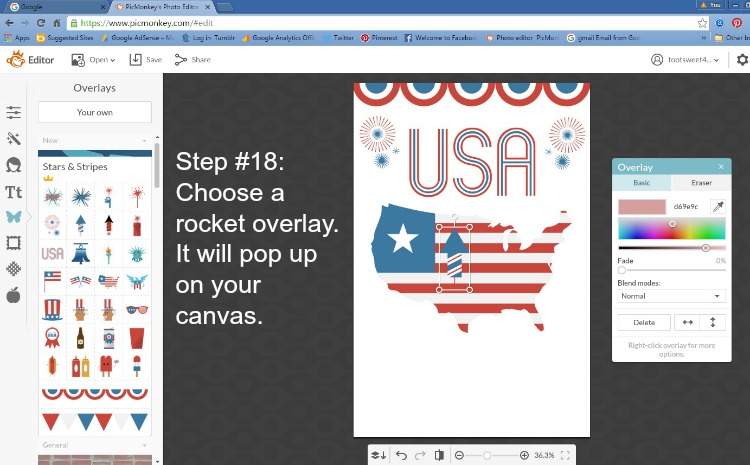
Step #18: Choose a “Rocket” overlay. It will pop up on your canvas.
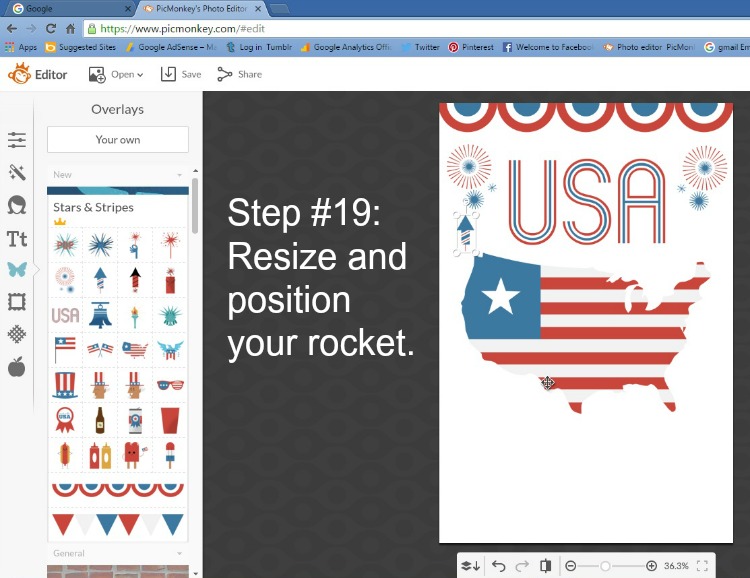
Step #19: Resize and position your rocket.
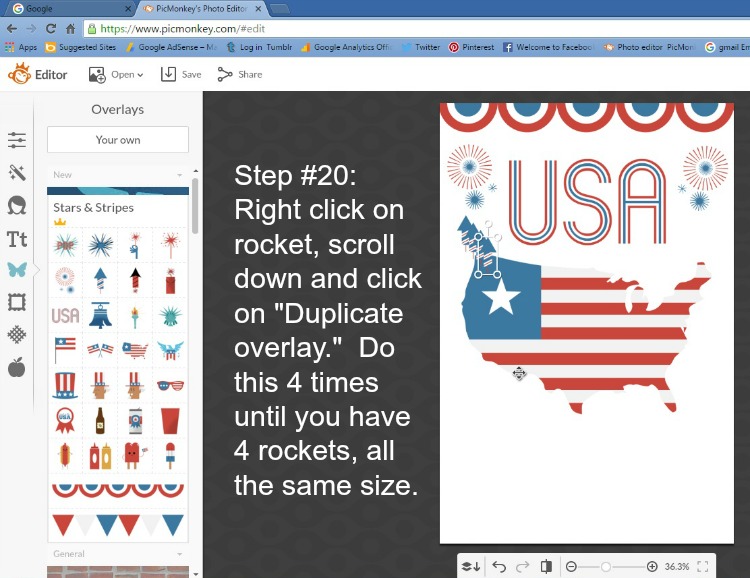
Step #20: Right click on the rocket, scroll down and click “Duplicate Overlay.” Do this 2 more times until you have 4 rockets, all the same size.

Step #21: Drag each rocket into position and rotate them using their handles.
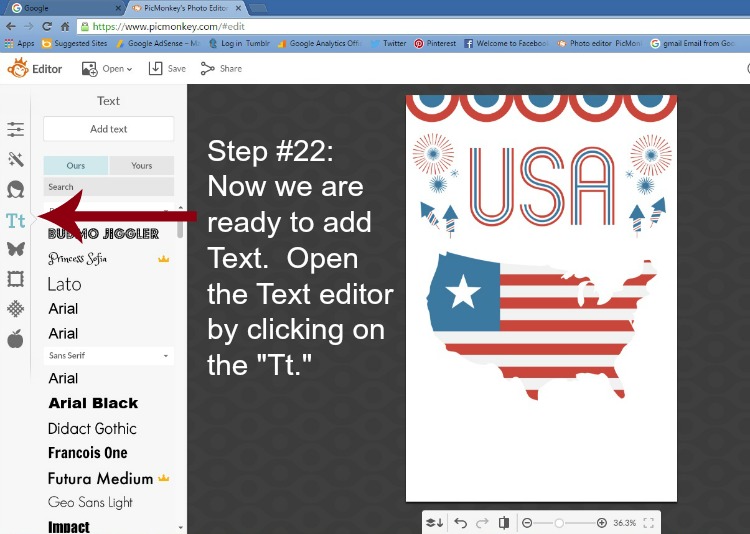
Step #22: Now we are ready to add Text. Open the “Text” editor by clicking on the “Tt” in the far left column.
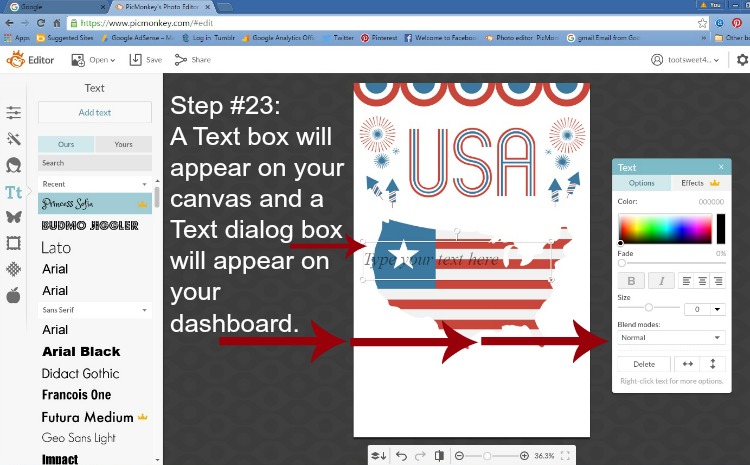
Step #23: A Text box will appear on your canvas and a Text dialog box will appear on your dashboard.
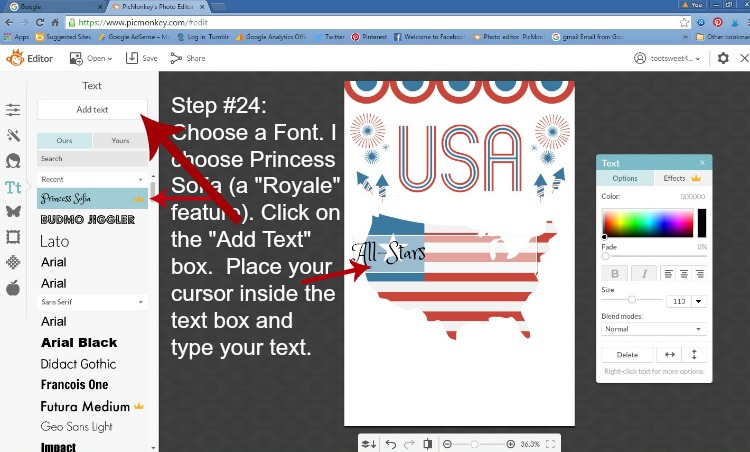
Step #24: Choose a font by using the scroll bar to find all the numerous fonts available and click on one to highlight it (blue). The ones that are “Royale” will have a crown beside them. I chose “Princess Sofia,” which is a new font at the time I write this AND a “Royale” font. Click on the “Add Text” box at the top. Then, place your cursor inside the text box and type your text.
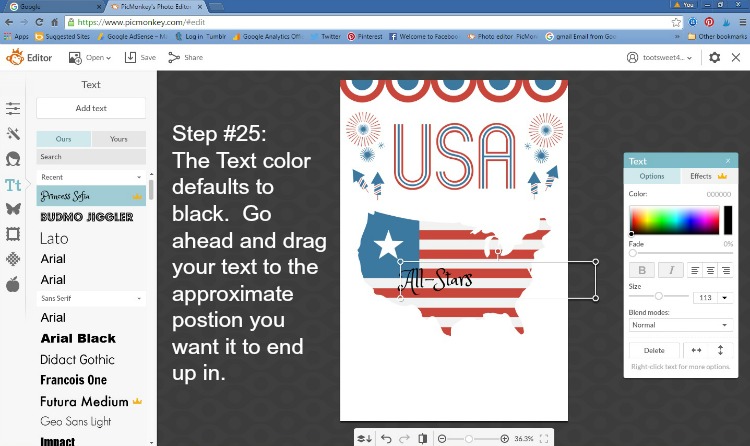
Step #25: The Text color defaults to black. Go ahead and drag your text to the approximate position you want it to end up in. You can change where your text is located on your canvas at any time.
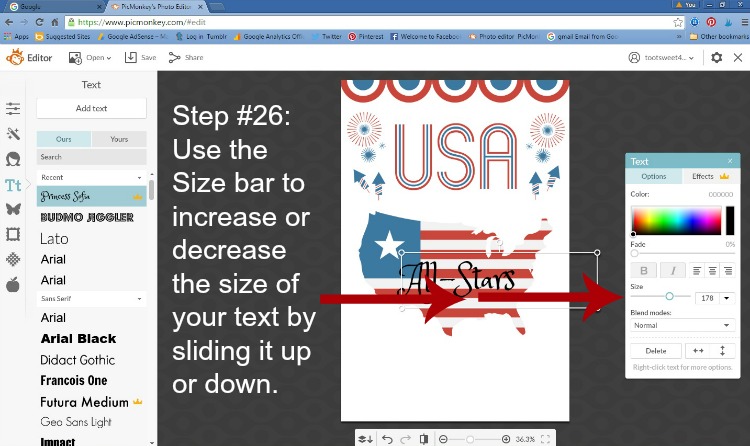
Step #26: Use the “Size” bar to increase or decrease the size of you text by sliding it from side-to-side. OR, use the drop-down arrow (next to 178) to increase or decrease the size of your text.
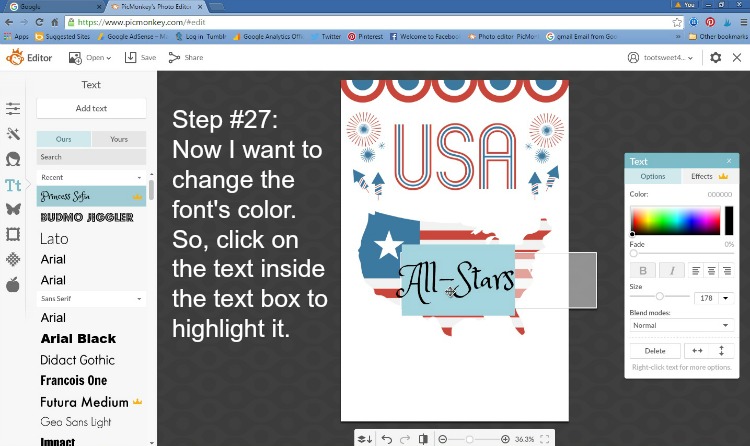
Step #27: Now I want to change the font’s color. So, click on the text inside the text box to highlight it.
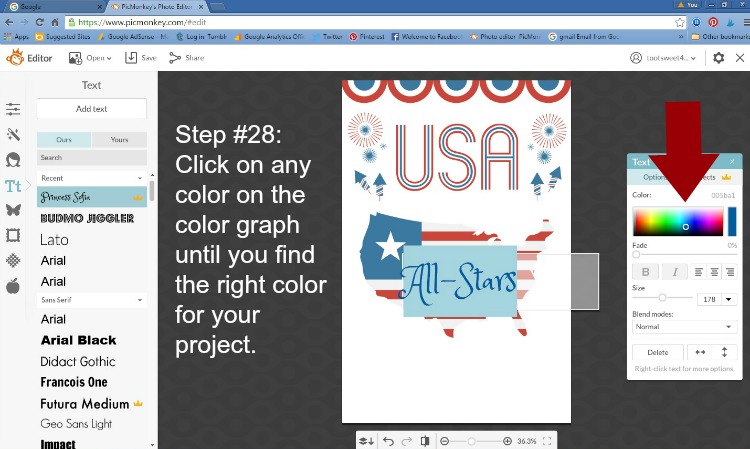
Step #28: Click on any color on the color graph until you find the right color for your project.
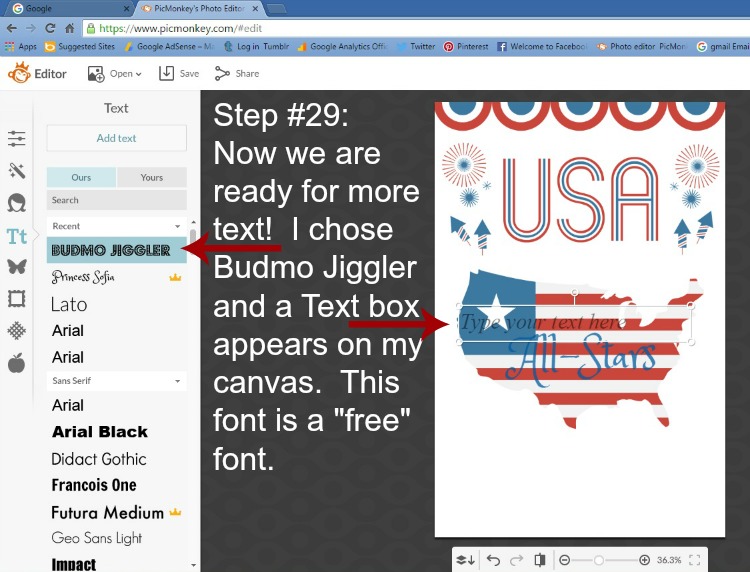
Step #29: Now we are ready for more text! I chose “Budmo Jiggler” for my next one, clicked on “Add text” and a Text box appears on my canvas. This is a free font. NOTE: once you’ve selected a font for your text, you are not stuck with it! You can change the choice of font even after you’ve typed your text! Just highlight your text and chose another font. Voila’! New font!
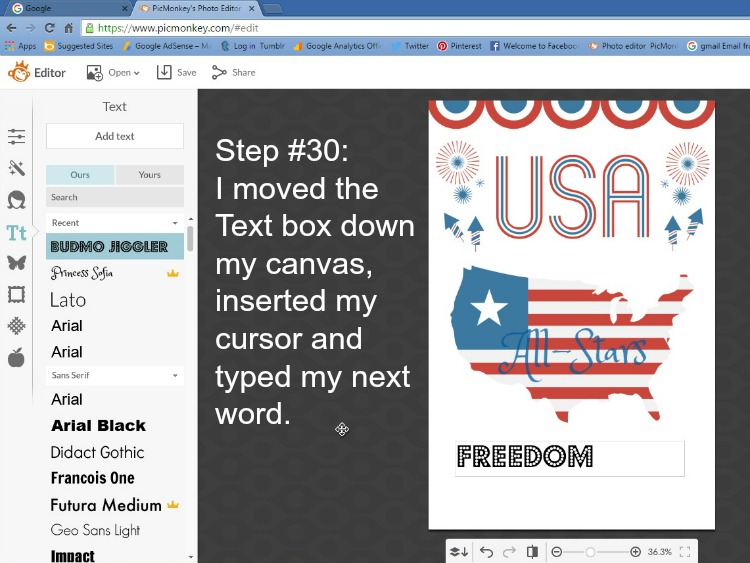
Step #30: Move the Text box down (or up) to place it on your canvas, insert your cursor and type your text.
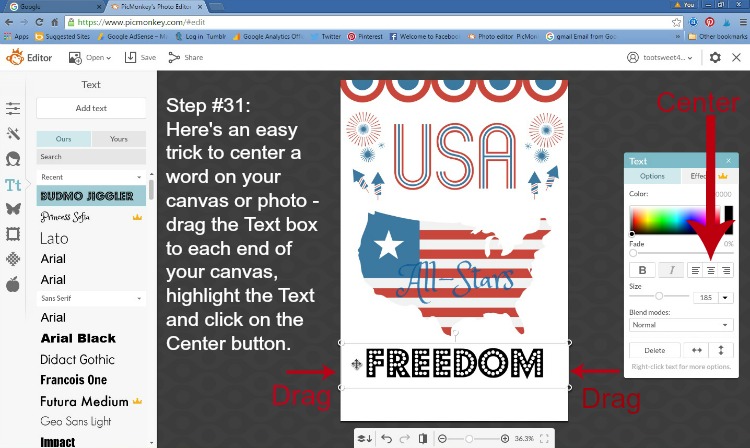
Step #31: Here’s an easy trick to center a word on your canvas or photo – drag the Text box to each end of your canvas (left and right). Highlight the Text and click on the “Center” button on the Text dialog box. Voila’! Perfectly centered!

Step #32: Change the font color. You can either change the text color of the entire word by highlighting the entire word and choosing a color OR you can change the color of each letter one at a time, by clicking and highlighting each letter and choosing a color.
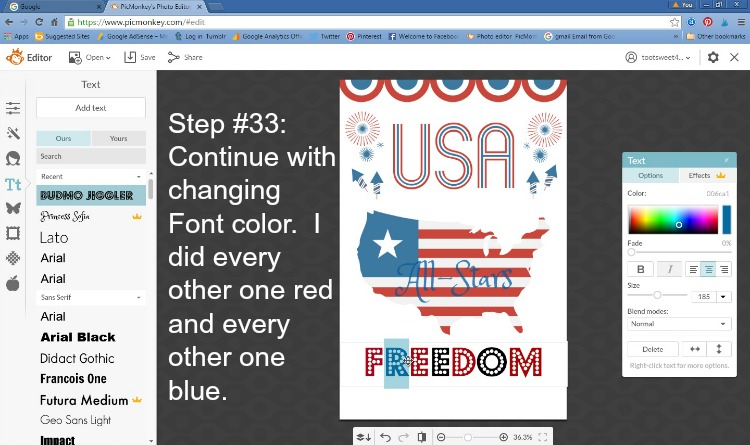
Step #33: Continue changing the font color until you have your word exactly as you want it. I made every other letter red and blue.
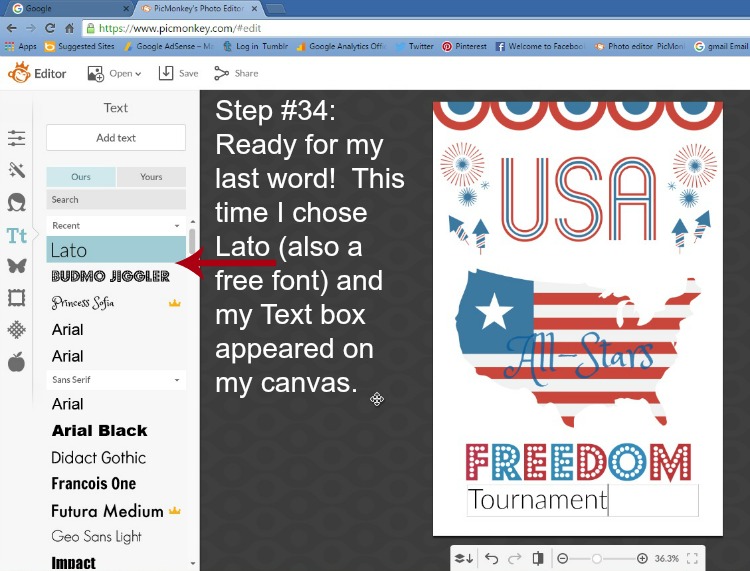
Step #34: Ready for the last word on this project! This time I chose “Lato,” also a free font. My text box appears in the approximate center of my canvas and I dragged it down to the bottom before I started typing my text.
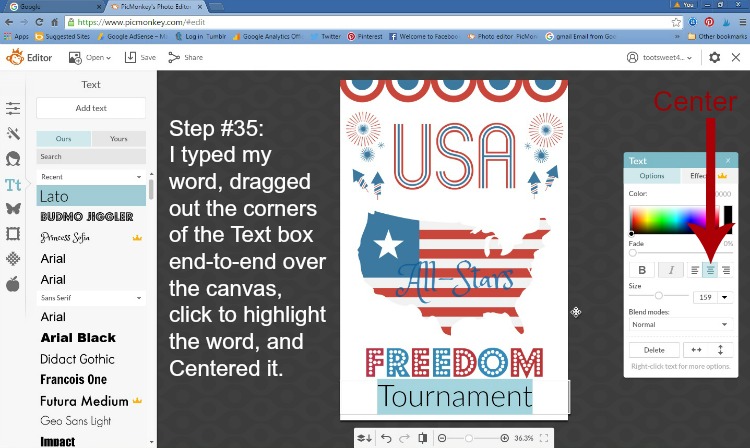
Step #35: After typing my word, I dragged the corners of the Text box end-to-end, highlighted the word (Tournament) and clicked on the “Center” box in the Text dialog box.

Step #36: Next, I highlighted the Text and changed the color. I also decided to “Fade” the text of both the words Freedom and Tournament to better match PicMonkey’s faded, retro red, white and blue color scheme. Just highlight your word and use the “Fade” bar by clicking and dragging it from one end to the other until you have the perfect bit of fade.
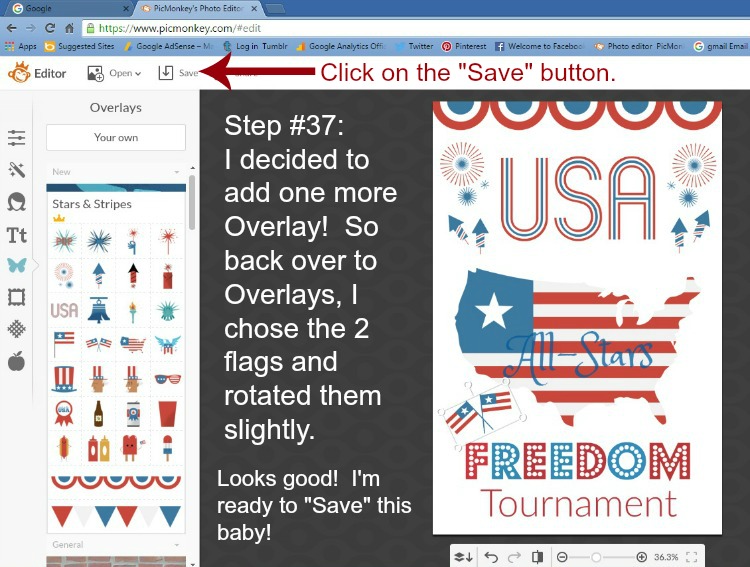
Step #37: Thought I was done, didn’t you?! I decided I needed one more overlay! So, I chose the 2 flags and then slightly rotated them so that they would be at an angle. Once you are satisfied with your masterpiece, click on the “Save” button at the top of the dashboard.
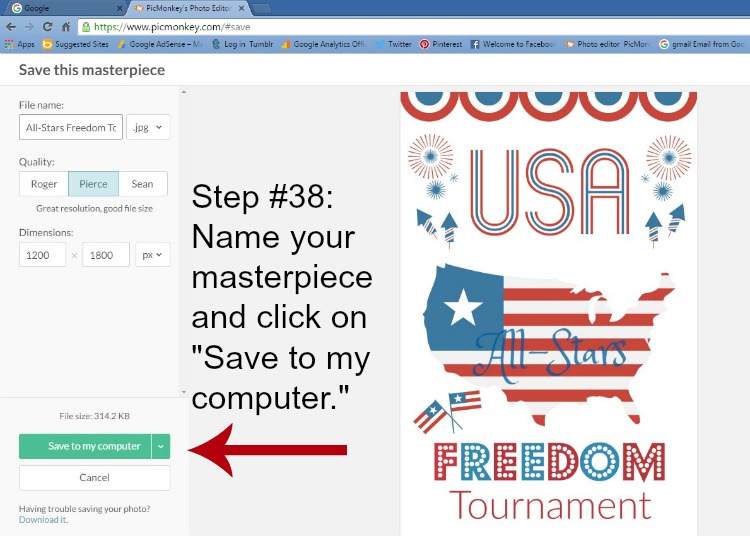
Step #38: Name your masterpiece and decide where you are going to save it on your computer. Be sure you’ve saved it as a jpg photo (see “File Name” above, and the drop-down beside it, which in this case defaulted to .jpg). We are now done with PicMonkey, unless you want to create another!
I know this seems like a lot of time and effort to create this label for this project. But, I promise you if you are a creative person and like to make things, you will love PicMonkey! And, with a bit of practice, you will be knocking out things like printables, labels, etc. in no time!
Honestly, this took me about 10 minutes, total, to create. I really didn’t have a complete concept in mind, except the words “All-Stars” and “Freedom Tournament.” And, I wanted it to be a label that I could adhere to brown paper bags. That was my total concept! Once I opened PicMonkey and saw the overlays in “Stars & Stripes,” my project came together in my mind very quickly!
PRINTING YOUR MASTERPIECE

Step #39: Find your masterpiece on your computer and double-click on it to open Microsoft Windows Live Photo Galley. Click “Print” on the toolbar.
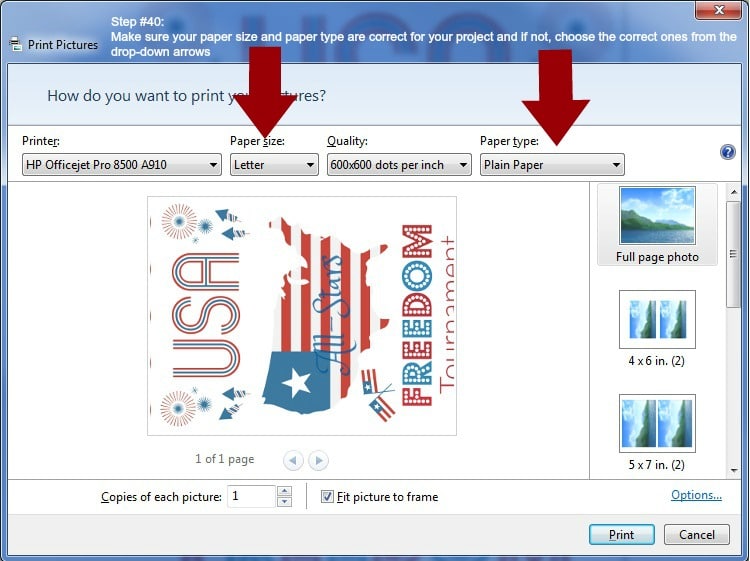
Step #40: Make sure your “Paper Size” and “Paper Type” are set to what you want from the drop-down arrows. I used plain paper for this project, but you could choose a heavier weight paper for a fancier project.
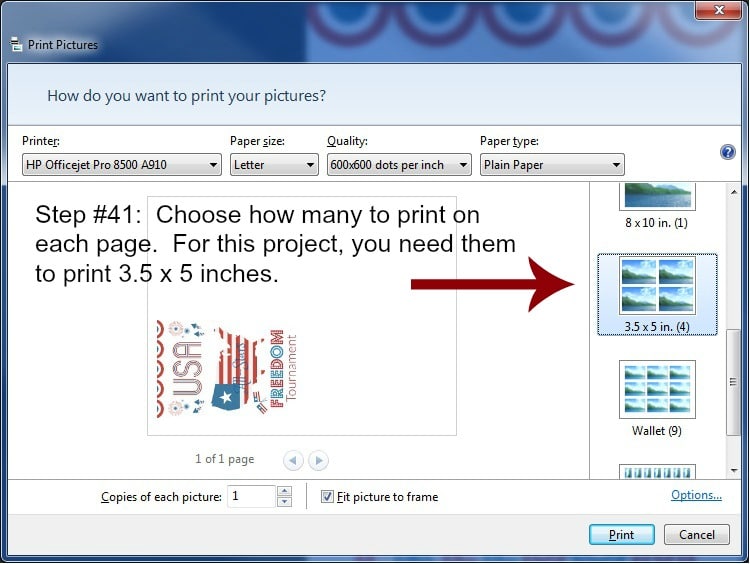
Step #41: Choose how many to print on each page. For this project, you need them to print 3.5 x 5 inches.
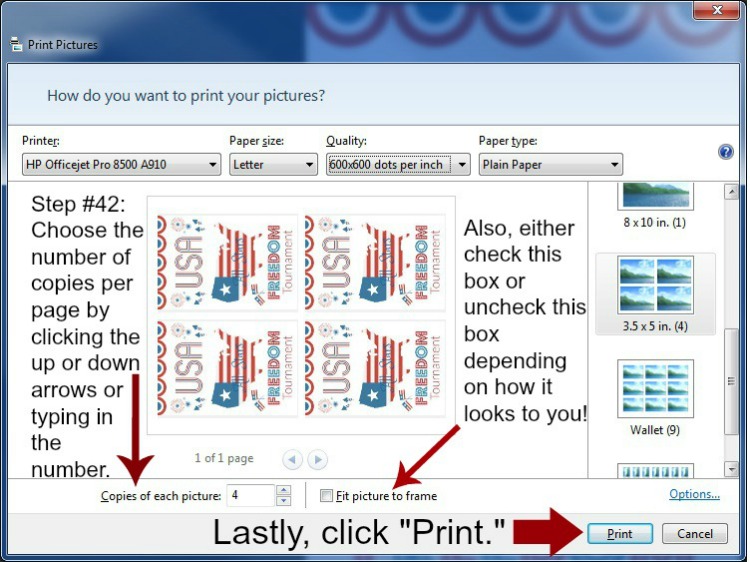
Step #42: Choose the number of copies per page by clicking the up or down arrows or typing in the number. For this project, I wanted 4 copies of each picture to print per page. Also, either check the “Fit picture to frame” box or uncheck it depending on how it looks to you. From my experience, I’d rather have a little more “white space” around each photo to give me “wiggle room” to cut them apart, so I leave the box blank. Lastly, click “Print.” I made a total of 12 bags, so I printed this 4 times (I made one extra sheet in case I messed up on any other part of the project!).
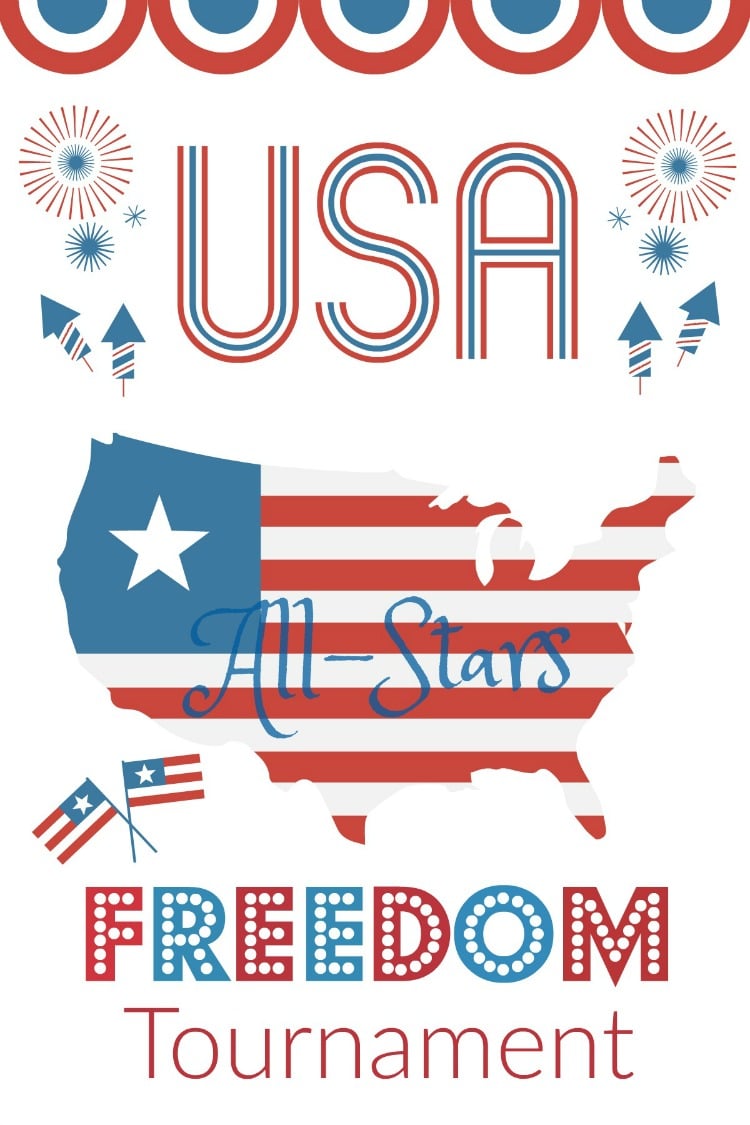
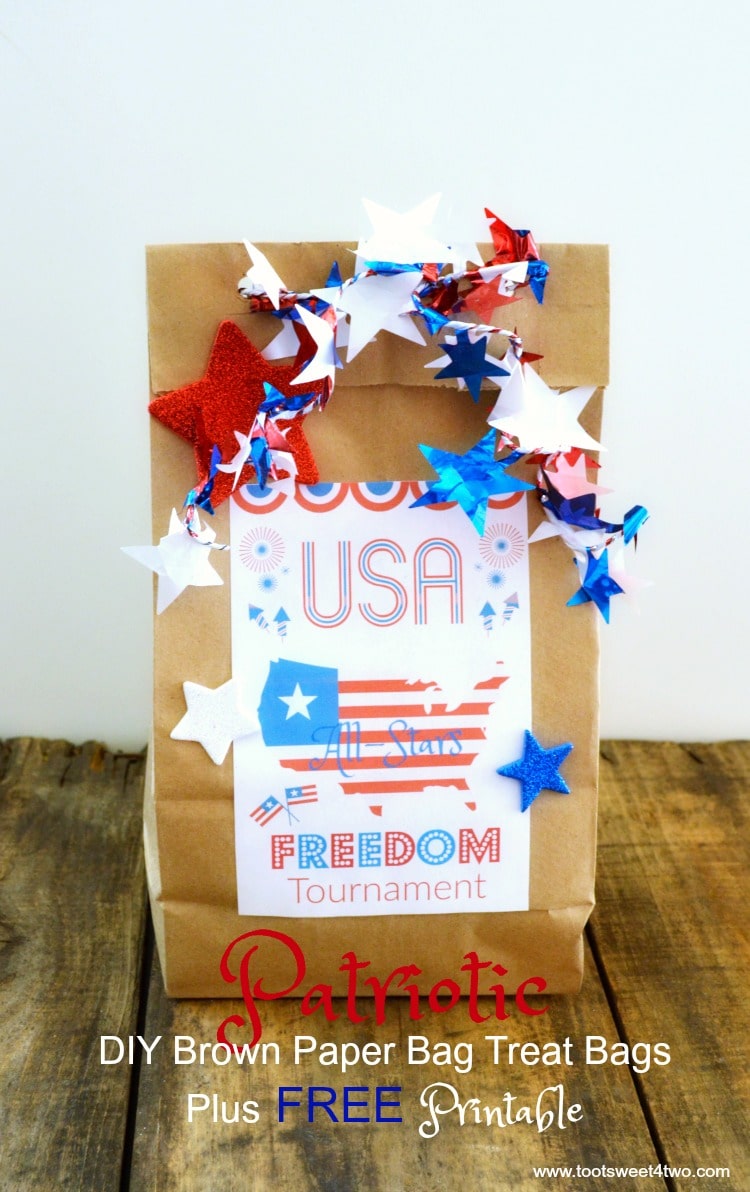
So, here’s your label! If you’d like to use this exact one because you have a child on an All-Stars team AND your child’s tournament weekend is around the 4th of July, please feel free NOT to go to the trouble of making your very own labels for your paper bag treat bags. Use this one that I’ve created for you, which will opens as a PDF and will print 4 labels to a page of 8 1/2 x 11 inch paper (click here to open and print your FREE printable): All-Stars Freedom Tournament Printable 4 to page.
Or, if you’d like to use this as a printable to frame, here’s one that will print like the photo above so that you can put it in an 8″ x 10″ frame: All-Stars Freedom Tournament Printable.
FINISH YOUR PAPER BAG TREAT BAG PROJECT

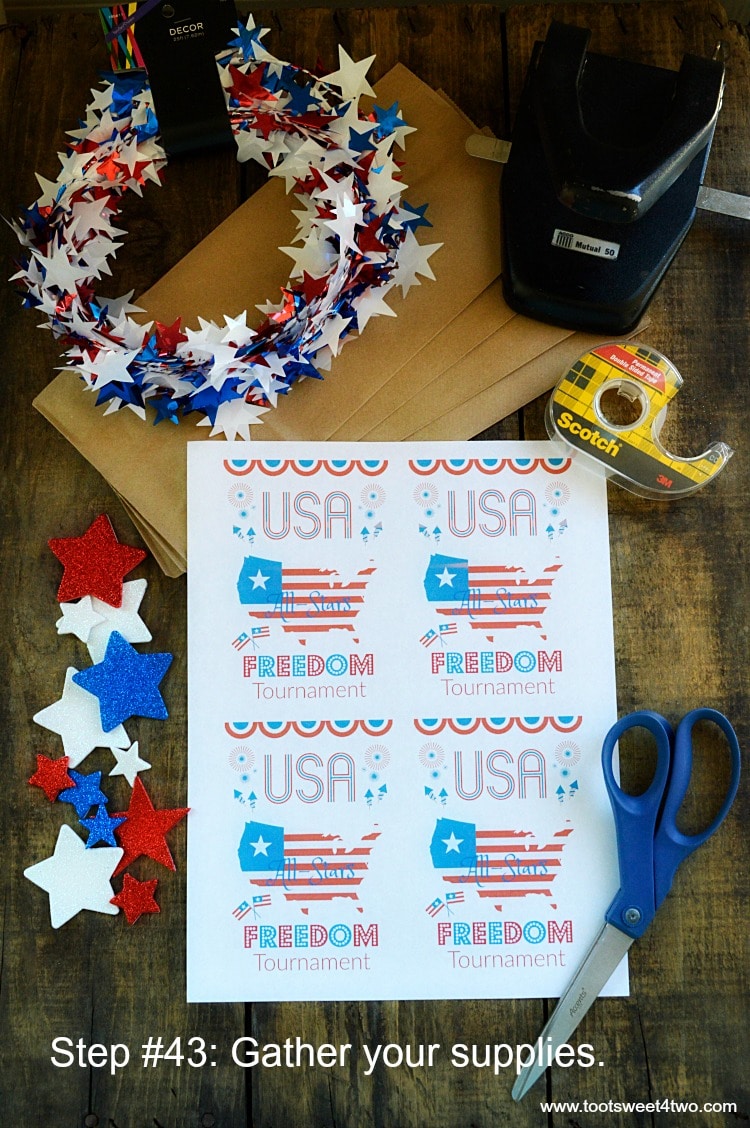
Step #43: Gather the rest of your materials (see Supplies and Materials list at top of post).
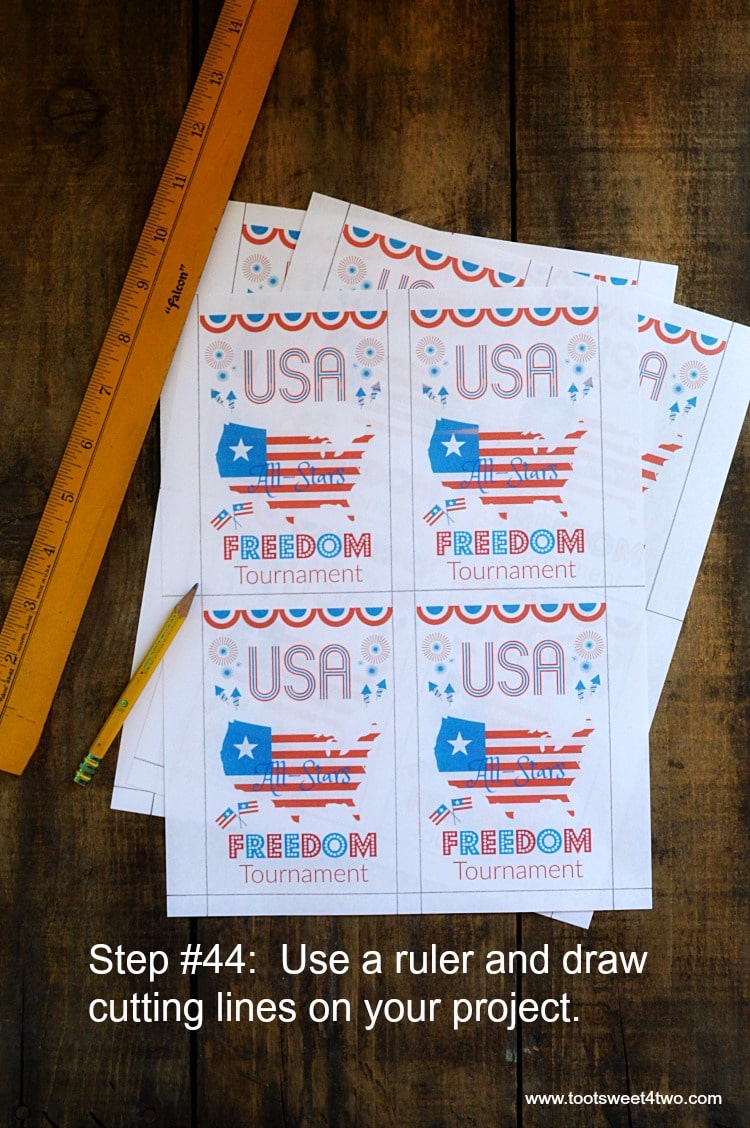
Step #44: Use a ruler and pencil to draw cutting lines on your labels. I have to be honest with you – I didn’t think about putting a border around these labels to make cutting them out easier until AFTER I’d finished the project! So, to make this easier for you, I’ve created a photo with a border!
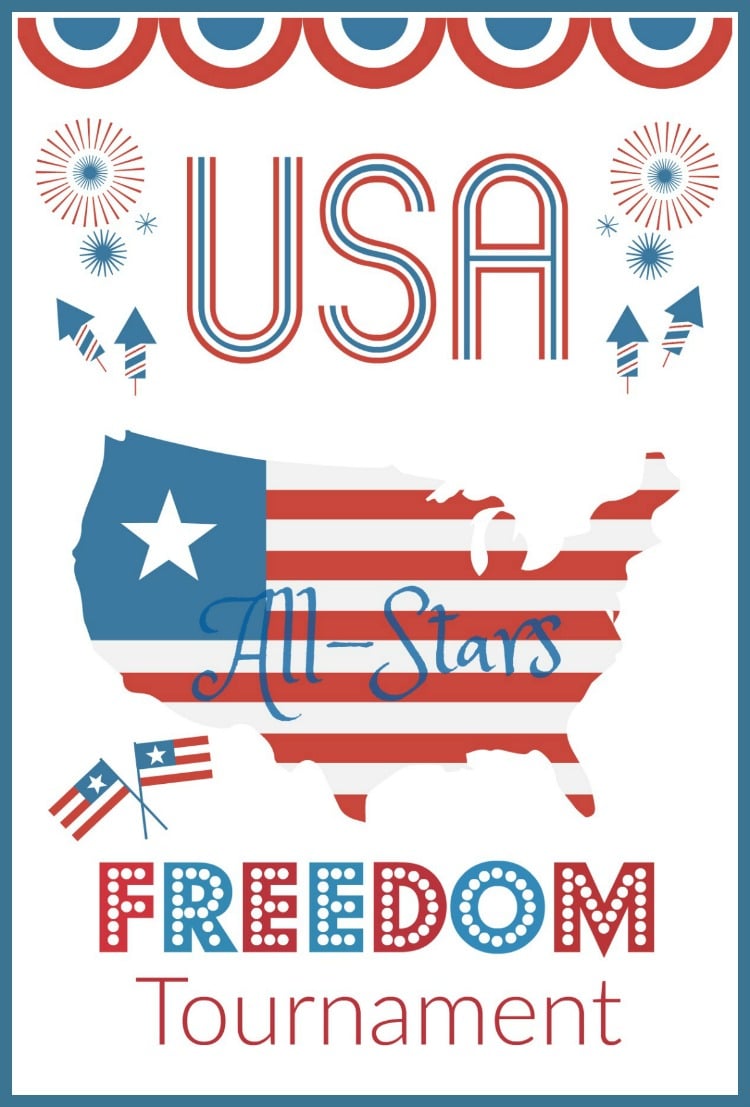
So, I made this one if you’d like to use it instead! Here’s the version that will fit in an 8″ x 10″ frame: All-Stars Freedom Tournament Printable blue border 8by10 and here’s the one that has 4 to a page: All-Stars Freedom Tournament Printable 4 to page blue border.
Oh, by the way, making a border around a canvas or photo is easy in PicMonkey. Just click on the “Frames” section on the left and choose which frame you’d like. Once you’ve chosen a frame, you can adjust the size and color easily.
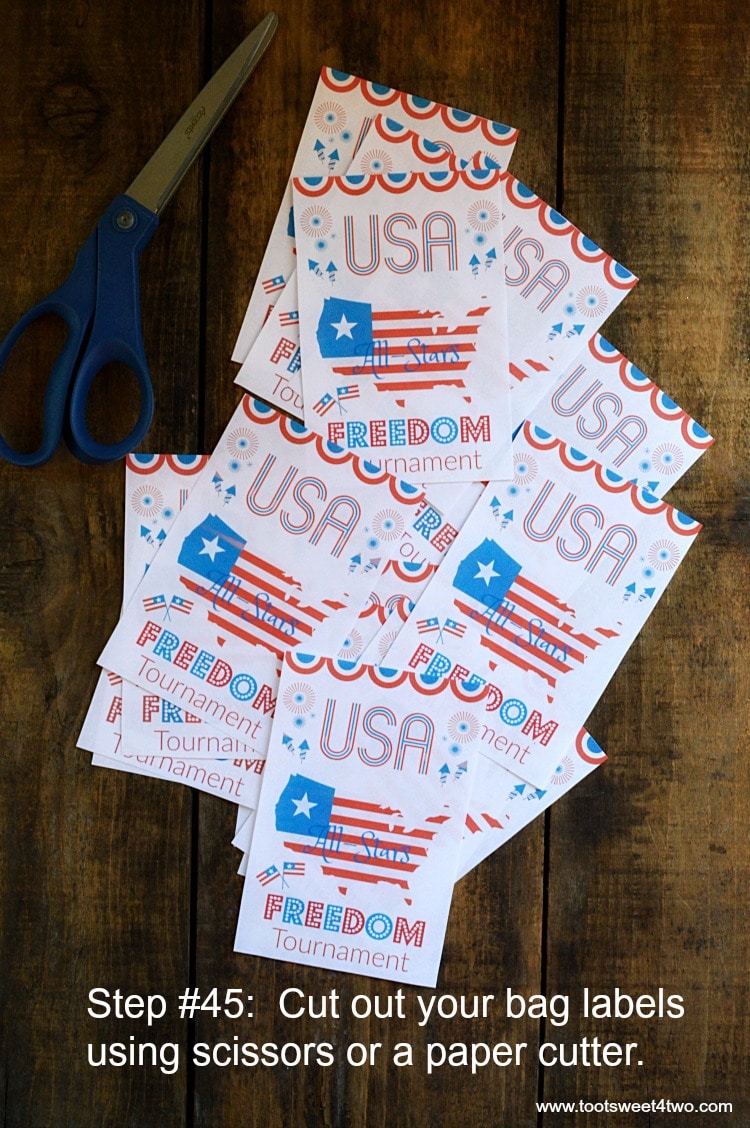
Step #45: Cut out your bag labels. This is even easier if you have a paper cutter, but I don’t, so I used regular scissors.
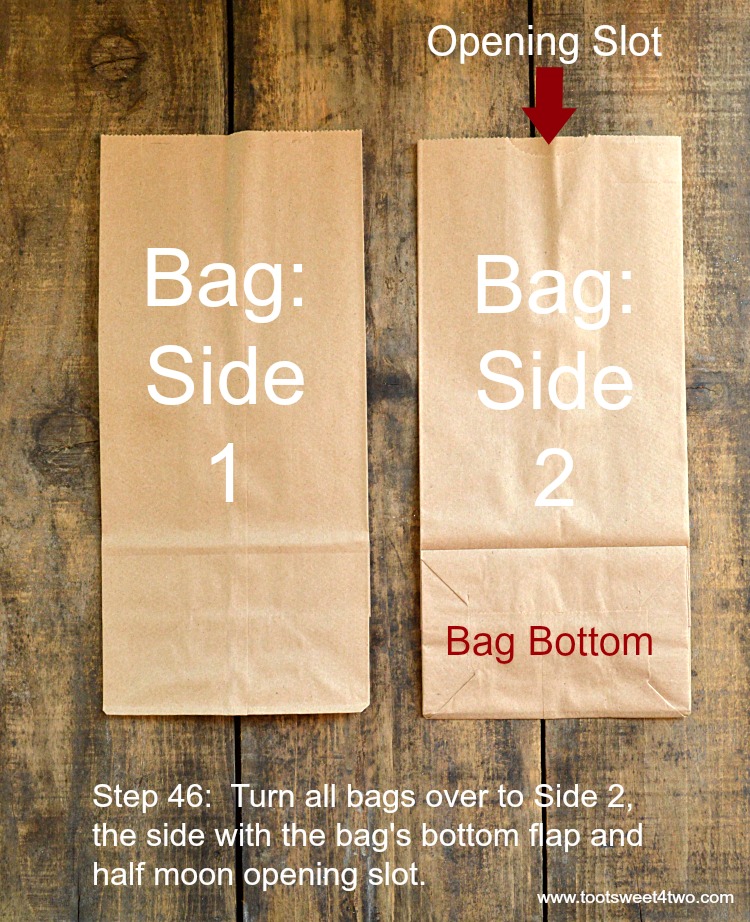
Step #46: Get your bags ready! By that I mean be sure to pick the correct side of your brown paper bag for this project. Notice that one side of the bag (Side 2 in the photo above) has the bag’s bottom flap showing and a moon-shaped opening slot at the top. This is the side of the bag that you want to adhere your label to.
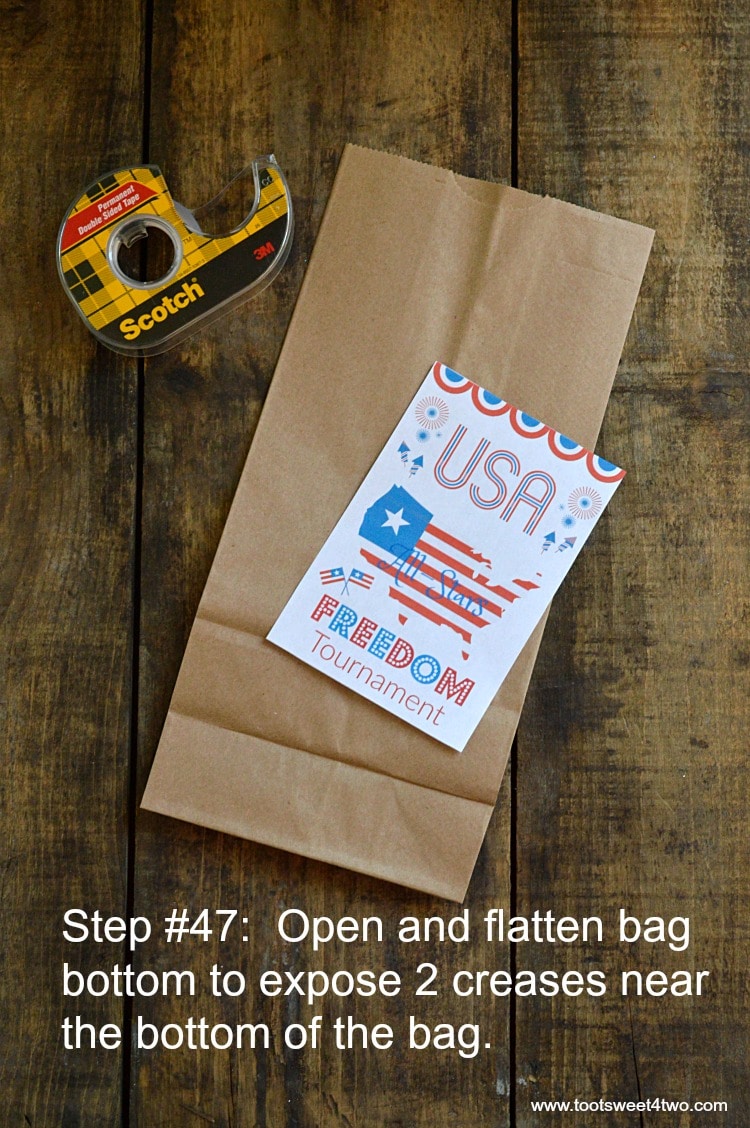
Step #47: That’s because when you open it up and flatten in out, you’ll notice 2 creases near the bottom of the bag.
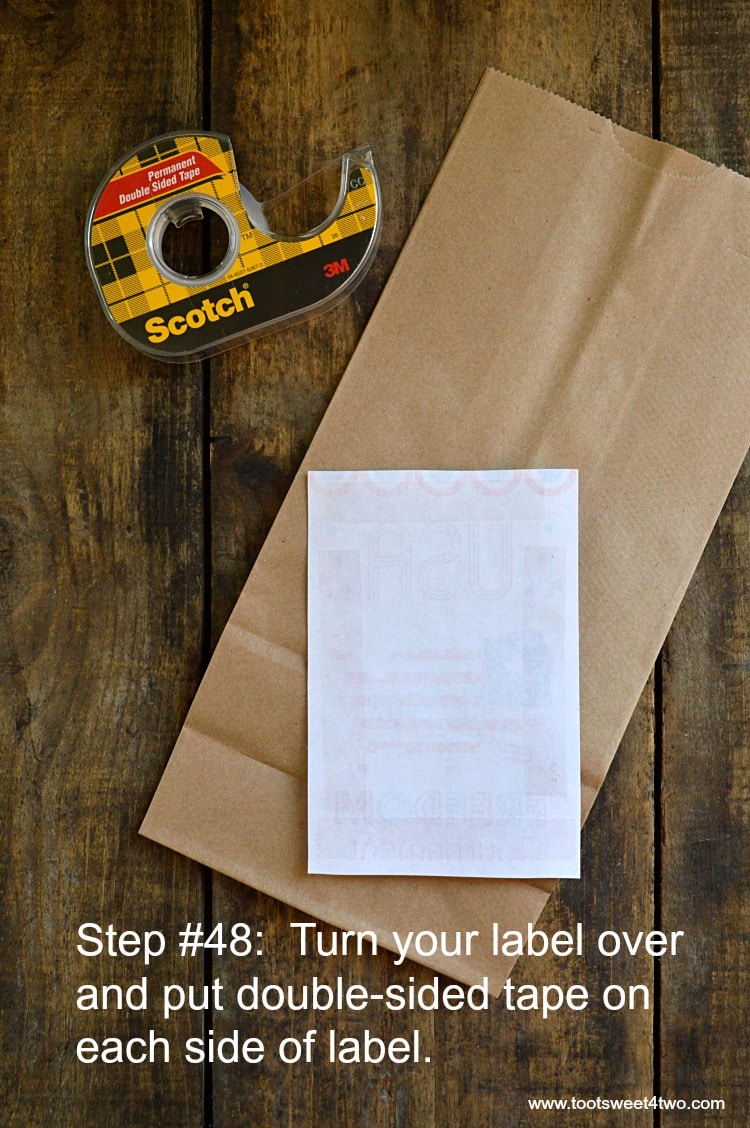
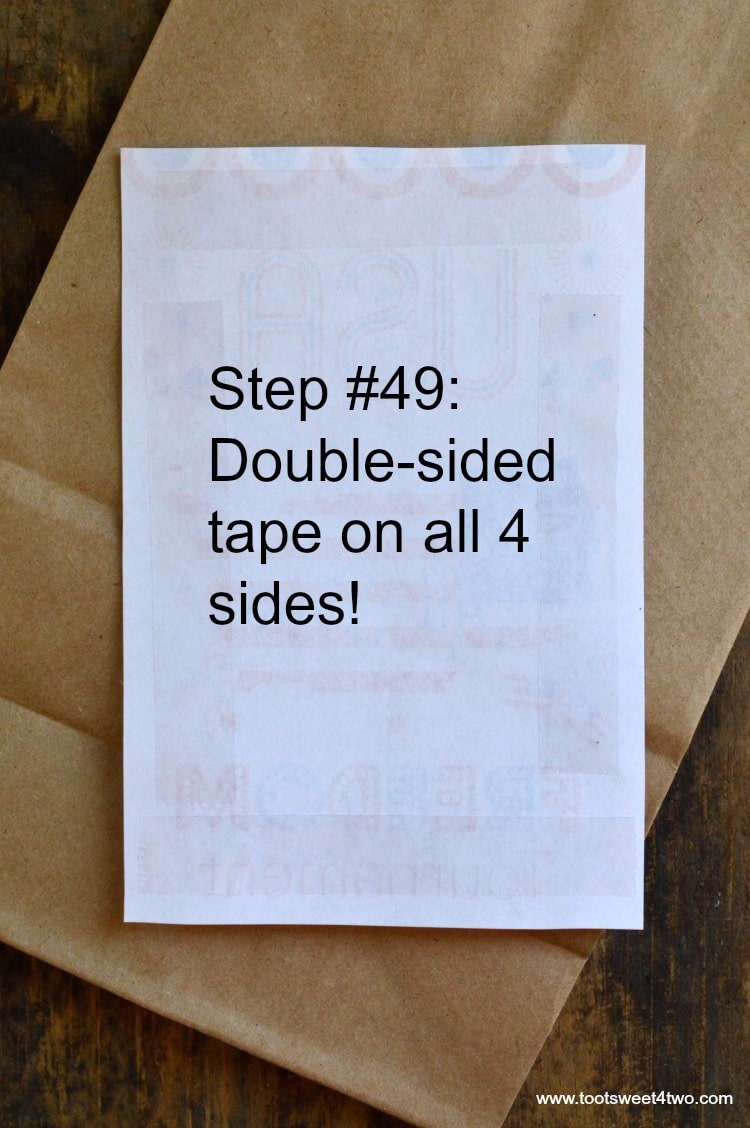
Step #48: Now, turn your label over and apply double-stick tape on each side of the label.
Step #49: You want to do this to make sure that an unsecured side doesn’t accidentally get caught on something and tear before your party!
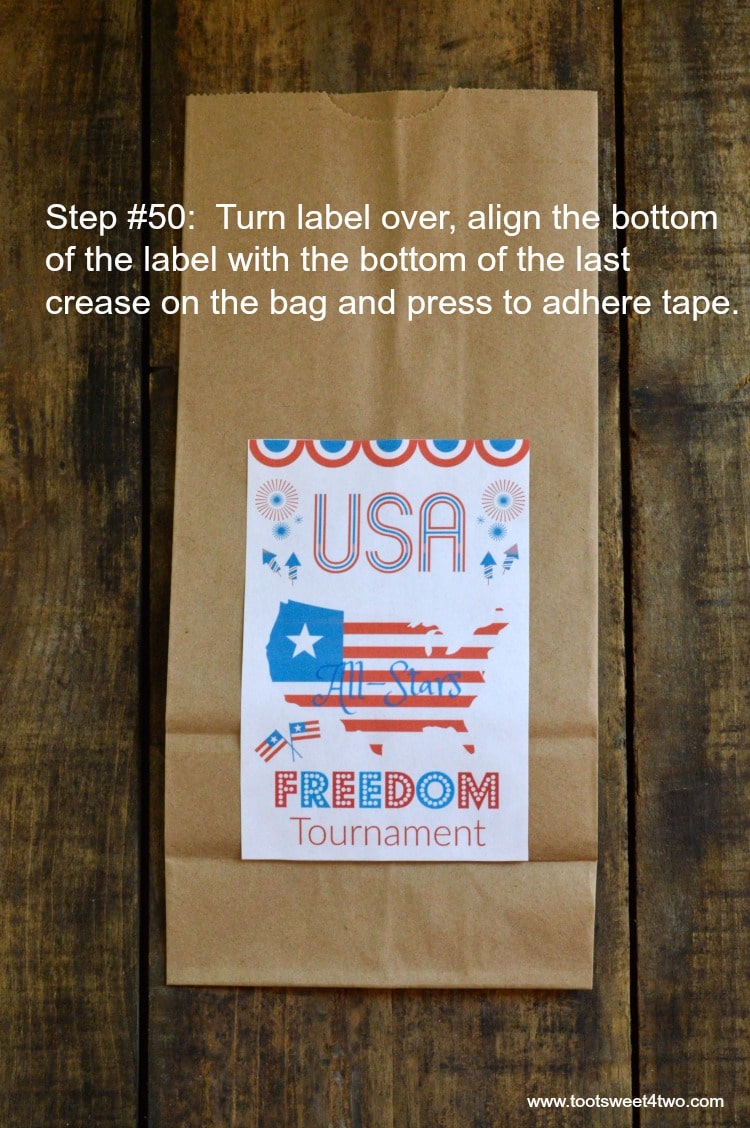
Step #50: Turn your label over and align it with the bottom crease on your bag. Press down to adhere the tape to the bag.
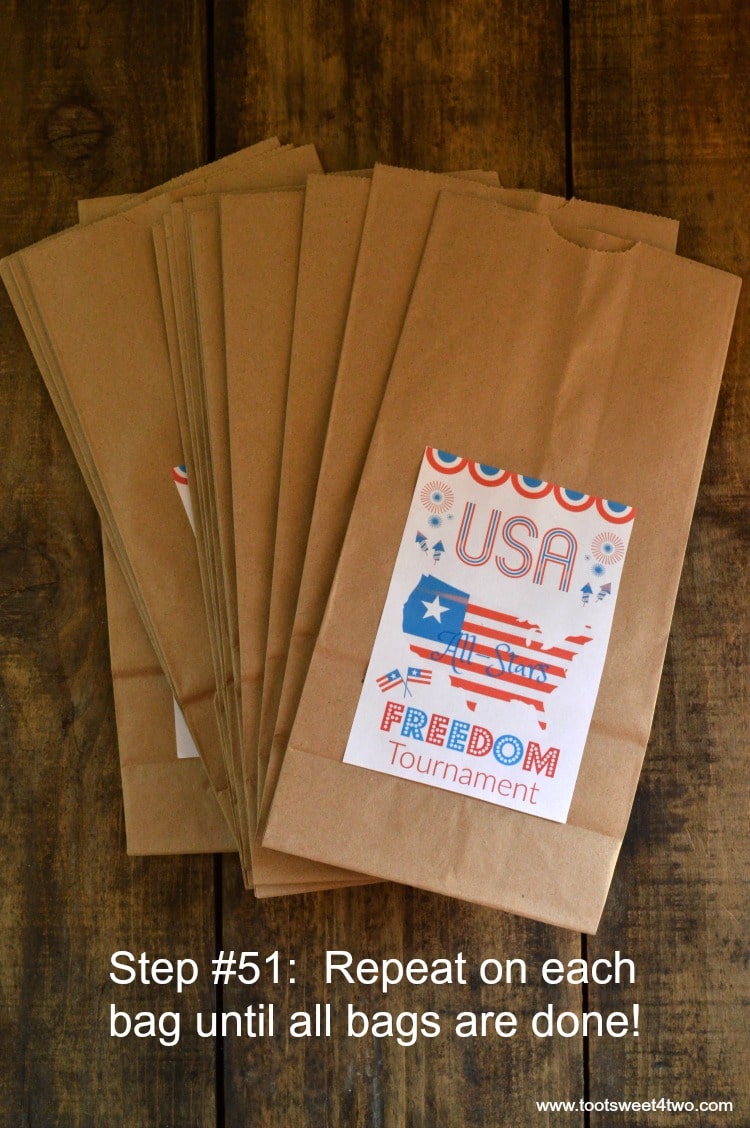
Step #51: Repeat until you’ve finished all bags.
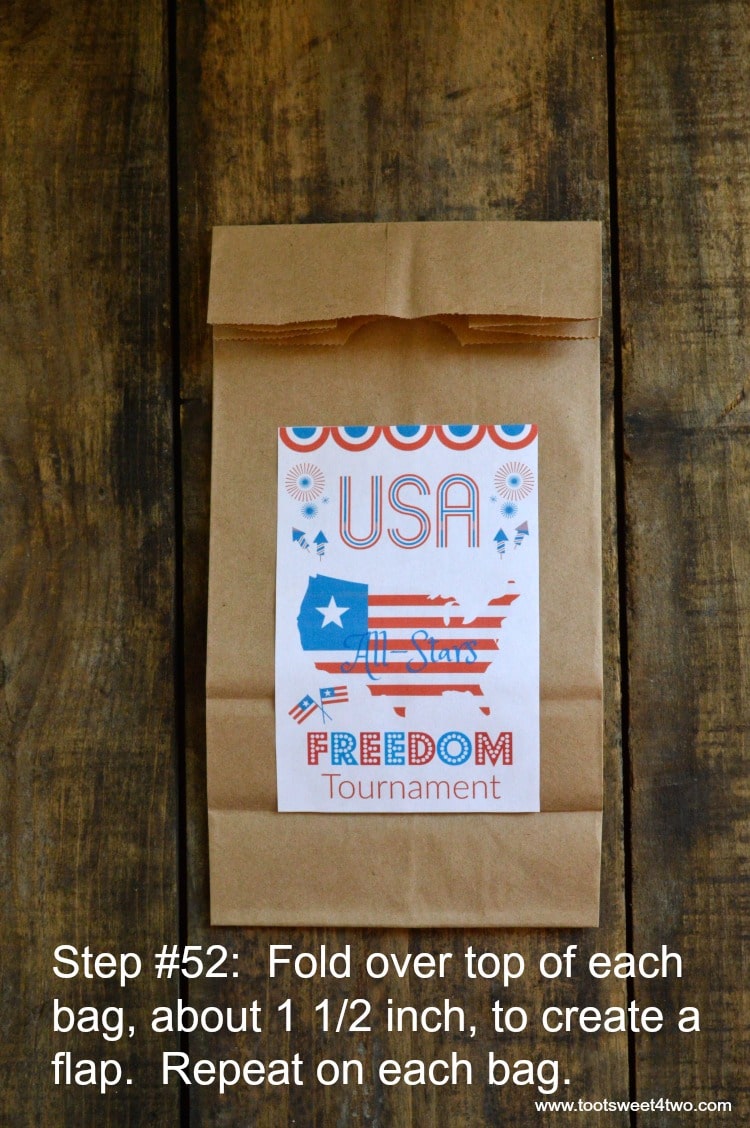
Step #52: Fold the top of each bag over about 1 1/2 inches to create a flap. Repeat this on each bag.

Step #53: Use a 2-hole punch to punch holes in the flap by inserting the paper bag into the 2-hole punch and pressing down on the handle.
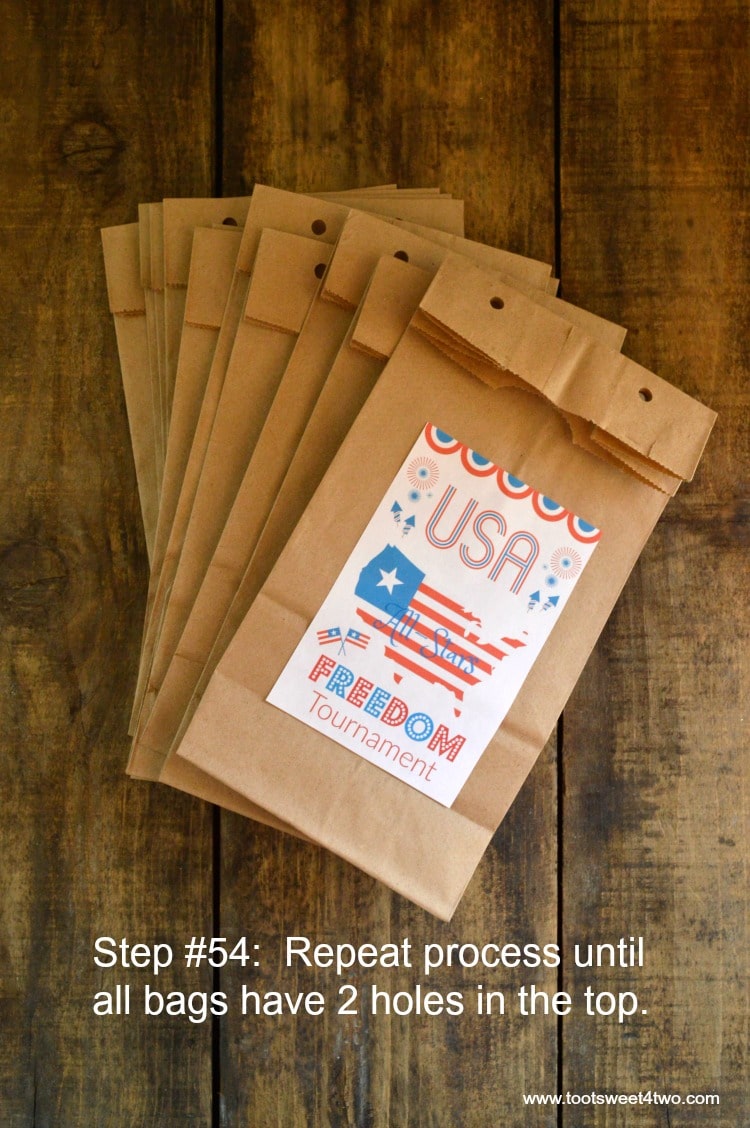
Step #54: Repeat process until all bags have 2 holes punched in the top flap.
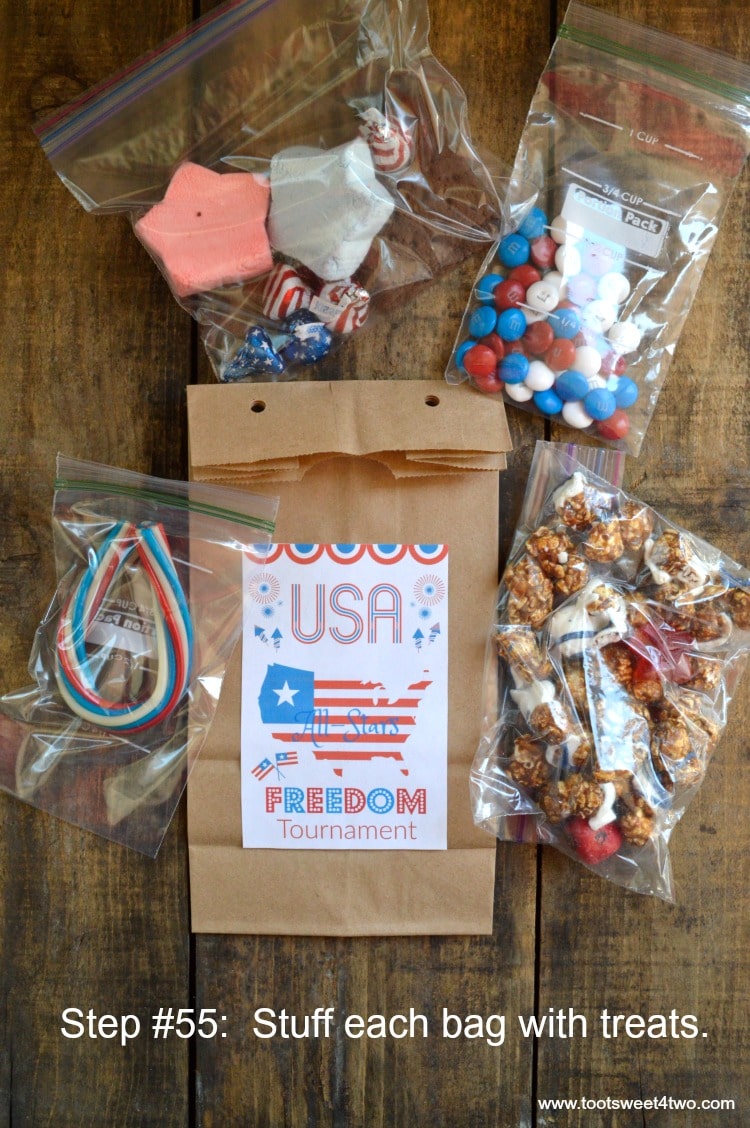
Step #55: Now, stuff your bags with treats! I stuffed mine with Patriotic caramel corn and star-shaped marshmallows I got at World Market and red, white and blue Twizzlers, M&M’s and Hershey’s Kisses that I got at Target. I divided them up into individual treat bags. I made one treat pack into a S’More package by placing 2 star-shaped marshmallows in the bag along with the Hershey’s Kisses and a chocolate graham cracker!
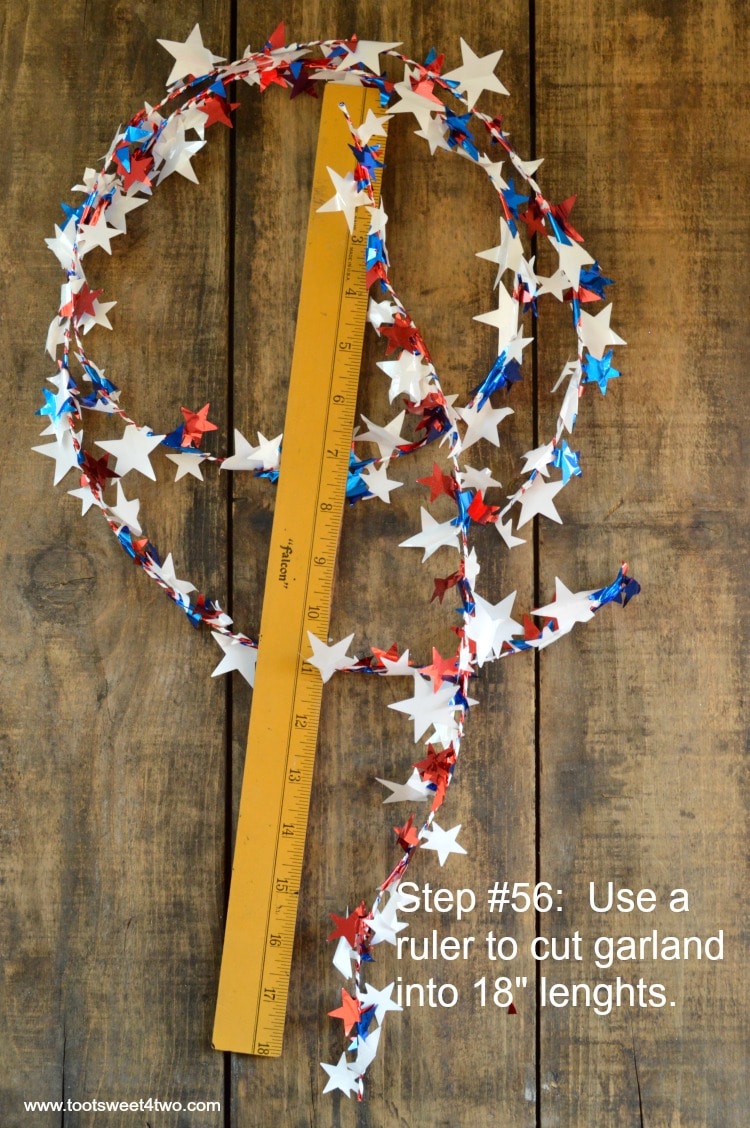
Step #56: Now measure and cut your garland. You will need 18 inches of garland for each treat bag.
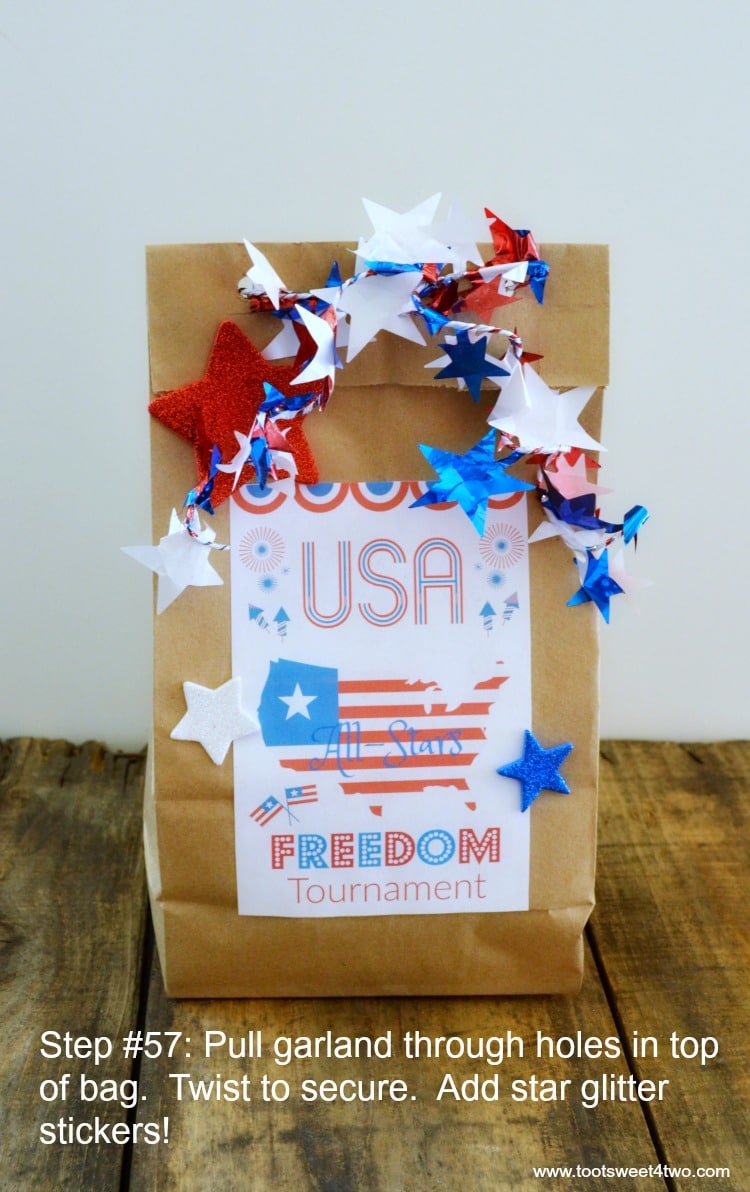
Step #57: Thread your garland through the holes in the flap at the top of the bag. Twist the garland (which in this case is a wired garland) a time or two so that it’s secure. I used a pencil to wrap each end of the garland into a “ringlet.” Next, adhere your fancy glitter stars to the bag by removing the backing on each and sticking them in place. Voila’! Paper bag treat bag finished!
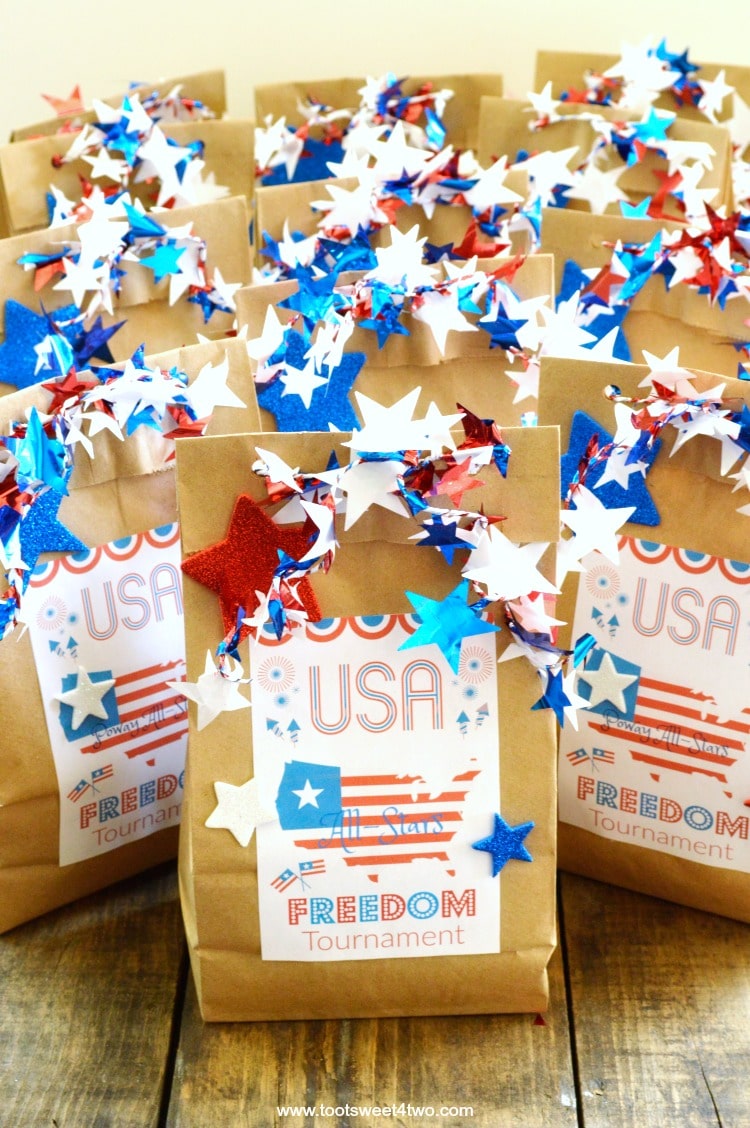
Now, repeat until you’ve made enough bags for your party!
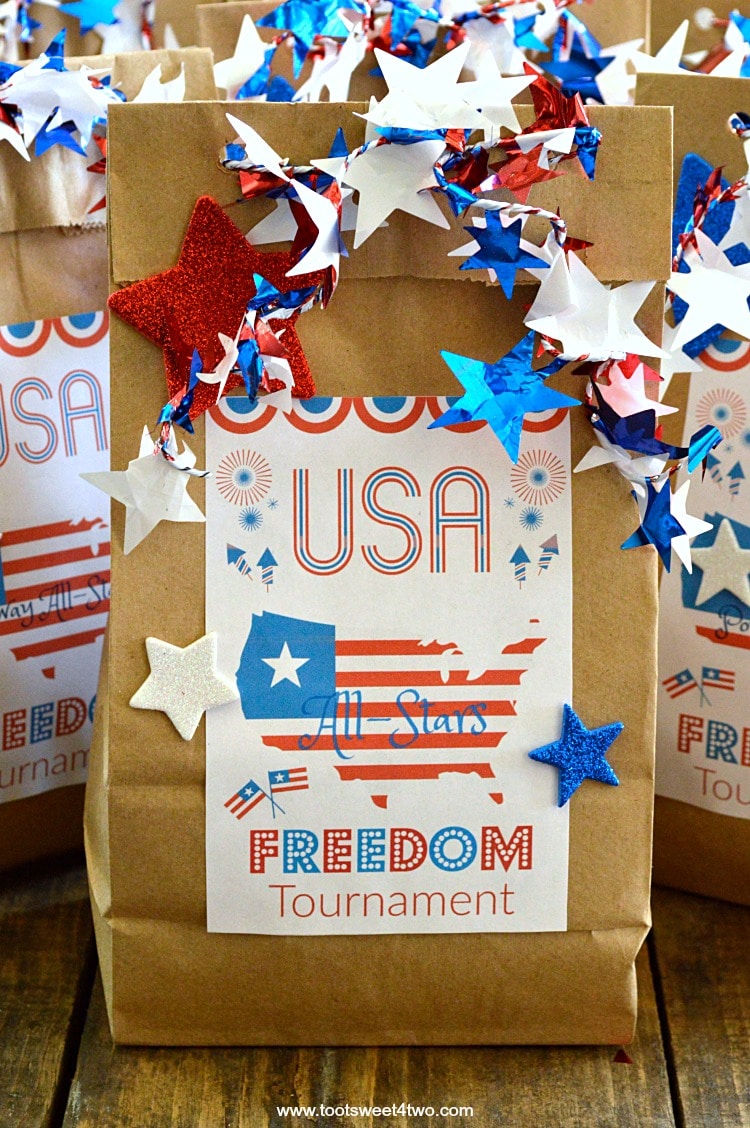
So cute! Don’t you think Princess P and her team will like these?
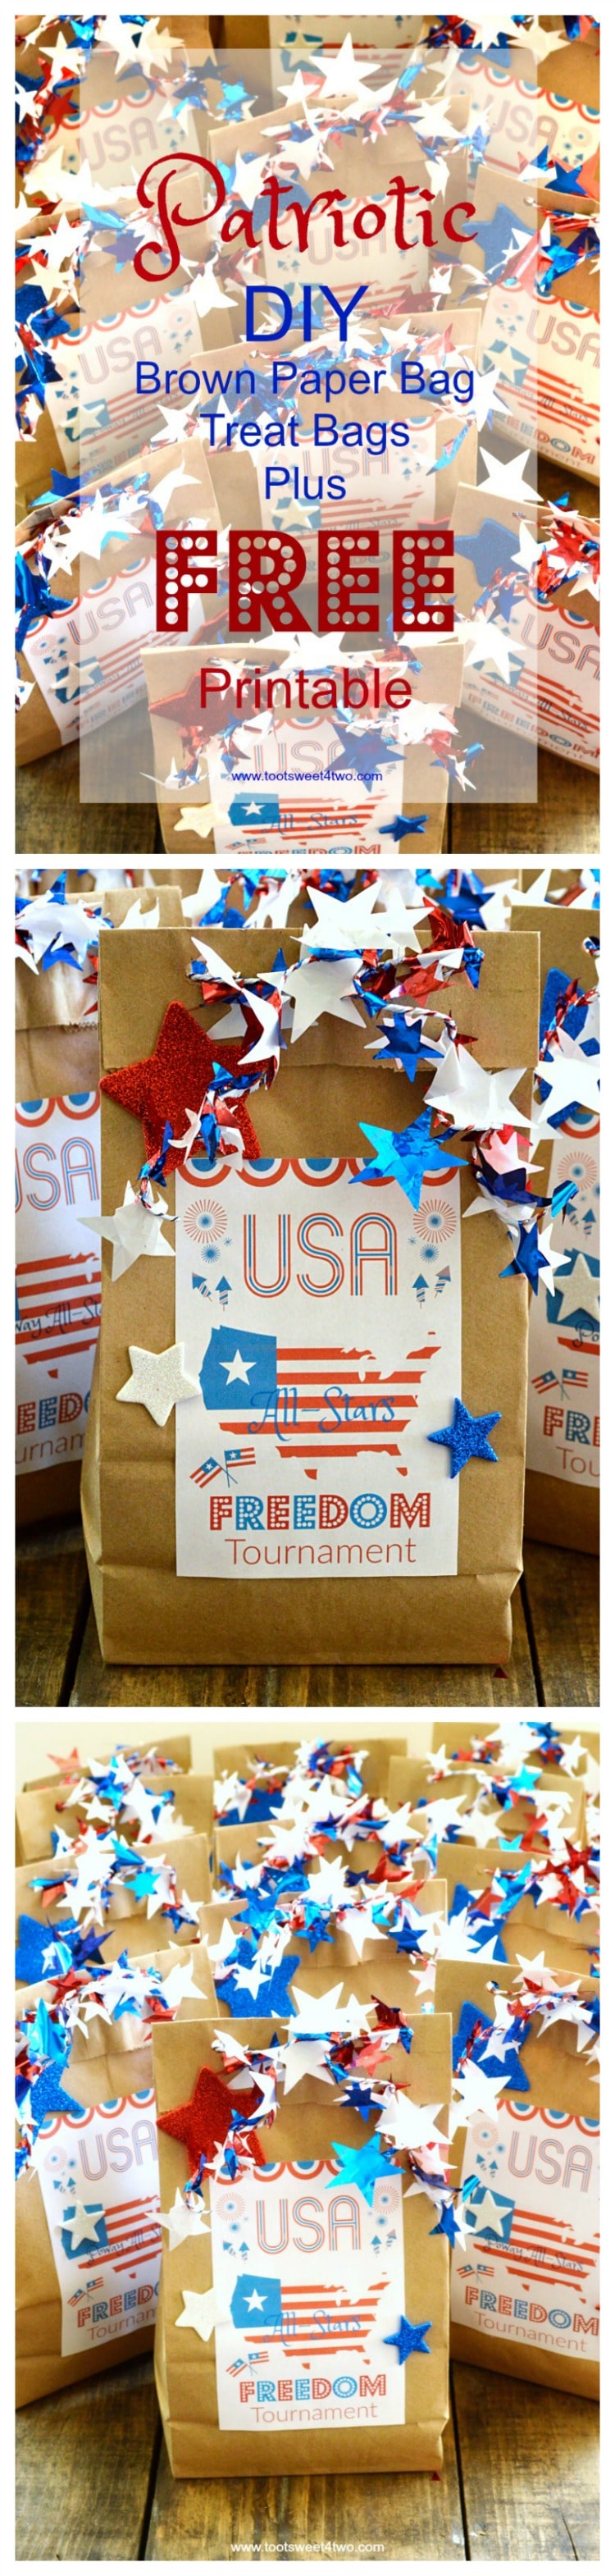
Here’s a collage to pin to your Pinterest board! Thanks for sharing!
Need more tutorials on PicMonkey? I’ve written a ton of them! Here are links to my other PicMonkey tutorials in Toot Sweet 4 Two’s archives:
PicMonkey Basics: Getting Started
PicMonkey Basics: Edit a Photo
PicMonkey Basics: Touch Up a Photo
PicMonkey Basics: Design Your Own
PicMonkey Basics: Create a Collage
Meet Coco (actually NOT a tutorial in the truest sense of the word; but, I manipulate some of Coco’s photos in fun ways!)
Oh, The Thinks You Can Think: 15 PicMonkey Effects to Make Your Photos Pop!
Dementors, Demons and Ghouls: A PicMonkey Tutorial
Zombie Apocalypse: Fun Halloween Photo Editing Themes in PicMonkey
How Did You Do That? A PicMonkey Halloween Tutorial
To Be Alive: How to Make a Pinnable Quote in PicMonkey
Here Comes Peter Cottontail – A PicMonkey Tutorial
How to Make Easter Placecards for Your Holiday Table in PicMonkey
How to Make a Horizontal Photo a Pinterest-friendly Vertical Photo Using PicMonkey
How to Make Easy Party Placecards using PicMonkey
Tootles,
Leave a Reply