Today is the BIG reveal! What? You didn’t know I was redecorating? Well, I’ve wanted a food photography home studio for years and my dream has finally become a reality.
FAIR WARNING: this is a super long post, packed full of useful information, ideas, and photos. But, stay with me here and check out the cute video at the end!
[convertkit]This post contains affiliate links for your convenience. Click here to read my full disclosure policy.
When I first started as a blogger, I was (I thought) a lifestyle blogger, and recipes were just one of the categories on my blog. But then a curious thing happened: the recipes drove traffic to my lifestyle blog far surpassing all other posts on my blog. So, the Universe spoke and said, “Carole, you are a food blogger!”
When asked, I still tell people that I’m a lifestyle blogger with a heavy emphasis on recipes. Anyway, this revelation (from analyzing my traffic via Google Analytics) that I am a food blogger, led me to ramp up everything that comes with being a food blogger, i.e., food photography and food styling became a priority to me.
In those early days, I would photograph recipes on my kitchen counter, which is a very dark brown, almost black, granite. Shiny and reflective, it is a poor choice for food photography. I tried photographing food on either my kitchen table or my dining room table and that didn’t work either because both of them, while made of wood, are polished to a high glossy shine which reflects light like crazy.
My next strategy was to cover up the kitchen table with all kinds of things so that I couldn’t see the shiny wood surface. Here are two examples of that period of time in my food blogging journey:
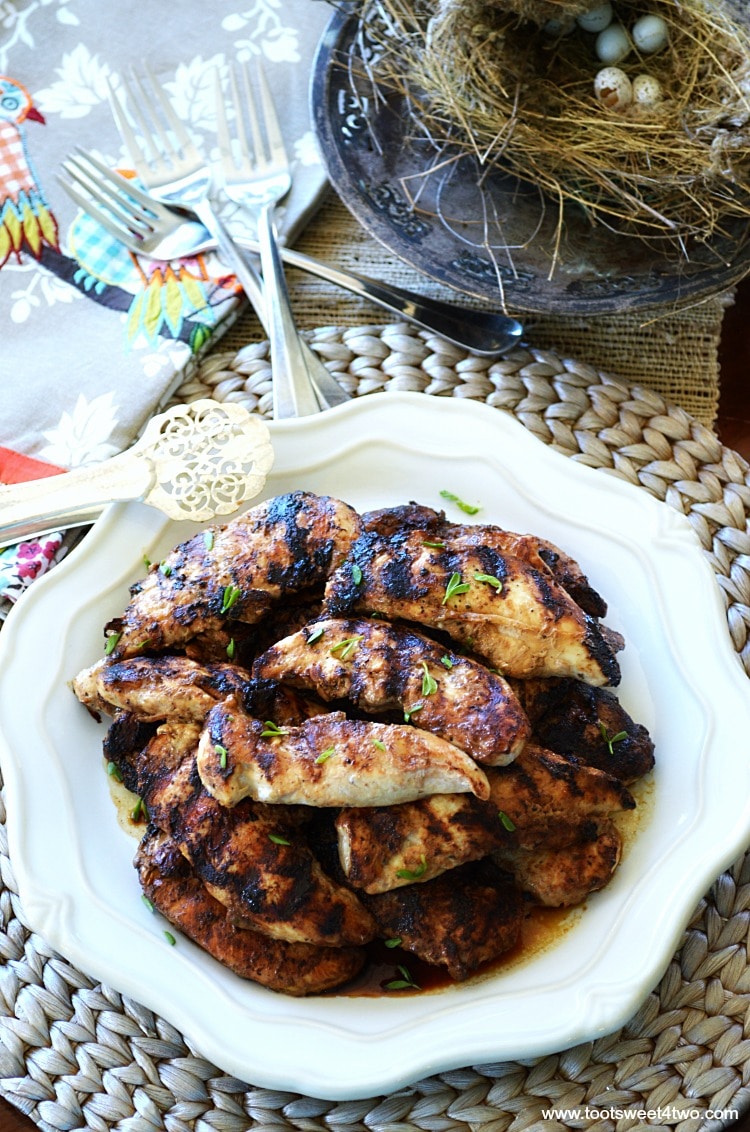
In the photo above of Grilled Balsamic Chicken Breast Tenders, you can see my shiny kitchen table peeking out in the very bottom left and on the right-hand side just under the bird’s nest. Every other part of this shiny surface is covered with two placemats (one round and one rectangle) and a pretty kitchen towel.
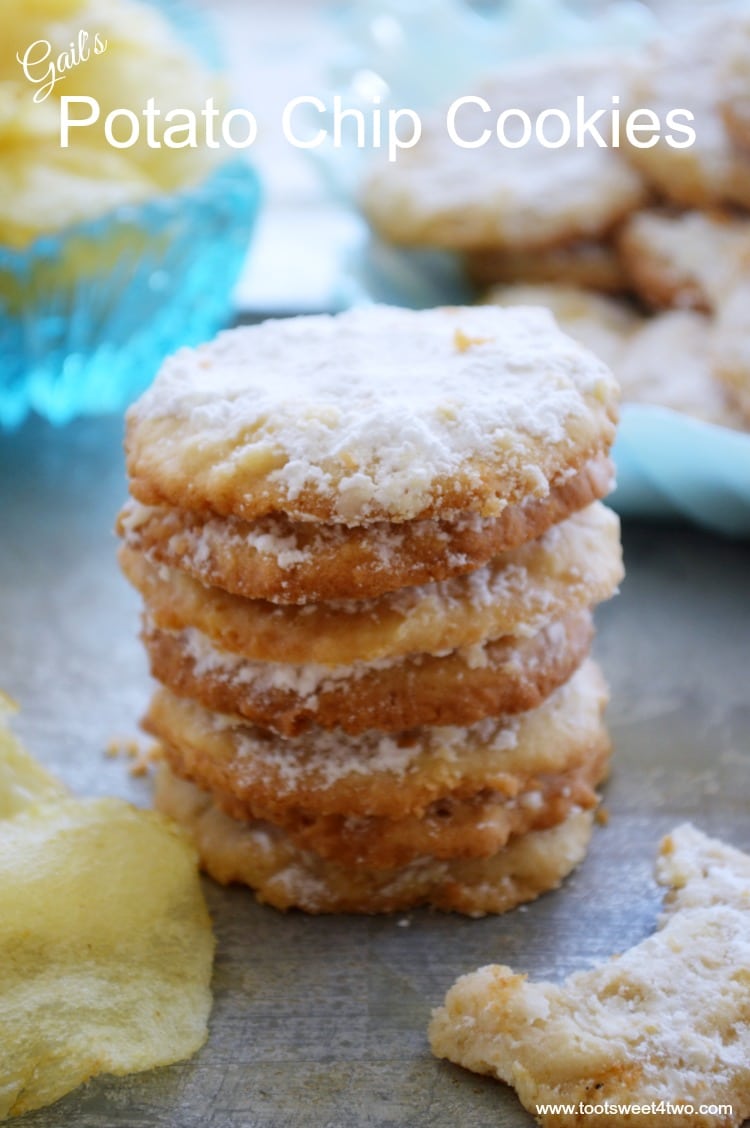
In the above photo of Gail’s Classic Potato Chip Cookies, while the cookies are on the shiny kitchen table, they are sitting inside a square gray charger plate that I bought years ago at Pier 1.
So…
Cheap Food Photography Tip #1 – Use What You Have
Yes, that’s right – until you have a wad of cash to spend, look around your house for things that can be used to photograph your recipes. Here’s another example:
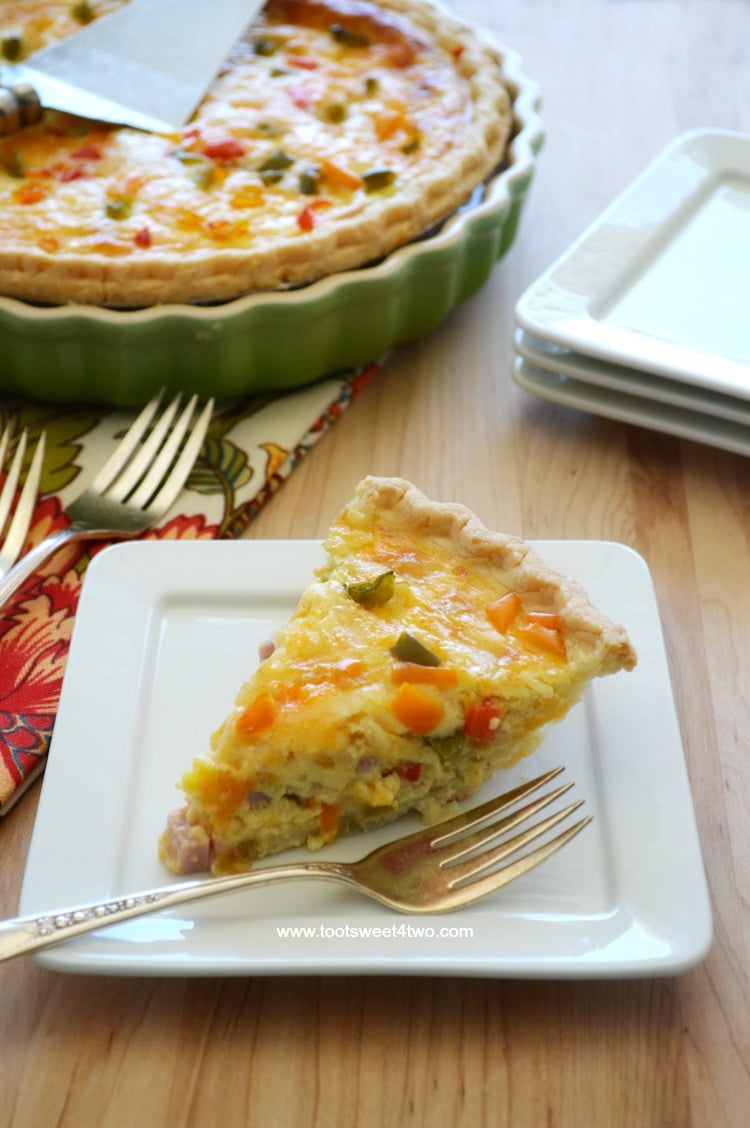
This recipe for Denver Quiche was photographed on a very large chopping board. So, use chopping boards, placemats, kitchen towels, etc.
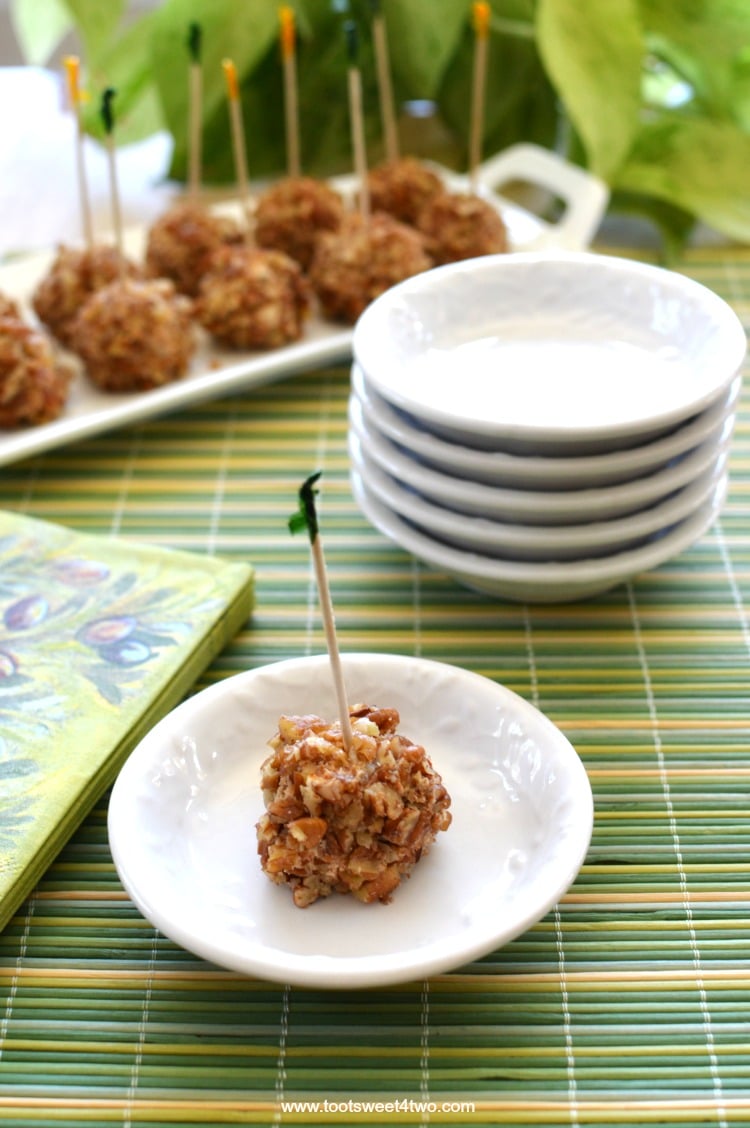
Here’s another recipe, Bacon Jalapeno Chutney Cream Cheese Balls, photographed on a placemat (and, here’s a food styling tip: make sure your toothpicks are straight before you take the photo!).
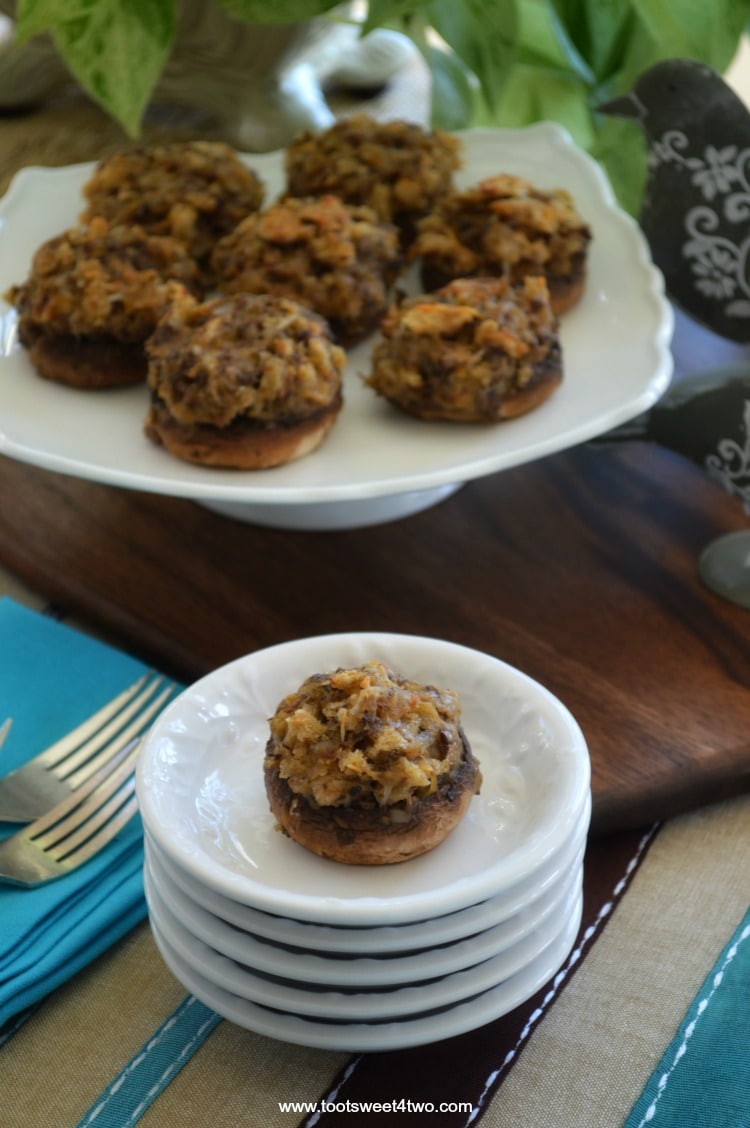
And, this photo of Dorothy’s Stuffed Mushrooms was taken with a placemat, chopping board, and napkin covering the shiny wooden kitchen table.
You can see that this worked very well for many years, but here’s the thing – it is very labor-intensive! First, you have to clear the surface of your shiny kitchen table that you use every day. Then, you have to find various chopping boards, placements, and napkins that will work for your photo. Next, you have to lay those items all over your table before you place the food into position, then take lots of photos and finally, break it all down again and put everything away so that you can use your kitchen table for what it is intended to be – your family’s hub for meals!
So, I sought a different path…
Cheap Food Photography Tip #2 – Buy or Build a Small Wooden Crate
The next phase of my food photography and blogging journey became the small wooden crate below. I reached out to a fellow food blogger I followed, Dana at This Silly Girl’s Kitchen, for food photography tips. She graciously answered my email and spent her valuable time offering me tips to make my blog better. I am forever grateful – thanks, Dana!
Anyway, for a time she was photographing her recipes outside on her patio on an old trunk that she found at a resale shop. That gave me the idea to find a wooden crate. So, this is what happened next…
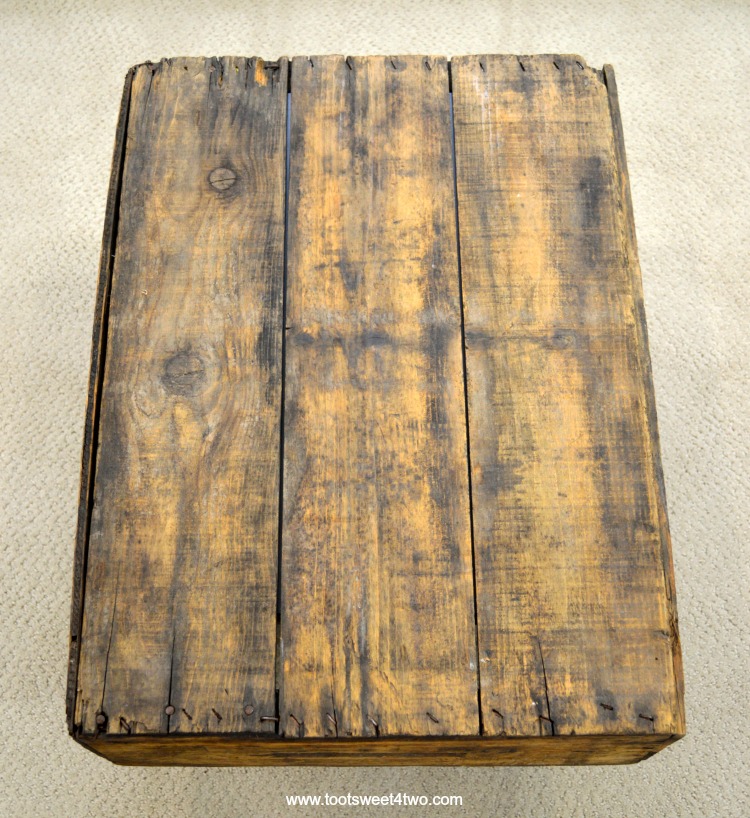
This is a wooden crate that I bought online years ago. I’ve used this wooden crate to style my food photos for years. It is actually two parts:
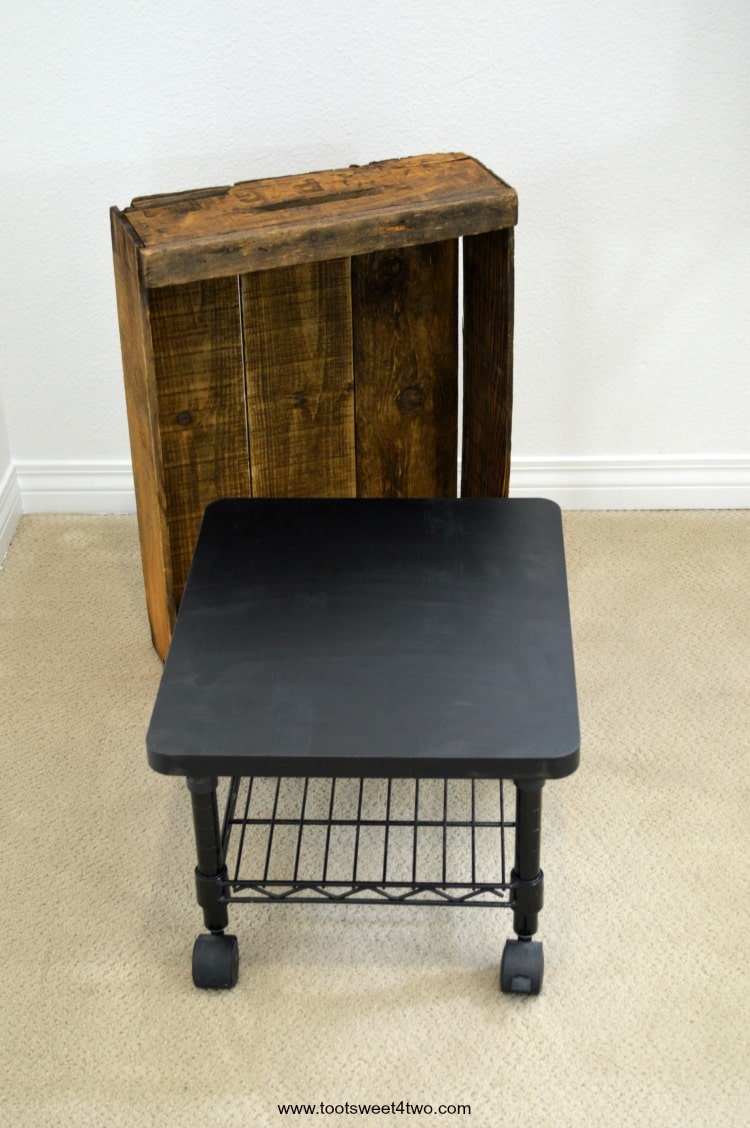
It’s a computer printer cart on wheels and the wooden crate fits over it, upside down. So, to do this you need to make sure that your wooden crate looks relatively decent on the underside.
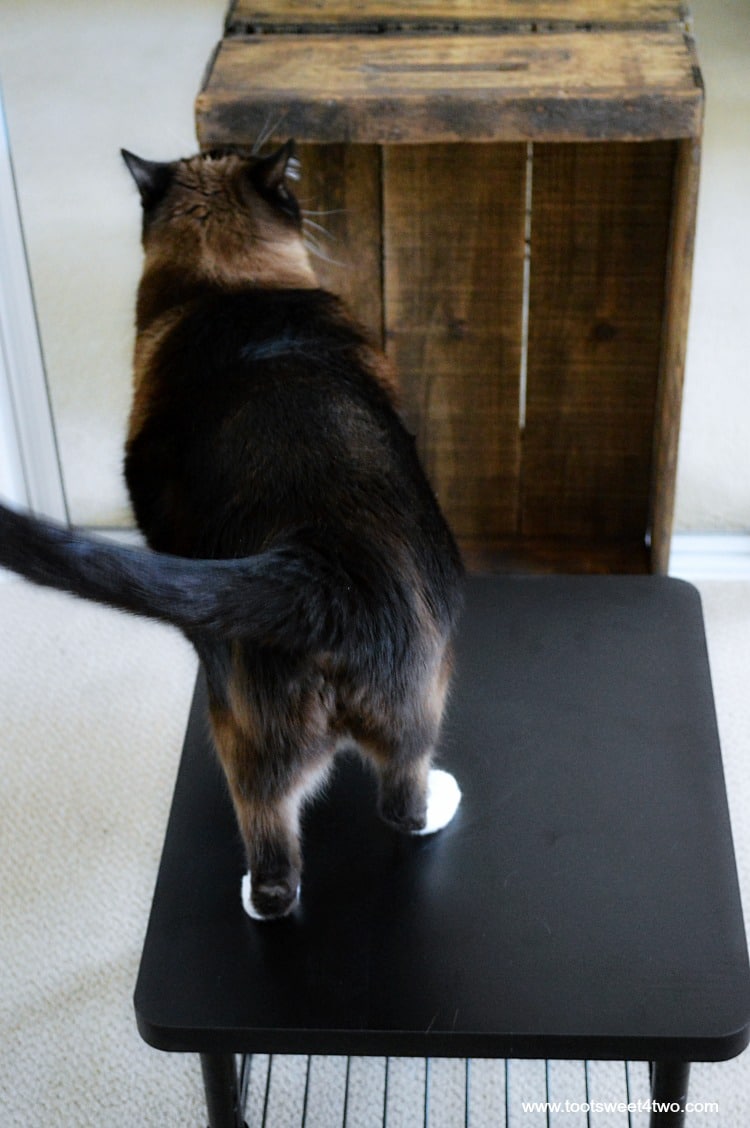
Here’s Coco helping me set up for a photoshoot. That Coco – always has his nose where it doesn’t belong!
Anyway, this food photography setup works really well, especially if you need to keep your costs down. For the price of a printer cart and a wooden crate, you are in business. It has a nice rustic surface that doesn’t reflect light, it’s low to the ground making overhead food photography a breeze, and it’s easy to set up and store – you can just push it into an empty closet space, which is what I did for years and years. Here are some examples of recipes taken on this setup:
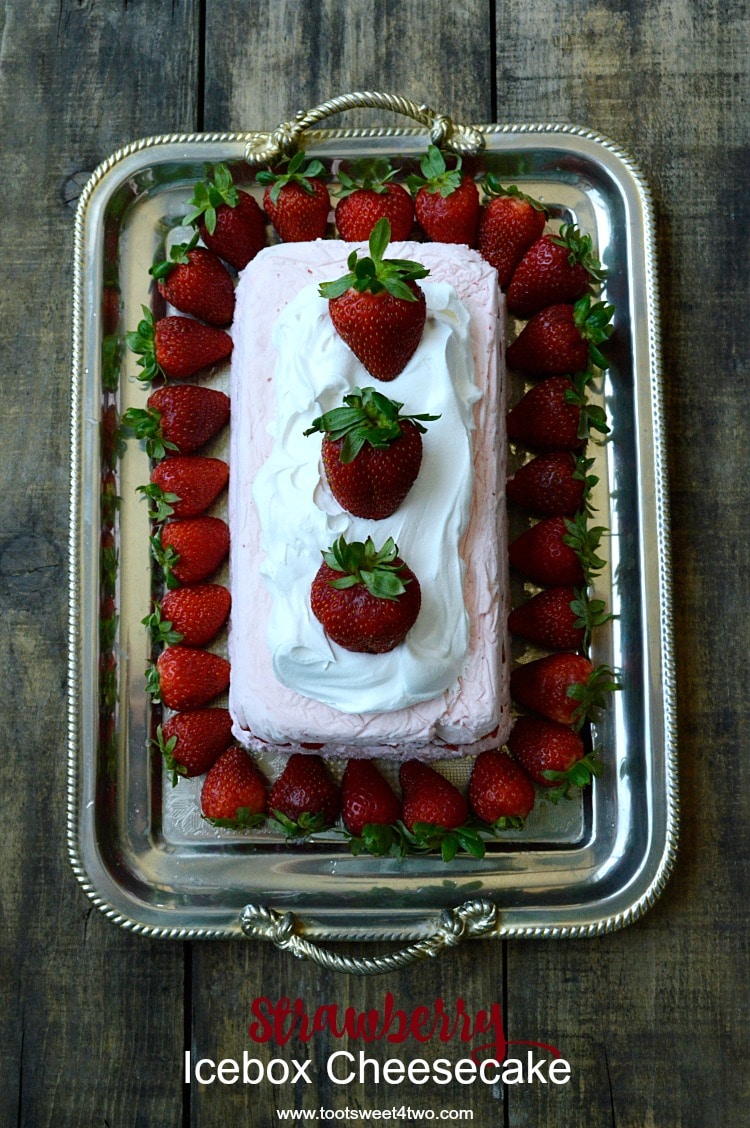
This is my Strawberry Icebox Cheesecake. You can see that the crate looks darker – it all depends on the lighting and photo editing.
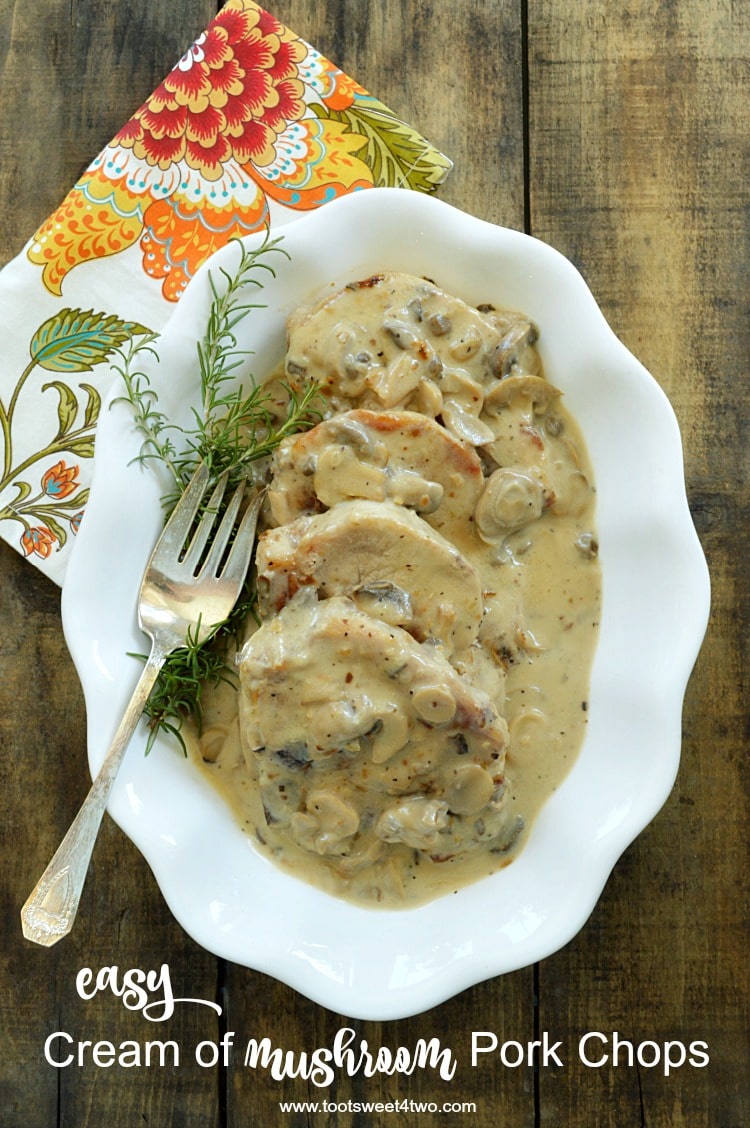
And this is my Easy Cream of Mushroom Pork Chops recipe. In this photo, the wooden crate has more blonde undertones probably from the color of this dish and, of course, the lighting at the moment. Interesting fact: this recipe drives the most traffic to my blog; at last count, over 500,000 people had visited my site for this recipe!
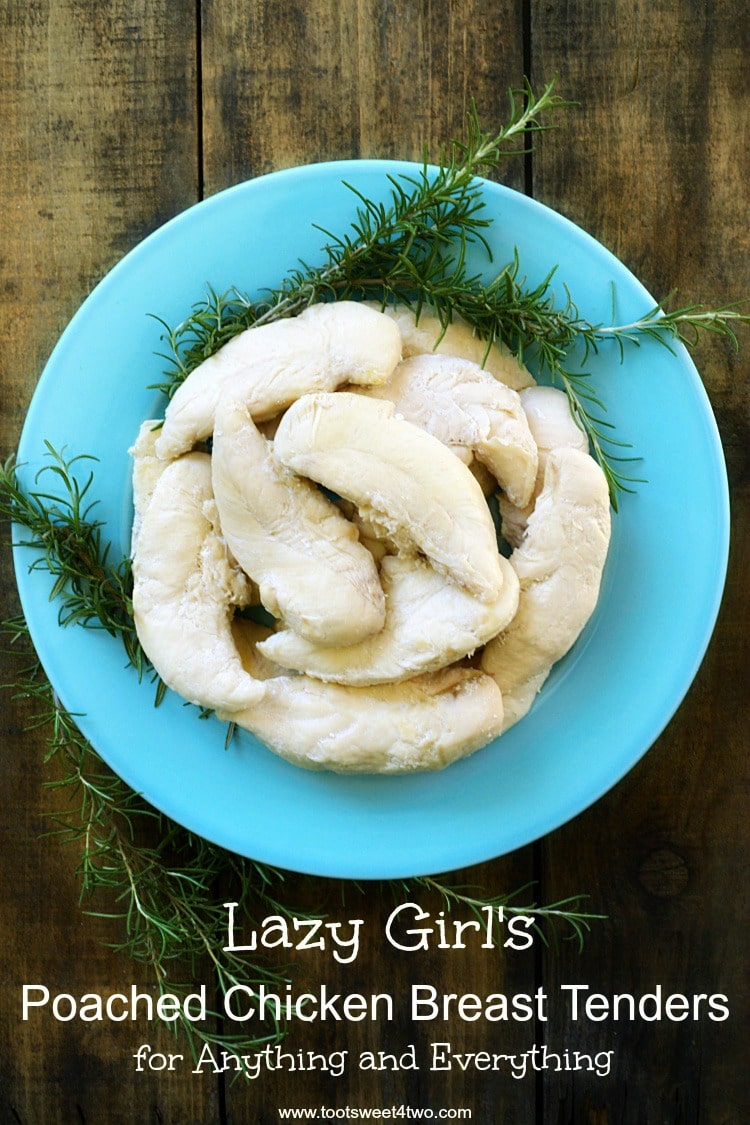
And, my Lazy Girl’s Poached Chicken Breast Tenders for Anything and Everything was photographed from overhead, too, on my wooden crate on wheels. Now you know all my food photography tricks and food styling secrets!
But, here’s the thing: with overall dimensions of 18 inches by 24 inches, my wooden crate doesn’t give me many options. You can see in the icebox cheesecake and pork chops recipes that those dishes fill the space. So, it limits my creativity unless I do something like this:
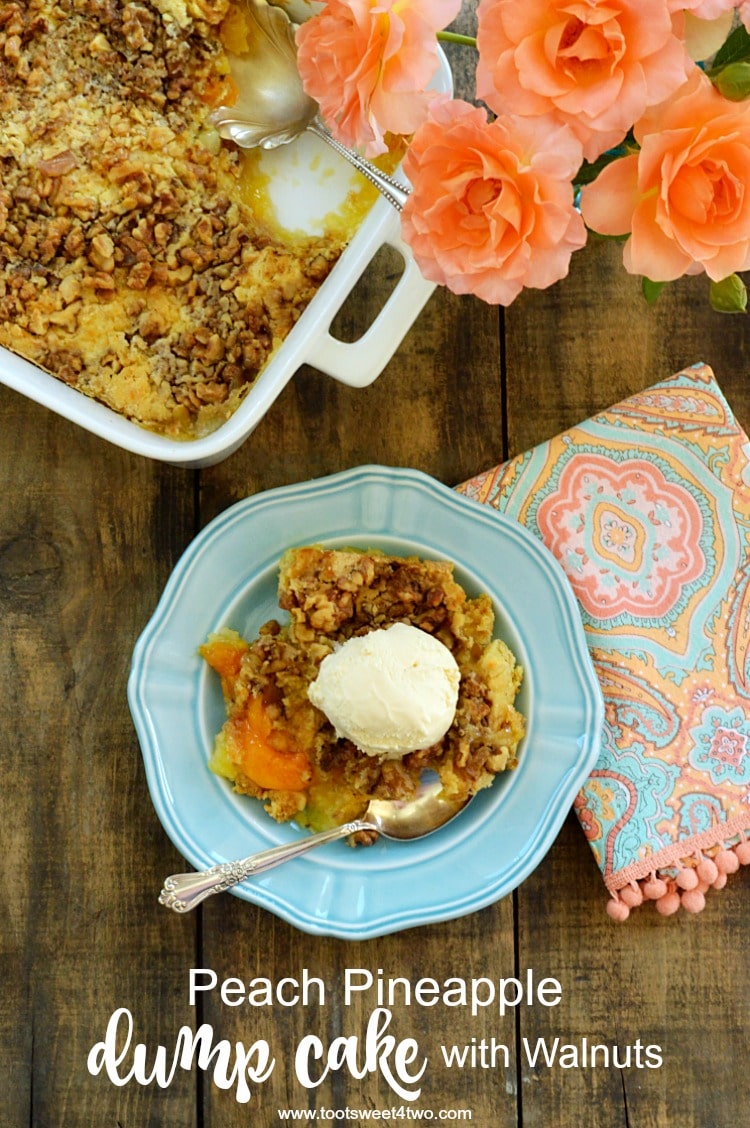
Here I placed the glass baking pan full of my Peach Pineapple Dump Cake with Walnuts sideways in the upper left corner, precariously hanging over the corner of the crate, and a dessert plate full of this deliciousness front and center. As you can see, I crammed a lot of things on my 18-inch x 24-inch wooden crate – a 12″ x 8″ x 2″ glass baking dish, a vase of roses, a pretty kitchen towel, and a blue dessert plate.
My point: this is truly one of the cheapest ways to create a food photography home studio if you are just starting out, or lack space, or want to keep things simple. It’s easy and if you want a clear cohesive look to your food photos, this setup does give you that.
Cheap Food Photography Tip #3 – Buy or Make a Portable Light Box
This one, below, I bought on Amazon (more about that later). But, you can make your own, as my friend and web designer, Tana from Your Marketing BFF, did.
As I mentioned above, more about my lightbox from Amazon below.
Food Photography Tip #4 – Dedicate a Room as Your Home Food Photography Studio
This tip, dedicate a room as your home food photography studio, is not necessarily cheap!
But, after years of taking food photographs on my placemat-lined shiny kitchen table or my small wooden crate, I wanted more.
So, finally, I took the leap! I decided to convert our smaller guest room into my food photography studio for a couple of reasons:
(1) we don’t have guests but a couple of times a year; so who really needs two guest rooms? And,
(2) this smaller guest room is relatively close to the kitchen.
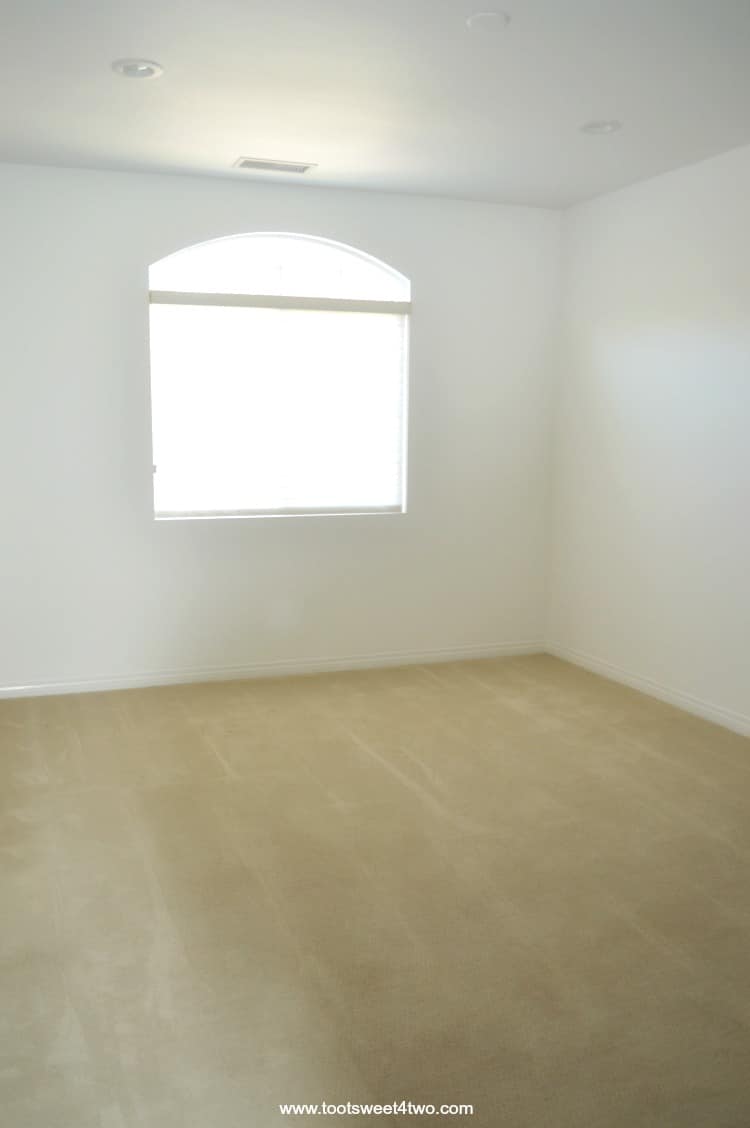
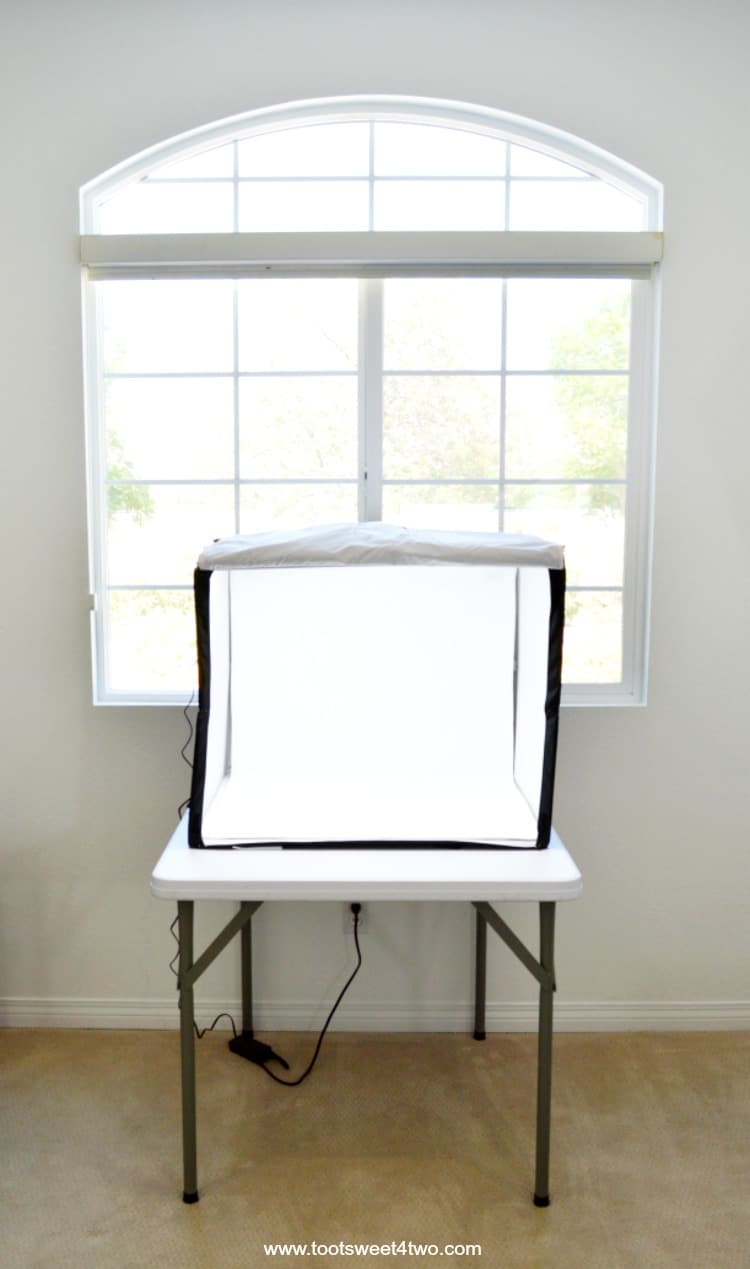
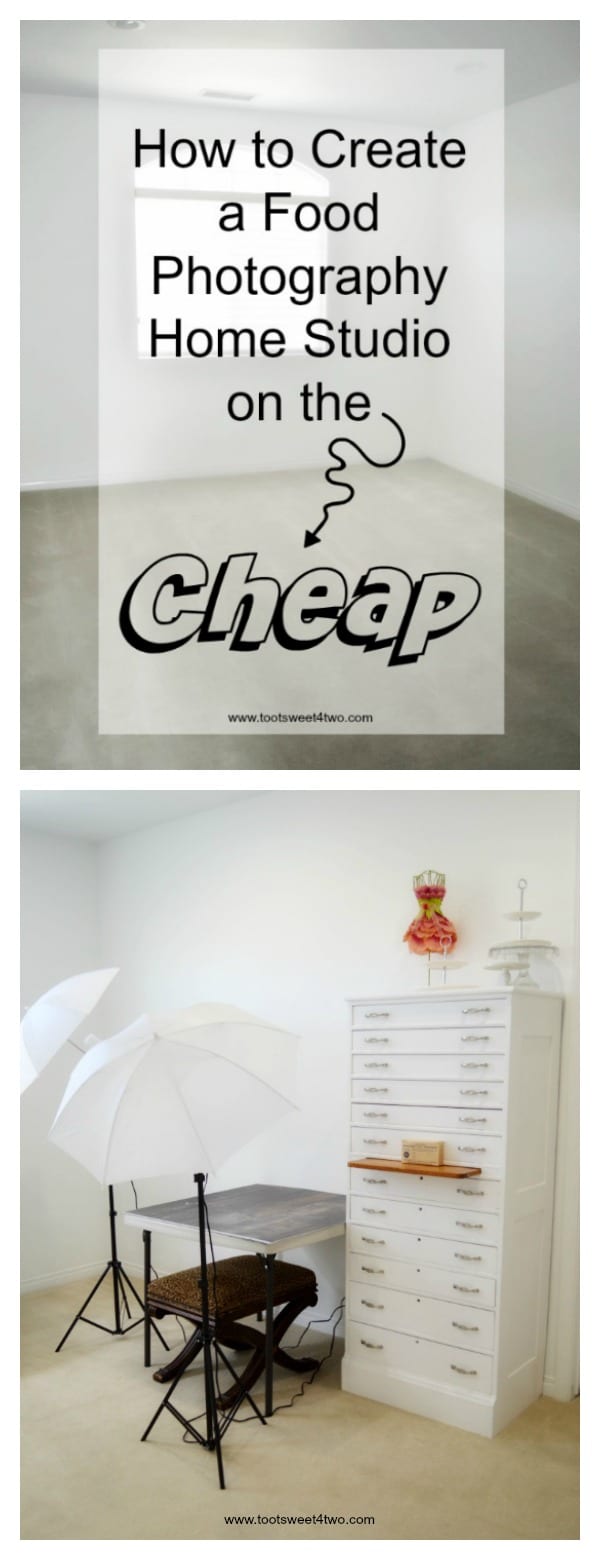
So, after emptying the room of all the furniture, painting the walls white, and cleaning the carpet, here’s what it looked like empty. This room faces north in our house; you can see it has a window with great diffused light with the blinds closed and nice bright light when the blinds are open.
Oh, before I go further with this makeover, let me back up a little and share the “before” photo:
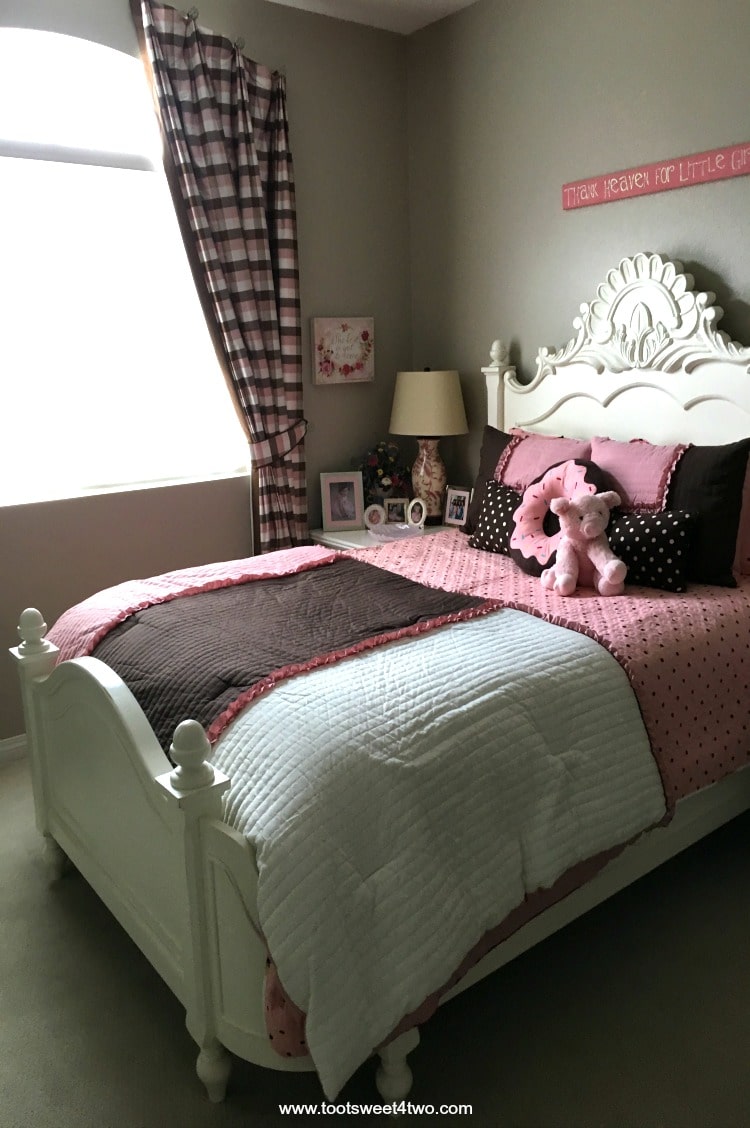
The “before” iPhone photo shows that this guest bedroom was primarily pink with medium-beige walls and carpet. Our entire house was painted this color for 10 years. That’s because when we built this house in 2008, the builder discouraged me from painting the walls white (which is what I requested when we were picking colors). He said nobody painted the interior of their home white; I think I was ahead of the time, but hindsight is 50-50, right?
Anyway, the pink-decorated room was created because we have lots of nieces in our family; more so than nephews. And, many of them were and are young and they all loved their pink room. They are all now a little perturbed with me. But, they are all growing up fast and getting older so they’ll just have to stay in the other guest room! The comforter is actually two comforters. I couldn’t decide which to use, so I used both. I bought them on Amazon.
Here’s the “before” and “after” photo side-by-side:
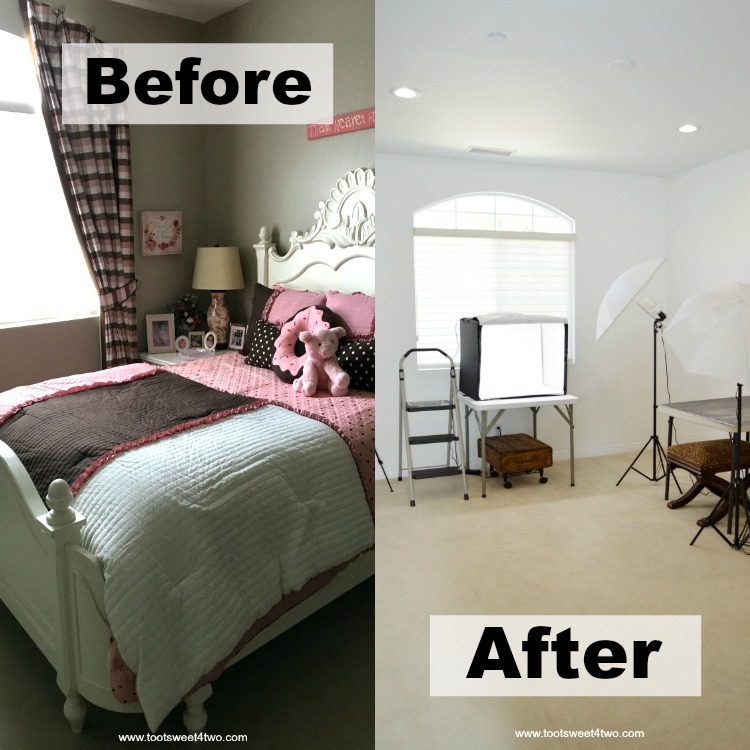
You can see from the “after” photo that this queen-size bed took up a lot of space in the room and it is really empty now even after placing my food photography equipment in there.
Food Photography Home Studio Details

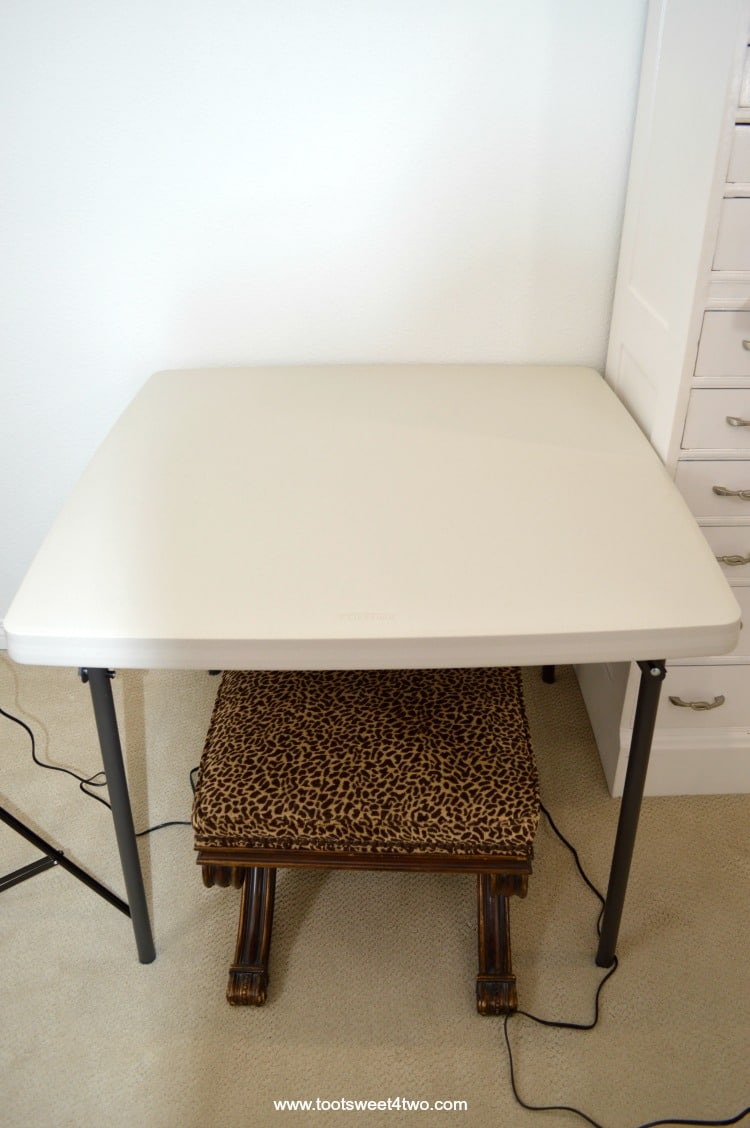
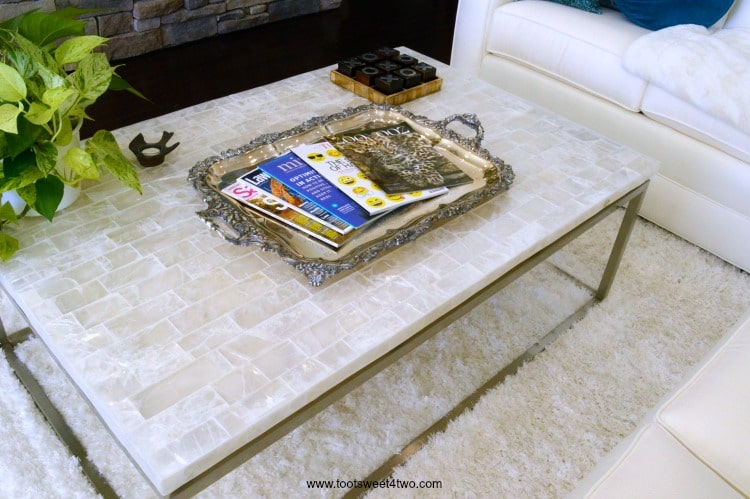
Here’s a bigger picture so that you can see more detail. See my wooden crate under the folding table? It has a place in my heart and I’m sure I’ll still use it. Let’s talk about the rest of the equipment that shows up in this photo starting from left to right:
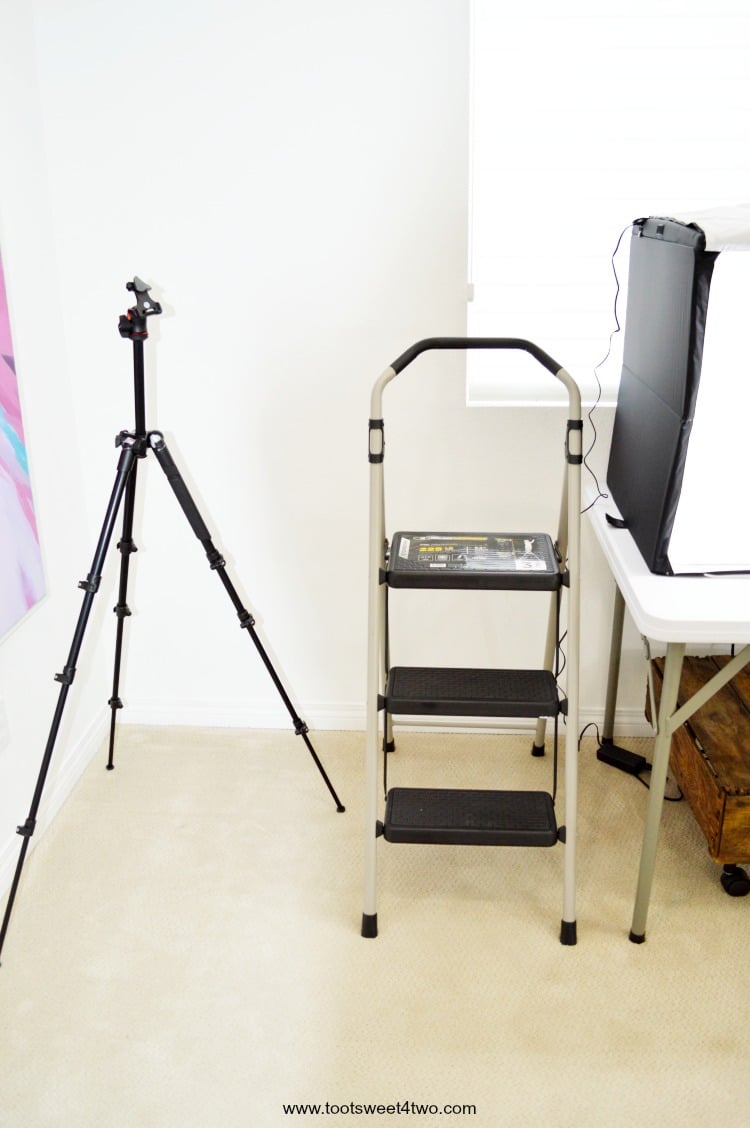
On the far left is a corner of one of my Dad’s painting. I’ll show you more of it later. The next piece of equipment is a camera tripod. I use this occasionally and I should use it more. I tend to hold my camera in my hands more often then not, but I’d get clearer, cleaner, crisper photos if I used my tripod more. I have two cameras now, a Nikon and a Canon, so I’m considering keeping one on the tripod full-time to encourage me to use it.
The stepladder in the middle is a necessity to me. I’m short (5’2″) and for me to do any kind of overhead food photography, I either need to use the stepladder or put the food on my wooden crate or even on the floor (which I have done). This stepladder is great because it has wide steps and a sturdy handle to hold on to. On the far right is my lightbox.
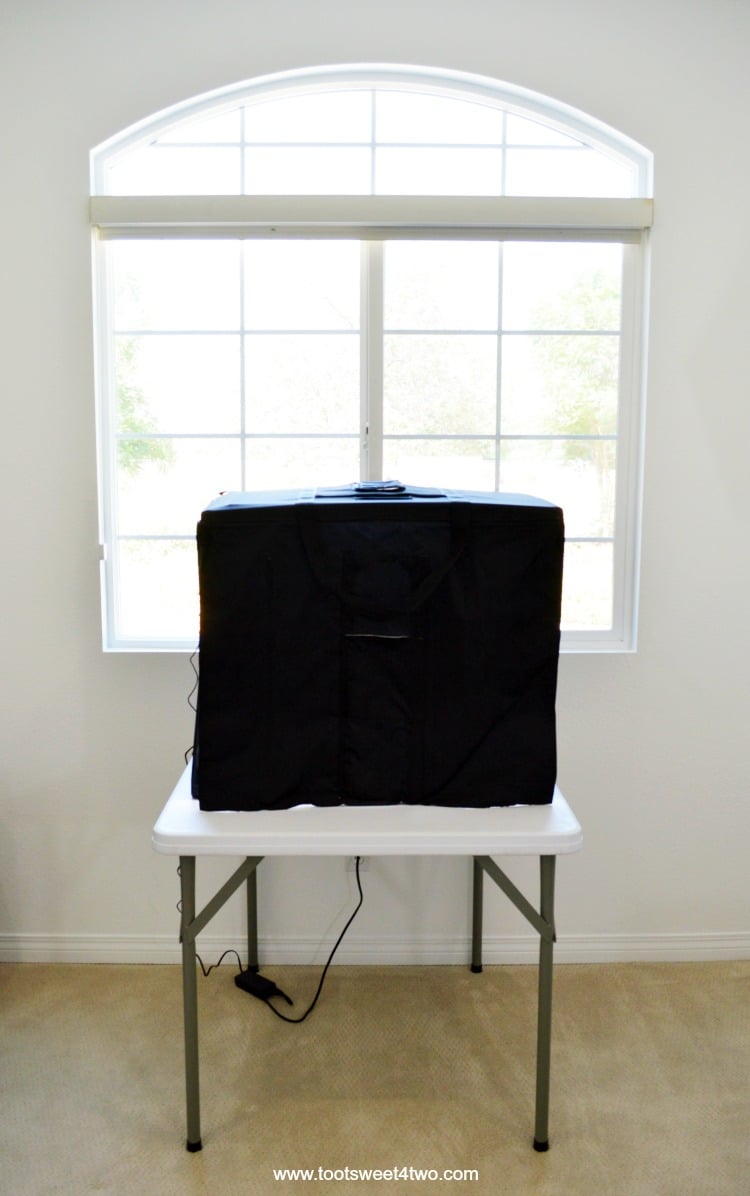
It is made by Amazon and it is technically called AmazonBasics Portable Photo Studio. I seriously LOVE this lightbox. It is easily portable and collapses in seconds and has a handy shoulder carry handle. This link to Amazon includes a video on how easy this portable photo studio is to set up and take down.
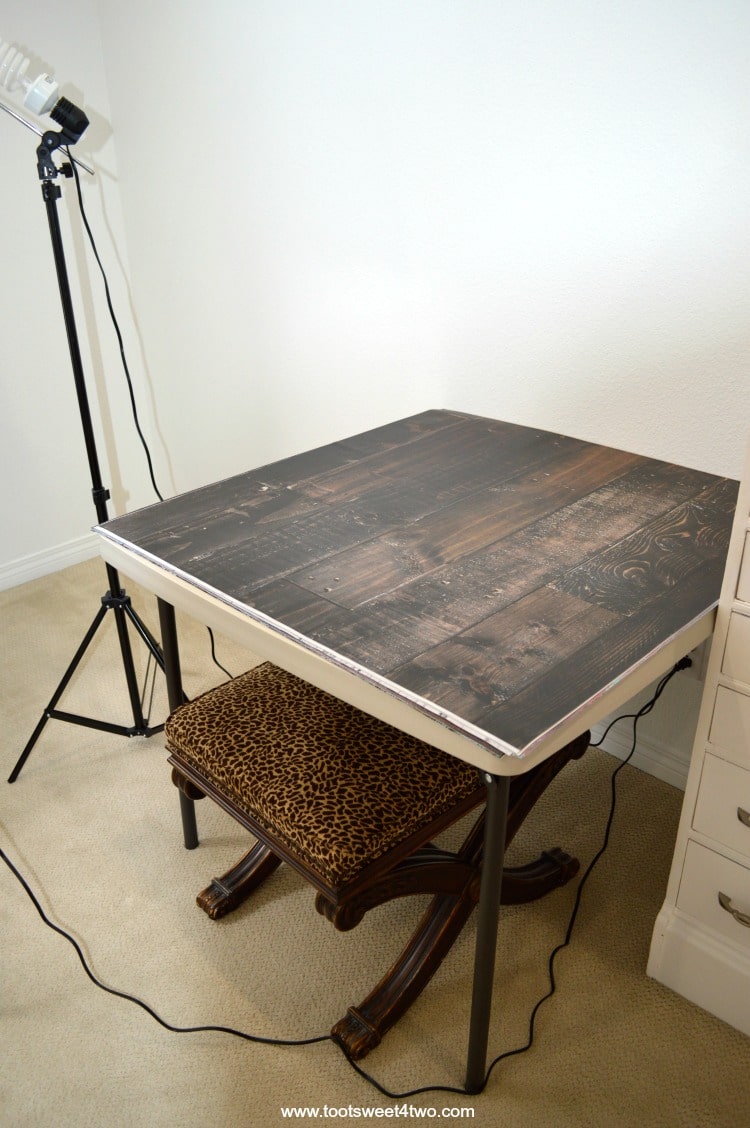
The above photo is of this portable photo studio all closed up. It has various holes in it that close with magnetic strips that allow you to take your photo from several angles, including overhead. I’ve placed it on a folding table so that I can leave it up all the time. But, it can be folded up and stored very easily.
Here’s a picture with the front flap open and placed on top of the lightbox. This is with the light turned on so that you can see how bright it is. Awesome, right? Also, you can easily clip your own photo backdrops on the back panel to change up the interior of this lightbox, and, of course, you can place different vinyl backdrops, fabric, placemats, napkins, wood chopping boards, etc. on the bottom of the lightbox.

Before we leave this area, let’s back up a minute and look at my dad’s gorgeous abstract painting, which I’ve named Delta Dream. My dad, who’s been gone for many years now (I miss him every day; he was a great dad), was an Air Force pilot, so Delta is the “D” in the pilot’s alphabet. Art was my dad’s hobby so I’m lucky to have many gorgeous paintings and sculptures that he created years and years ago in my home.
This one he intended to be hung horizontally; in fact, it hung horizontally for years and years in my parents’ kitchen. But, I don’t have a space in my home that can handle it’s size horizontally, so I hung it vertically. That’s the beauty of abstract art…you can hang it either vertically, horizontally, or upside down; whatever speaks to you. It’s an amazingly beautiful painting and adds a pop of color to my otherwise very white and beige space.
Oh, and guess what? You can buy one of your own to hang in your house! I’ve licensed some of my dad’s paintings through Great Big Canvas. That link takes you to all of the reproductions of my dad’s artwork that are currently available on Great Big Canvas. They sell digital reproductions of artwork in a multitude of sizes. You can choose the size that works best in your home and can choose a frame. They’ll make it and ship it to you, beautifully packaged with all the hardware ready to hang. They even include a mini level so that you hang your painting level.
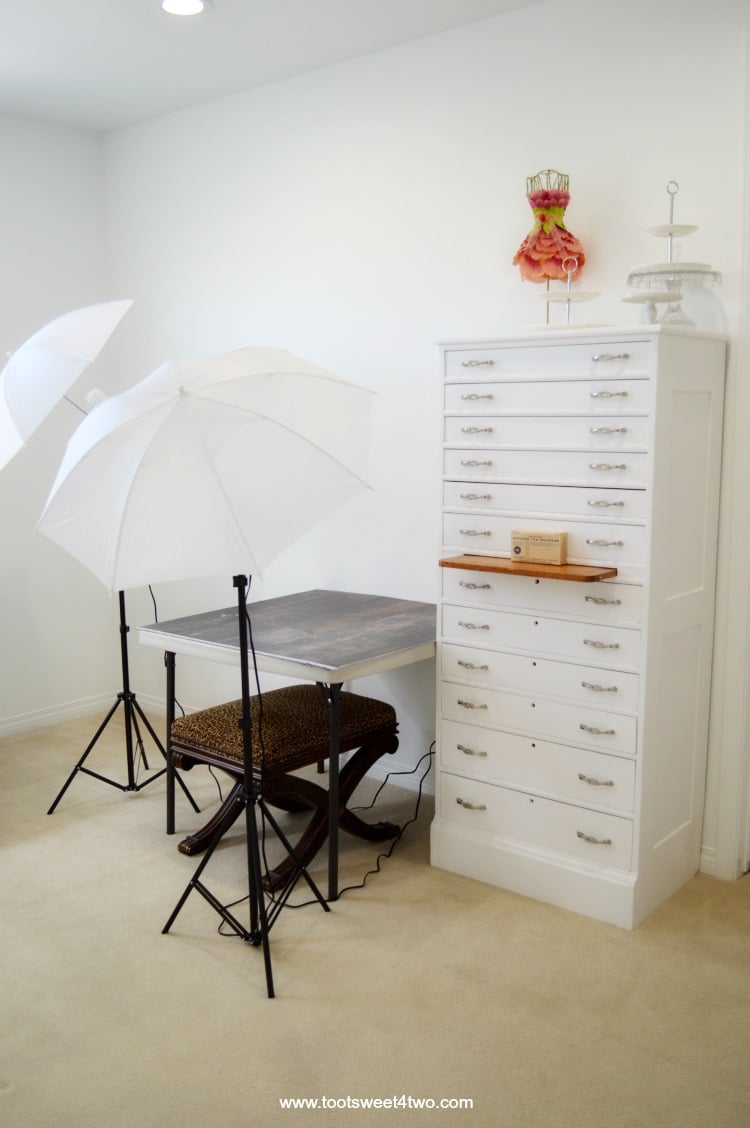
Continuing our tour moving right around the room, the next area is another folding table with two photography lights with umbrellas attached, a faux wooden backdrop on top of the folding table, an ottoman under the folding table and my 12-drawer “prop” cabinet with some knickknacks.

I brought the ottoman in from another room in our house, so it cost me nothing (well, it cost me something when I bought it 10 years ago!). So, I’m repurposing it for another use. I decided I needed something to sit on when I need to photograph something at eye level. It fits easily under my second folding table and I don’t have to move it out of the way like I would a chair. So, if I need to sit down, it’s handy. It isn’t a storage ottoman, but how much better would it be to have one with storage? I’d stick my camera bags in there if I had one.
The folding table is just a standard 34″ square that I bought on Amazon. If I want to shoot something on the floor, it is easy to collapse the legs and put the faux backdrop right on top of it. The cords you see are for the two photography lights which are on either side of this table. There is a drawback to this folding table – at 34″, it isn’t quite large enough for my 36″ square photography backdrops. I’m thinking of getting one that’s a better size. So, my tip – buy your backdrops for your food photography home studio first, then your table!
Surfaces for Food Photography
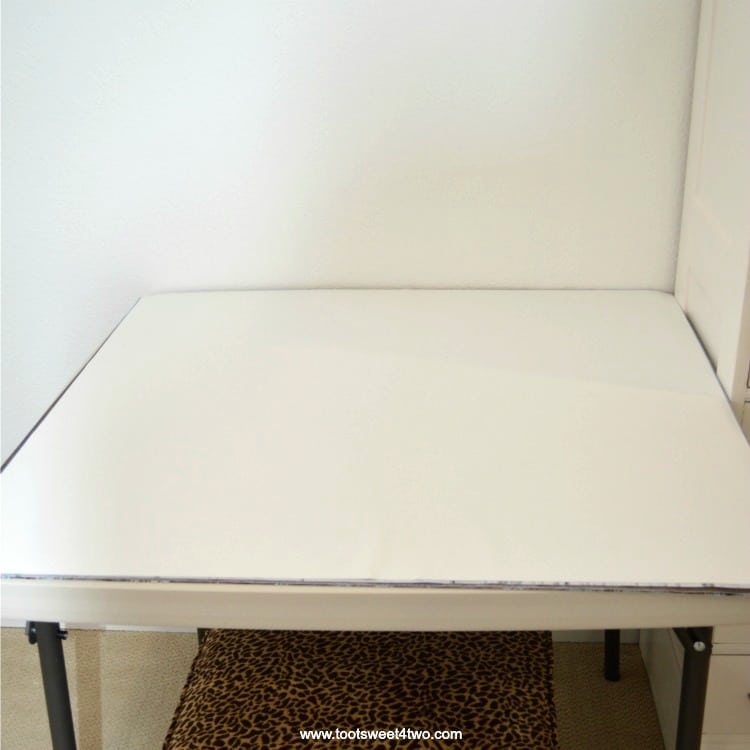
I have quite a few backdrops that I use for food photography…
In this photo, you can see them all piled on top of each other on the folding table. This is really, in my mind, the only way to store them, i.e., flat. They come in a shipping tube all rolled up and you can continue to store them that way, but then you have to get them out of the tube each time, smooth them out (because they curl up) before you even style the rest of your shot! So, I store them flat on this table.
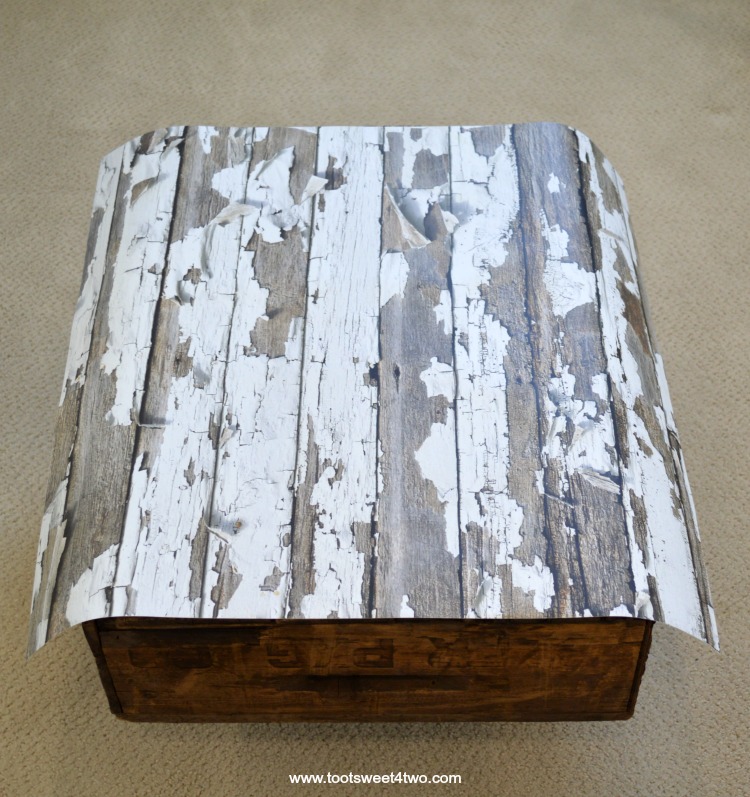
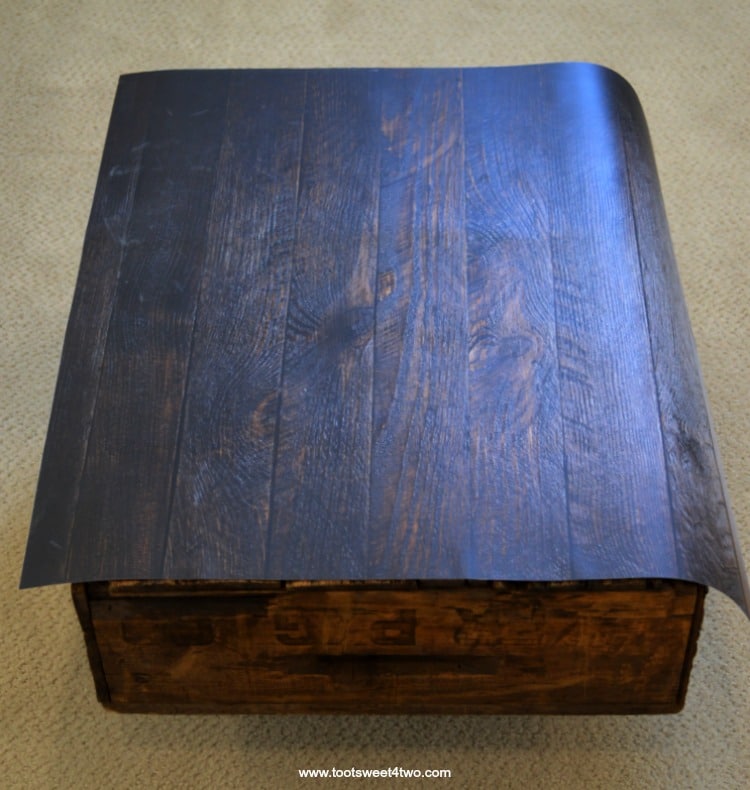
In the early days of using my wooden crate (peeking out above), I ordered smaller faux wood backdrops to put over the crate to give me more surface options rather than just always photographing the wooden crate. But, as you can see, they are bigger than my 18″ x 24″ crate, hanging over the sides. I decided not to cut them down to size to fit on the wooden crate and, instead, used them as is. Here’s an example:
This post is called Uncommon Gifts from Uncommon Goods.
Here’s another backdrop meant for the wooden crate.
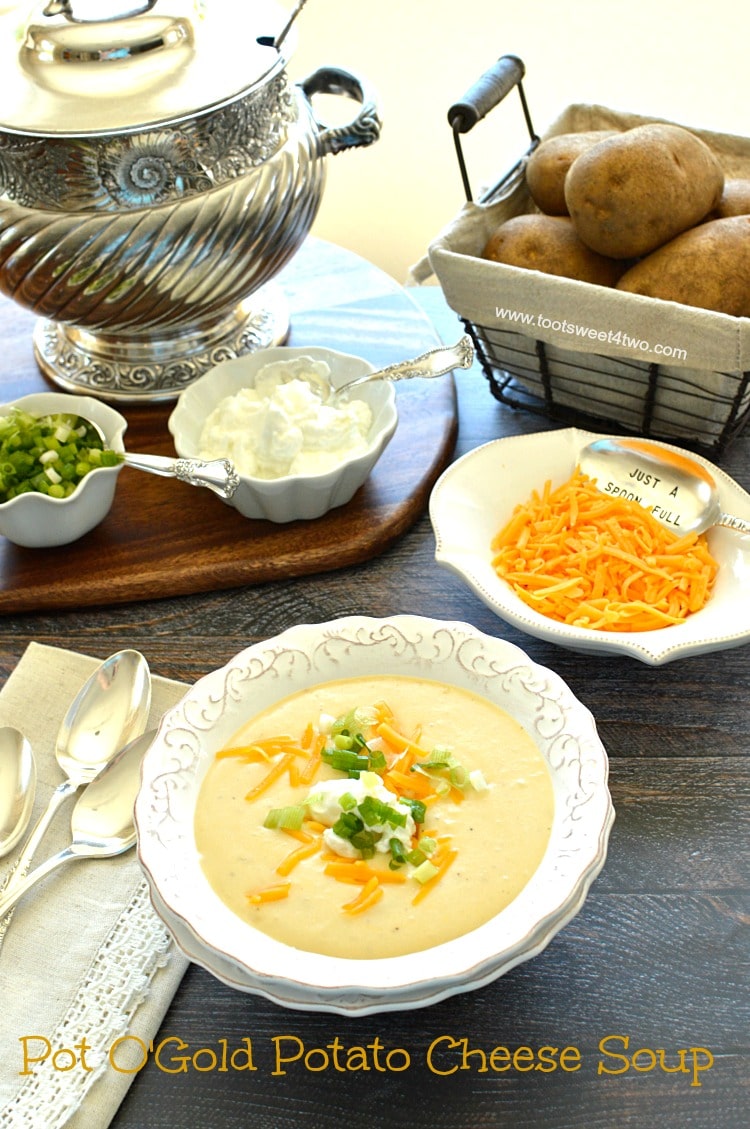
Here it is in action – a lot of stuff crammed on a small surface! My Pot O’Gold Potato Cheese Soup has my great-grandmother’s, Emma’s, Victorian silver soup tureen, a small wooden chopping board, with a tiny bowl of green onions and another with sour cream, a small wire basket with potatoes, another small bowl with grated cheese, a soup bowl full of soup, not to mention the napkin and silverware! But, I managed to get it all on there!
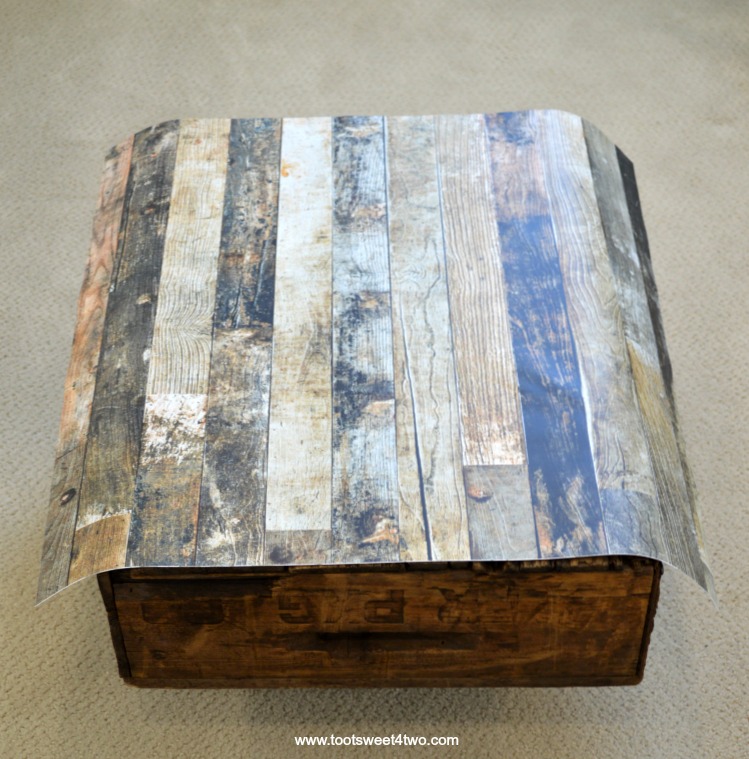
Here’s the last small faux wooden vinyl backdrop I have that was intended for my wooden crate. I’ve never used it. It’s a bit busy for my taste, but I keep it…just in case.
I’m sharing these old backdrops with you just to show you that smaller ones are available, but I decided to go bigger because as I explained above, I wanted “options.” So, stacked altogether, one on top of the other are these newer, larger faux backdrops, all of which I purchased on Etsy:
This one is plain white, no pattern at all. It’s like the surface of a white painted wall. I haven’t, yet, used this one, but when I bought it, I thought I’d use it as the backsplash since all my walls were painted beige.
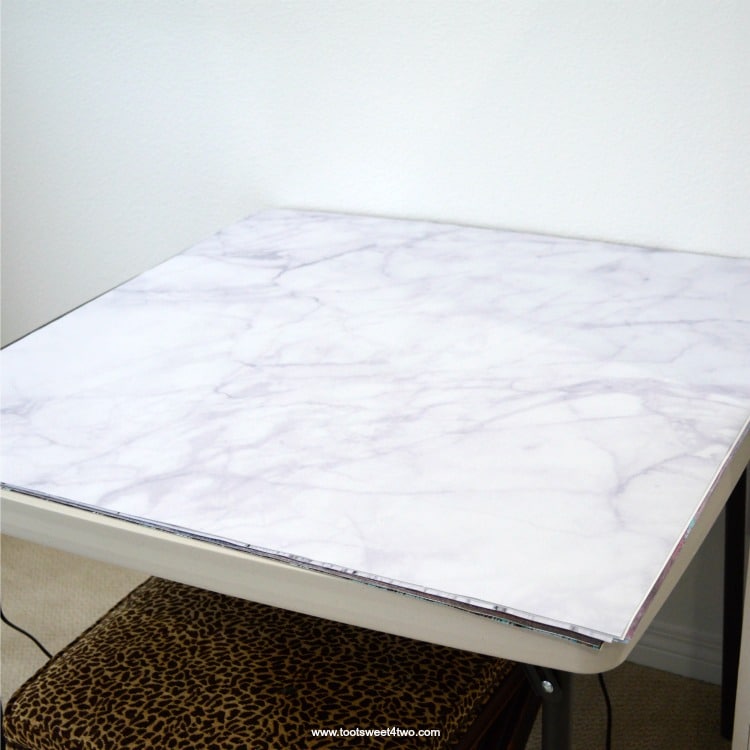
This one is a faux marble surface, meant to look like a white marble kitchen countertop. Here’s an example of this faux marble photography backdrop in action…
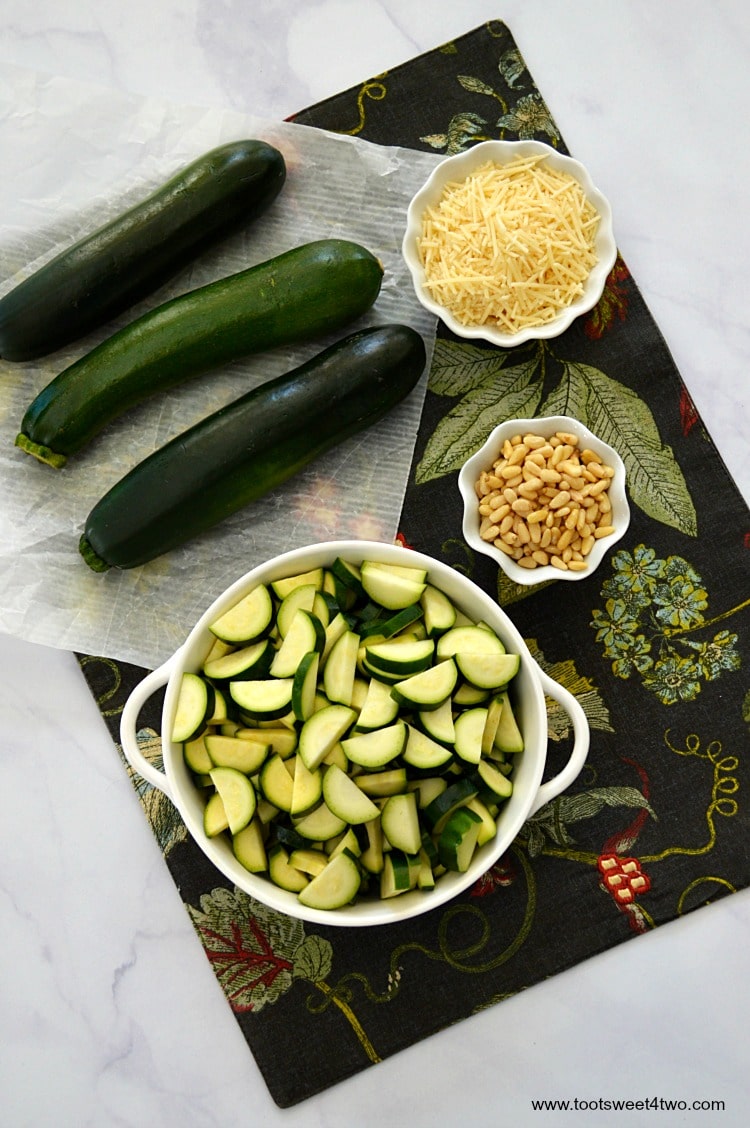
These are my Out-of-This-World Zucchini Moons with Parmesan and Pine Nuts before the recipe is cooked! Notice the backdrop on top of which I placed a placemat, a crumpled-up piece of wax paper, and then the actual props.
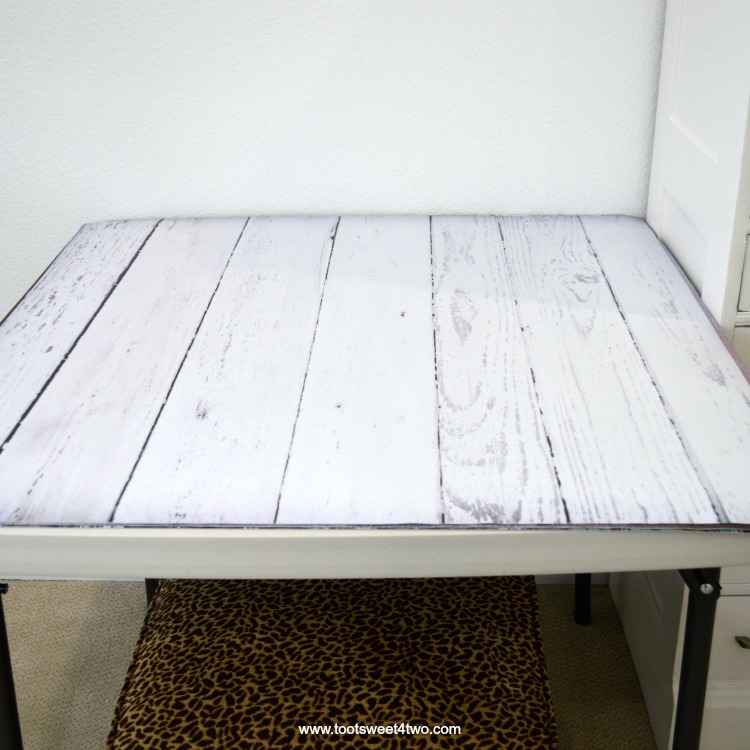
This food photography backdrop is a solid white faux wooden surface. I’ve used it several times and here’s an example…
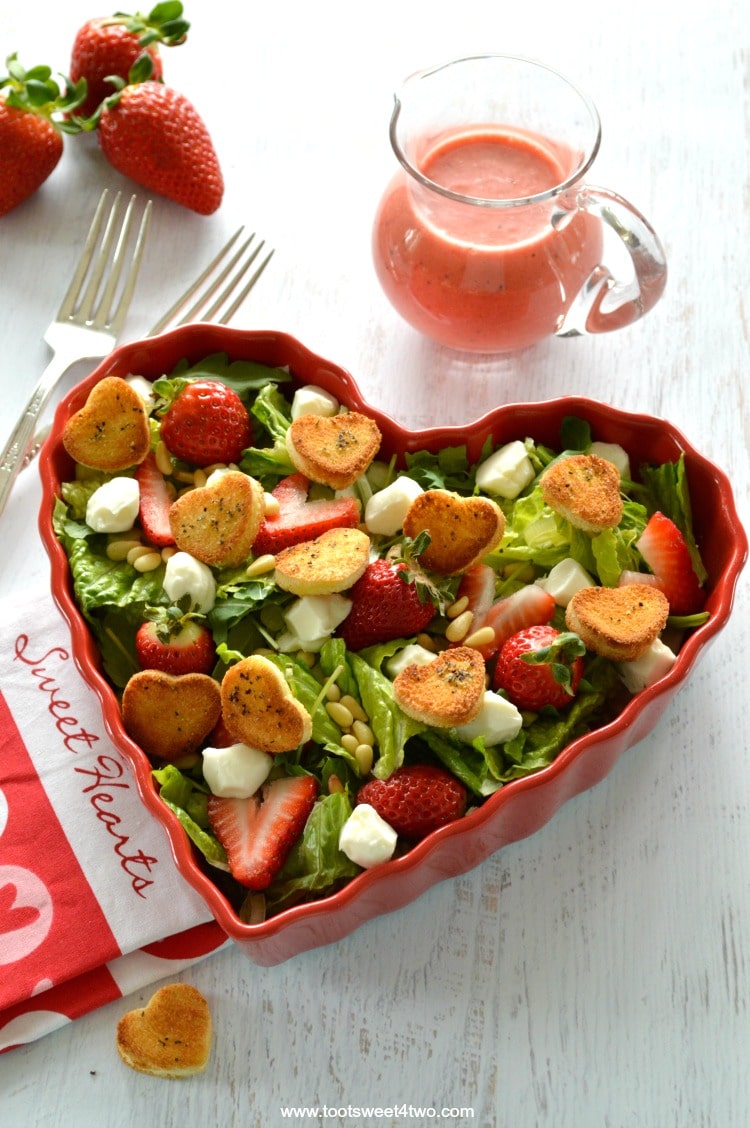
This is a close-up of my Sweetheart Strawberry Salad with Blushing Berry Dressing. Don’t you just love the little heart-shaped bowl I made it in? It’s actually a ceramic heart-shaped pie pan. And, my adorable croutons were made with a small heart-shaped cookie cutter.
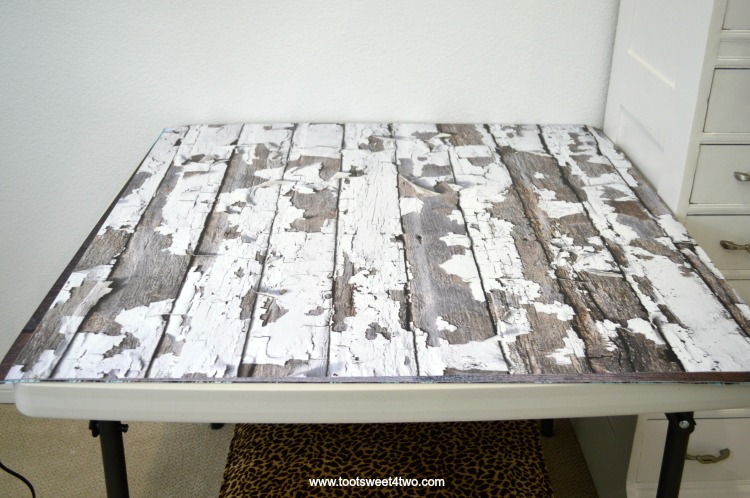
This is my white peeling faux wood food photography backdrop, similar to the small one I have. These are all 36″ x 36″. Here’s a photo of it in action…
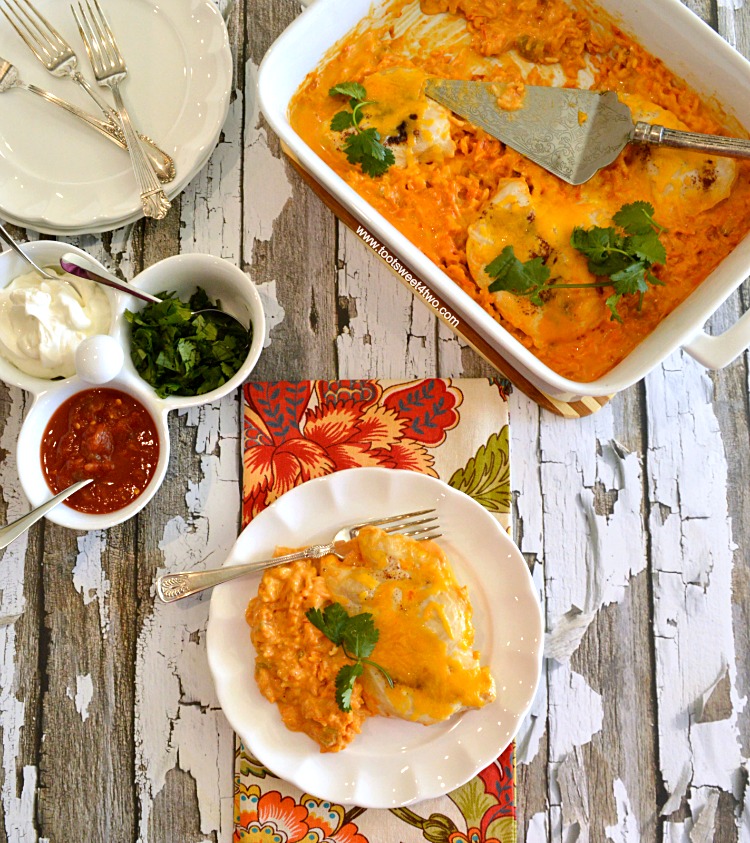
This recipe is Cheesy Fiesta Salsa Chicken and Rice Bake, part of my “Teach Me to Cook” recipe series. “Teach Me to Cook” is a series where I invite friends and family over to teach me to cook one of their recipes. That way I expand my horizons. I cropped this photo a little more square so that you can see I wasn’t limited by the narrow 18″ x 24″ space of my original wooden crate.
Tip: don’t put hot pans on your vinyl food photography backdrops. Be sure to use a trivet or a chopping board or hot pads. See my chopping board peeking out?
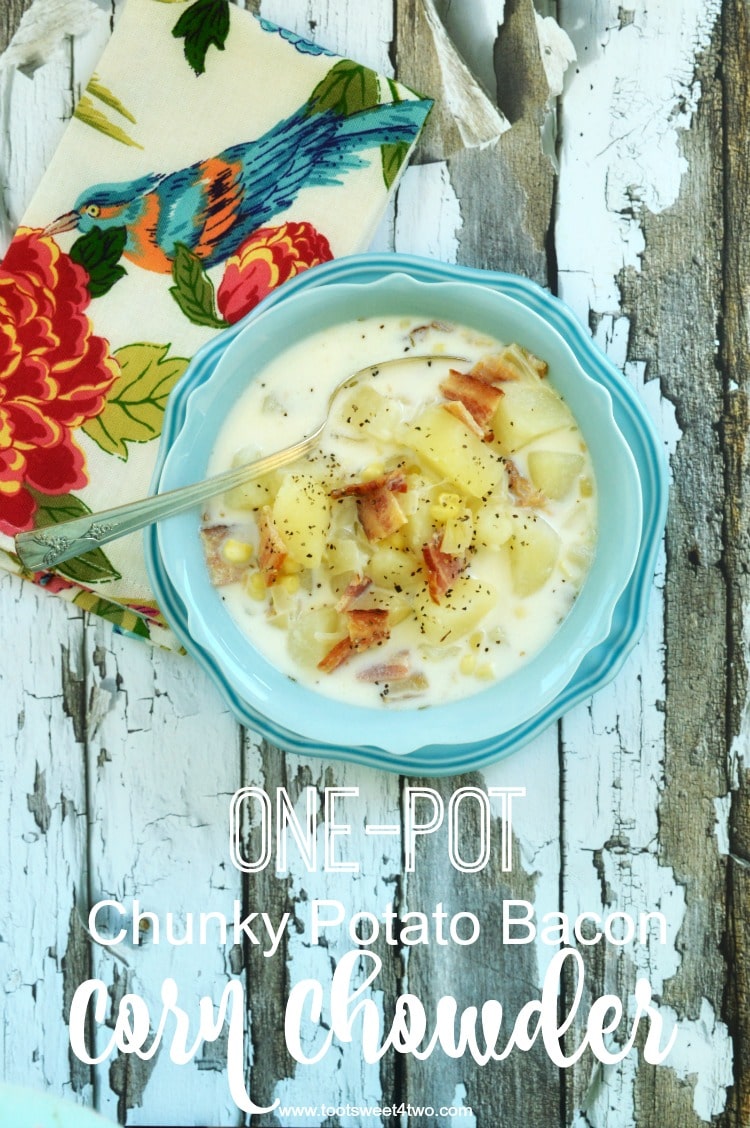
And this recipe is One-Pot Chunky Potato Bacon Corn Chowder on my large white peeling faux wood backdrop.
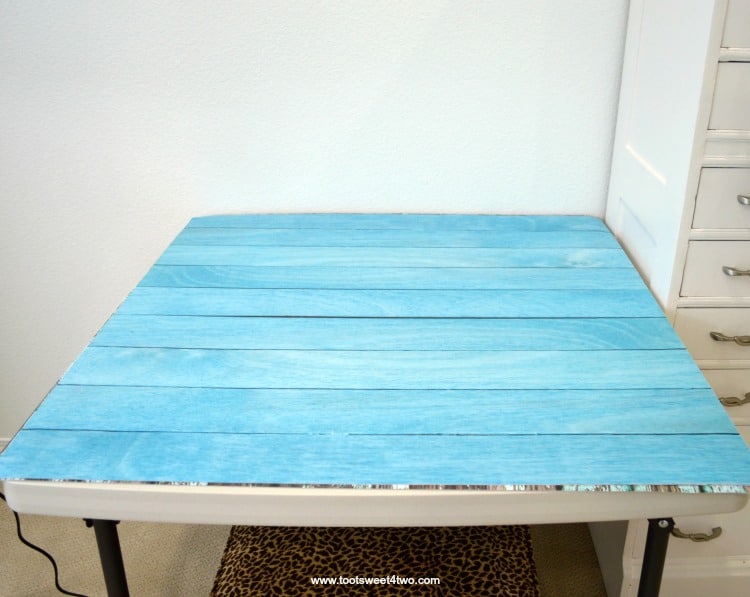
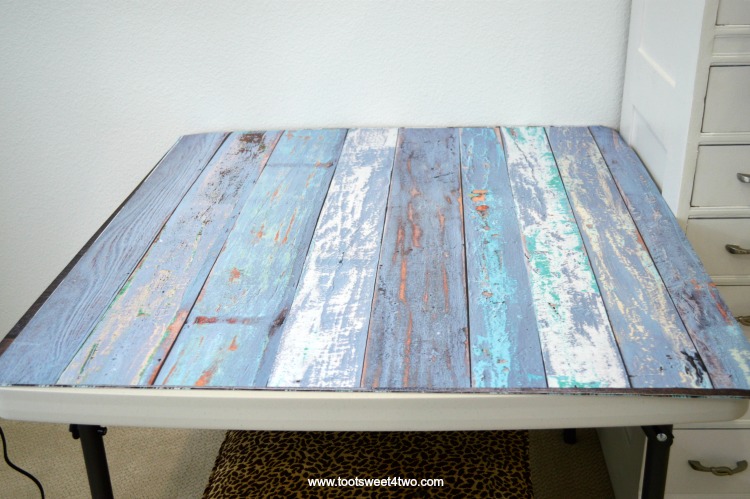
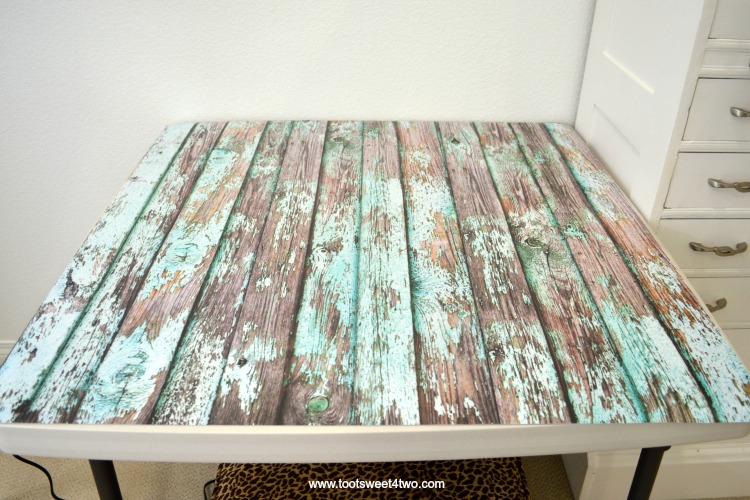
Blue is my favorite color, so it stands to reason that this is my favorite faux wood food photography backdrop in kinda a turquoisey-blue (or would you call that a deep sky blue?). Here it is in action…
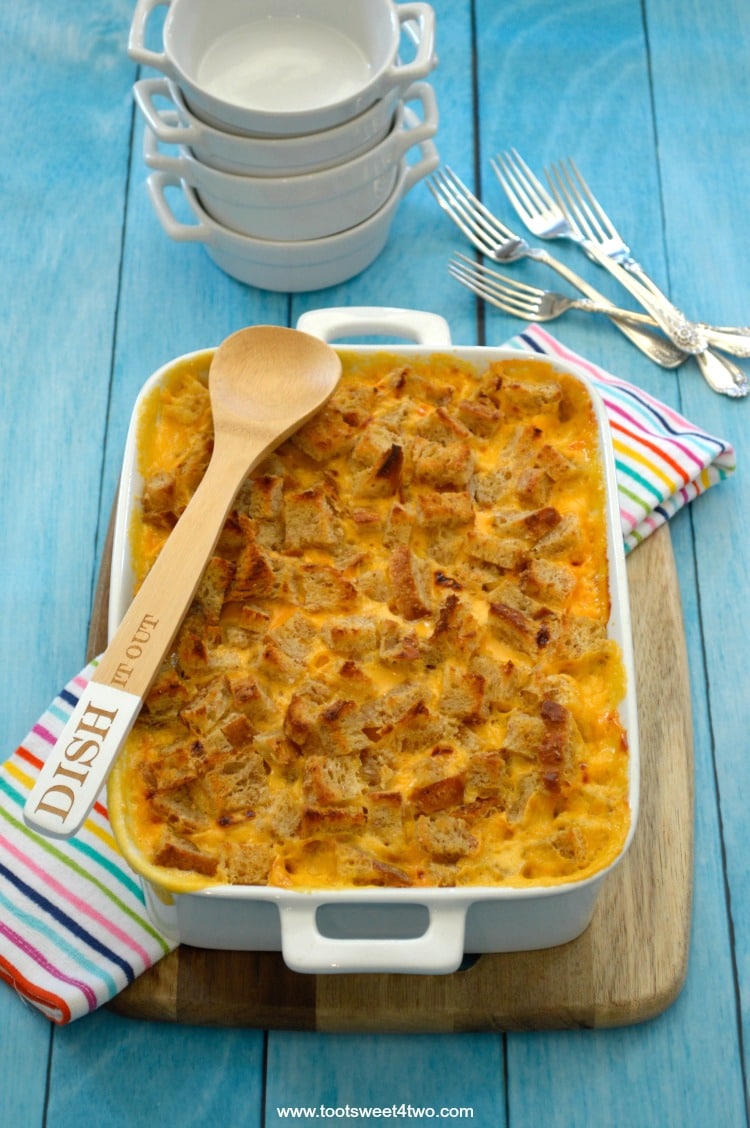
This is Baked Mac & Cheese with a Crunchy Sourdough Topping. Can I tell you that it is sinfully delicious? Don’t you love the “Dish It Out” wooden spoon? I got it at Michael’s about two years ago. Sometimes if you don’t “jump” on a purchase, even if it is a spur of the moment purchase, you miss the opportunity because you can’t find it again. The closest thing I can find to this adorable wooden spoon is a set of wooden spoons with the handles painted various colors. Here’s a challenge for all you creatives out there – recreate some of these adorable spoons using store-bought wooden spoons! I think there’s still a market out there for these!

This food photography backdrop is blue as well and has a peeling faux wood character. Here’s a photo from the food shoot on this one…
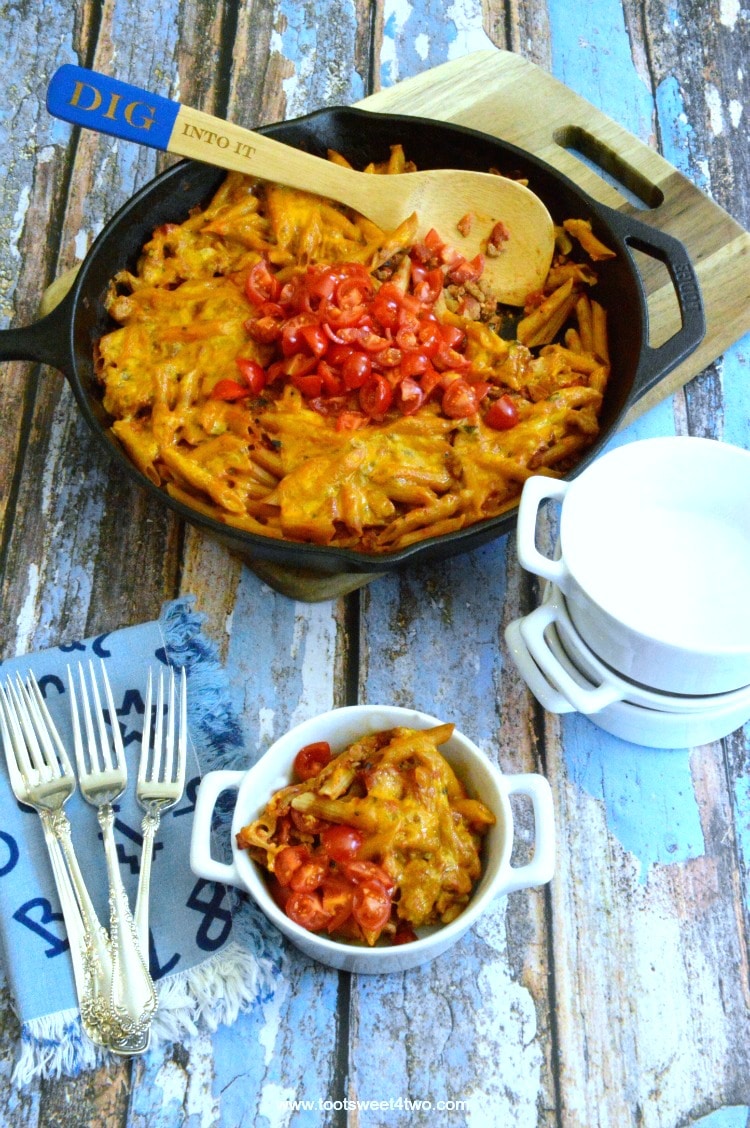
This recipe is Easy Skinny Cheeseburger Casserole out of a cookbook of easy casserole dinners called “Family Favorite Casserole Recipes” by Addie Gundry. Notice the awesome royal blue-tipped wooden spoon, “Dig Into It”, also from Michaels.
I have a few more food photography backdrops that I haven’t, yet, used. Here they are…
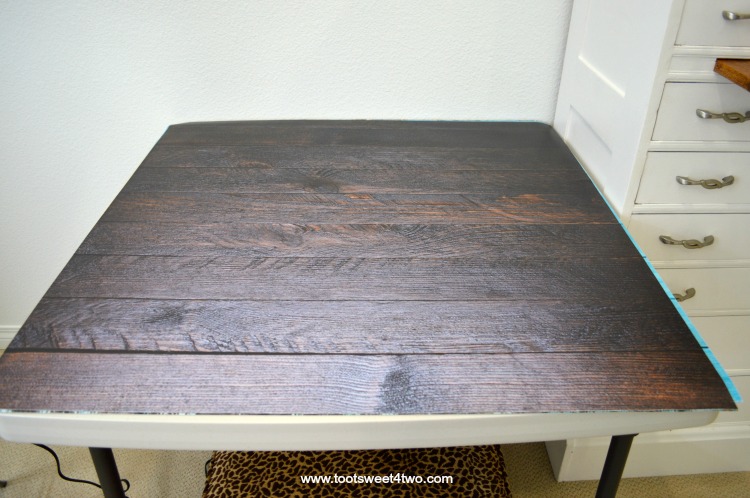
This is a larger version of the dark brown faux wood backdrop I used on my Pot O’Gold Potato Cheese Soup.
This faux wood food photography backdrop is a very distressed, rustic blue-green combination.
This one is a mint green rustic faux wood food photography backdrop.
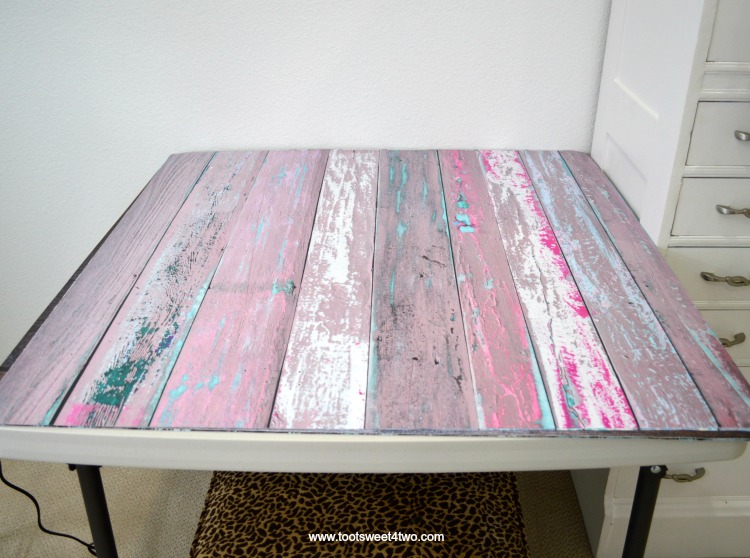
And here’s a fun pink faux wood food photography backdrop that I haven’t used yet.
Whew!
Finally, we are done with those! But, my point in sharing these with you, even the ones I’ve yet to use, is to let you know that they come in various sizes starting at 12″ x 12″ and go up from there. They are relatively inexpensive from around $8.00 up to about $25.00, depending on the size. There are so many of these food photography backdrops out there that you shouldn’t have any trouble finding one that suits your purposes. All of these I got on Etsy.
Amazon carries them, too, but theirs are typically larger meant as backdrops to photograph people. They have great ones, though, if you are looking for the larger sizes; like ones for weddings, birthdays, Halloween, Christmas, even a cartoon city backdrop for superheroes! I’m telling you, guys, if you are thinking about adding a photo booth to your next party, these large backdrops from Amazon are perfect! You’d just have to buy a background support kit, too, but they really aren’t all that expensive. Talk about a showstopper at your next party!
Okay…enough about backdrops!
Food Photography Props
Way back about 20+ photos ago, you may remember this picture of my new food photography home studio:
I mentioned the 12-drawer “prop” cabinet. This cabinet actually belonged to my great-aunt and I inherited it years and years ago. I originally painted it blue 20+ years ago, of course, and used it as a sock drawer and jewelry cabinet when we lived in our 99-year-old house before the wildfire that burned it to the ground in 2007.
Fortunately for me, firefighters rushed through our burning home and saved a few treasures. This was one of them. They opened the drawers and saw jewelry inside and two of them carried it outside to safety. We weren’t home (we had evacuated), so I didn’t know about this precious save for about 10 days. Anyway, it has remained in my new garage for the past 10 years (it was smoke damaged and needed to air out – for 10 years! Just kidding, but it was smoke damaged and then I could never quite figure out a place to put it in my home).
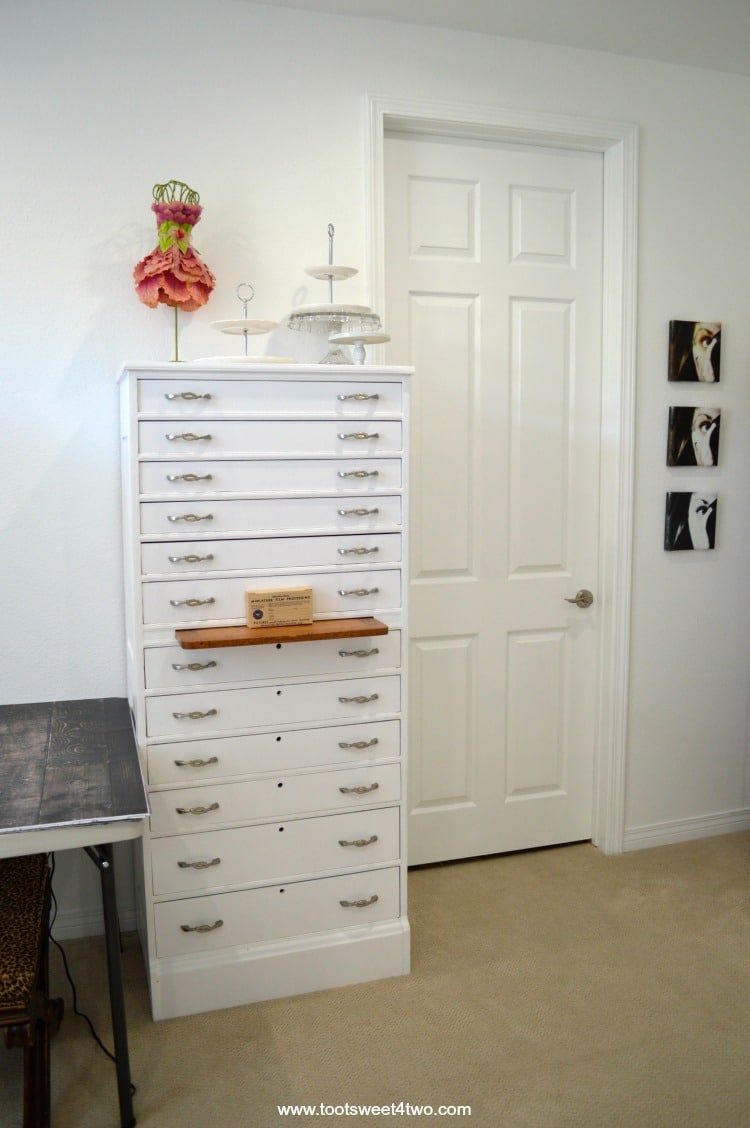
Finally, this summer, I decided to paint it white, bring it into my new food photography home studio and use it to store “props.” And, truth be told, I didn’t actually paint it. I hired my lovely neighbor, Josie, to paint it. You can see the beautiful Josie in this post here: Gail’s Classic Flashback Potato Chip Cookies and this post here: Inspiring Celebration Hacks for a Stay-at-Home Graduation Party. Halfway down this 12-drawer cabinet is a cool pullout shelf that you can use to prop things on.
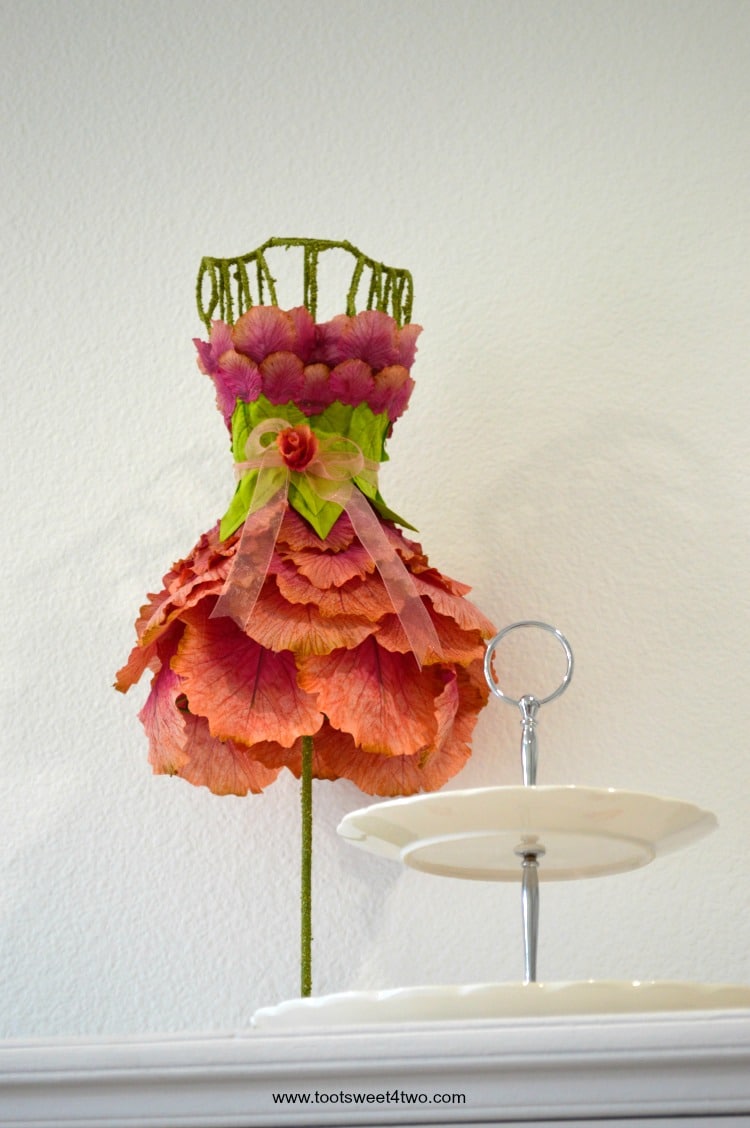
This adorable pink-flowered mannequin used to live in the pink guest room. I got it at Michael’s a couple of years ago. Since I no longer have a pink guest room, I don’t have a place for it as a decoration. So, now it lives here in my food photography home studio because I can’t bear to part with it!
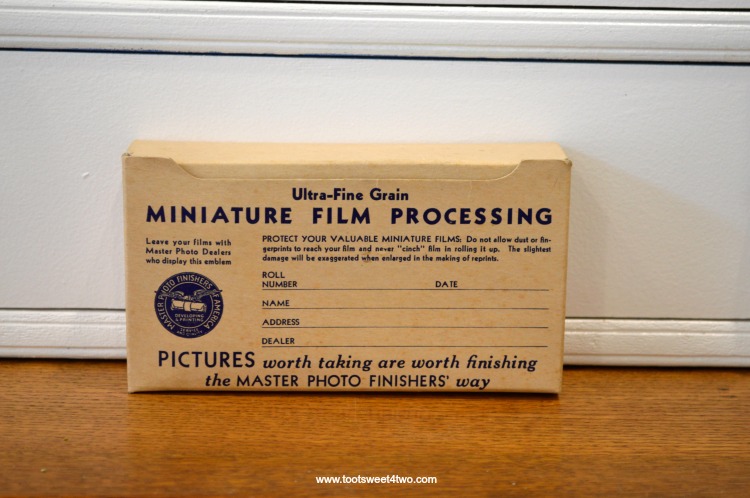
And this is a vintage miniature film processing box that I inherited from an elderly relative that has now passed away. I love the look of this box plus it makes me think of her every time I look at it in my food photography home studio.
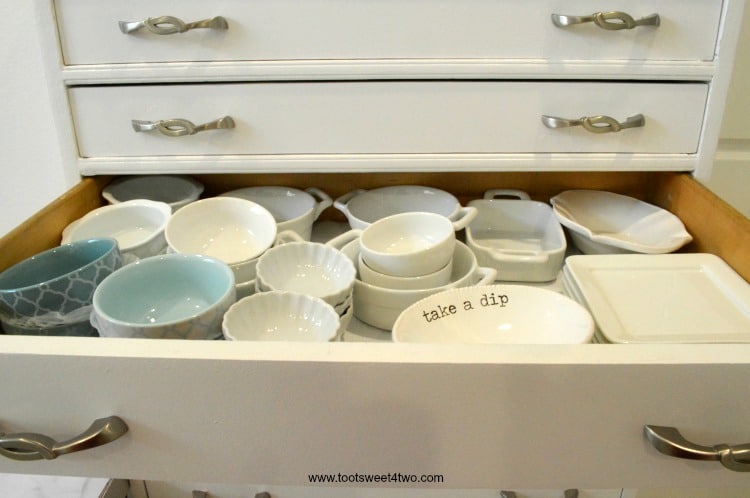
A Peep Inside the Drawers of My Prop Cabinet
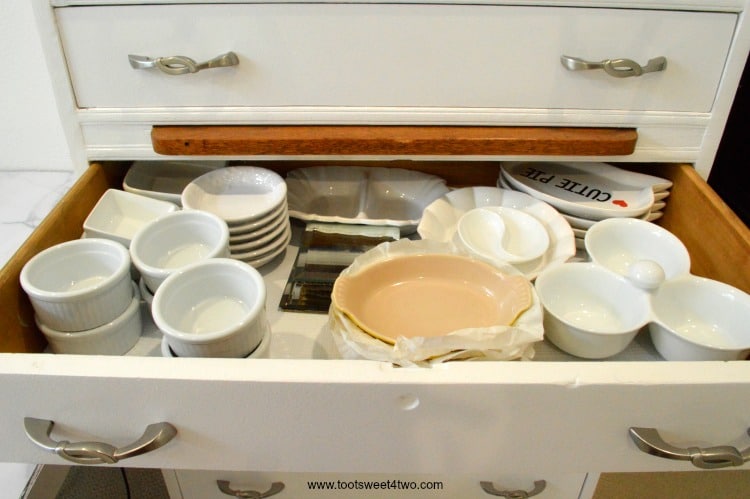
Here’s the inside of one of these drawers. As you can see, it’s crammed full of dishes. Most are tiny and others are single-portion sized. I’ve collected these dishes over the last five years from places like Home Goods, Pier 1, World Market, Target, and my local grocery store.
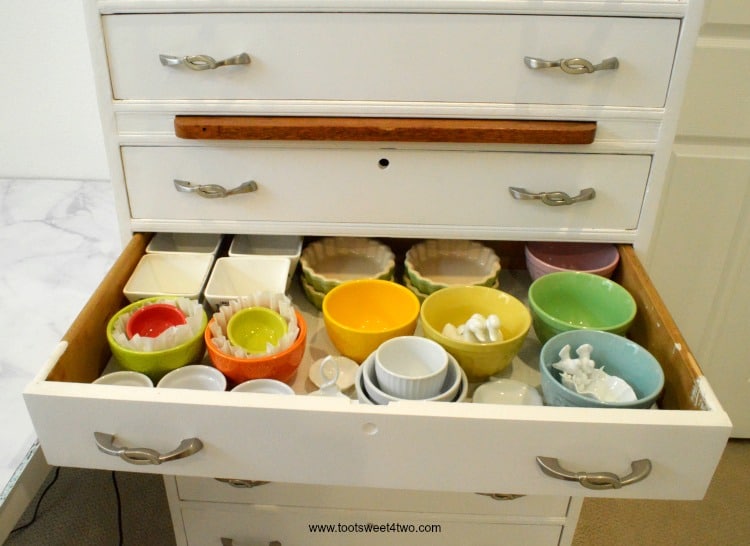
This drawer has dishes in several different colors other than white. White dishes allow blog readers to focus on the food in the bowl or on the plate, but adding a pop of color sometimes is fun. You can also see my cute duck salt and pepper shakers (inside the yellow bowl) and a tiny trinket bowl with adorable birds perched on the edge (inside the blue bowl).
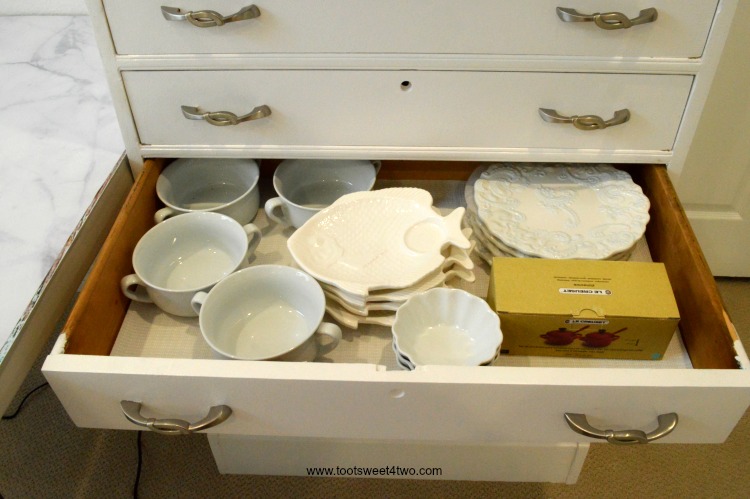
This drawer has a few larger items, like these cute fish-shaped salad plates, beautiful blue and white embossed desserts plates, and 4 individual serving sized soup bowls that are oven-proof.
Here’s the last drawer I’m sharing; I figure four is enough because you get the idea…I’ve collected tons of things to use as food styling props and this repurposed 12-drawer cabinet is perfect for storing them. I’m guessing this cabinet is close to 100 years old, so it can handle the weight of these dishes. Should you choose to store your food styling props in this manner, just be cautious of the amount of weight you are putting in a drawer. Many modern-day dressers are made with flimsy drawer bottoms. I’ve actually had one break from the weight of clothes!
Since we’re talking about food styling props, I’m going to take a moment and jump across the room to the closet and share what’s in there.
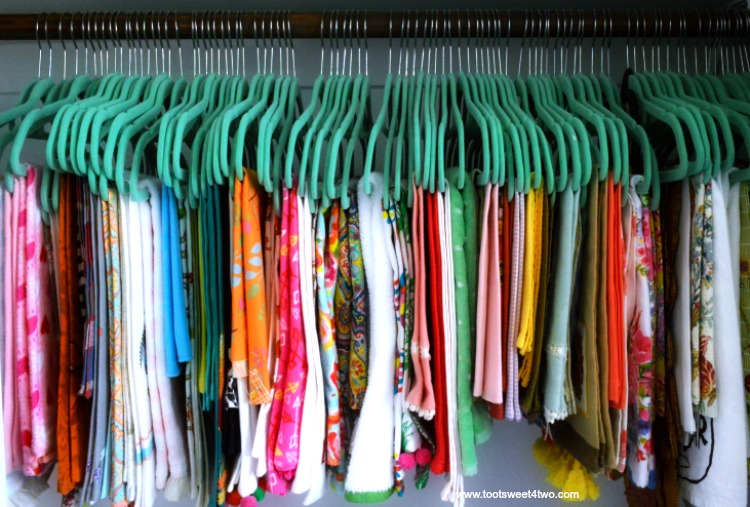
Dish towels! Tons and tons of dish towels! Also, napkins, but not a set of napkins, but rather one napkin from the set (the sets of napkins are stored elsewhere in my house) and a few remnants of fabric. They almost fill this closet (this is one-half of the closet). I’ve hung them on green flocked hangers. But, I must share a cautionary tale with you about these metal flocked hangers.
When we first moved into our new home 10 years ago, I had to buy, mostly, everything new because while the firefighters did save a few things, the things they did save were big-ticket things like the 12-drawer cabinet. So, since I had to buy new hangers, I choose these pretty metal flocked hangers and color-coded them to the rooms in the house. For example, the pink girl’s guest room had pink hangers.
Anyway, our master bedroom closet is quite large, and even though I didn’t have enough clothes to fill this wonderful new closet, the clothes I did have I hung on these hangers. In the middle of the night, a few weeks after we first moved home, there was a loud crash emanating from the closet. I jumped out of bed to see what was going on and found everything on the closet floor! The weight of these hangers, plus clothes, over a long expanse of the unsupported closet rod, caused the rod supports to rip out of the wall! We later realized that the rod supports were not nailed/screwed/bolted into studs. What a mess! I went back to bed and dealt with it in the morning!
So, make sure your closet rod can handle the weight! Now, these are kitchen towels and napkins, so they don’t weigh as much as clothing, so I think I’m safe.
My Gallery Walls in my Food Photography Home Studio
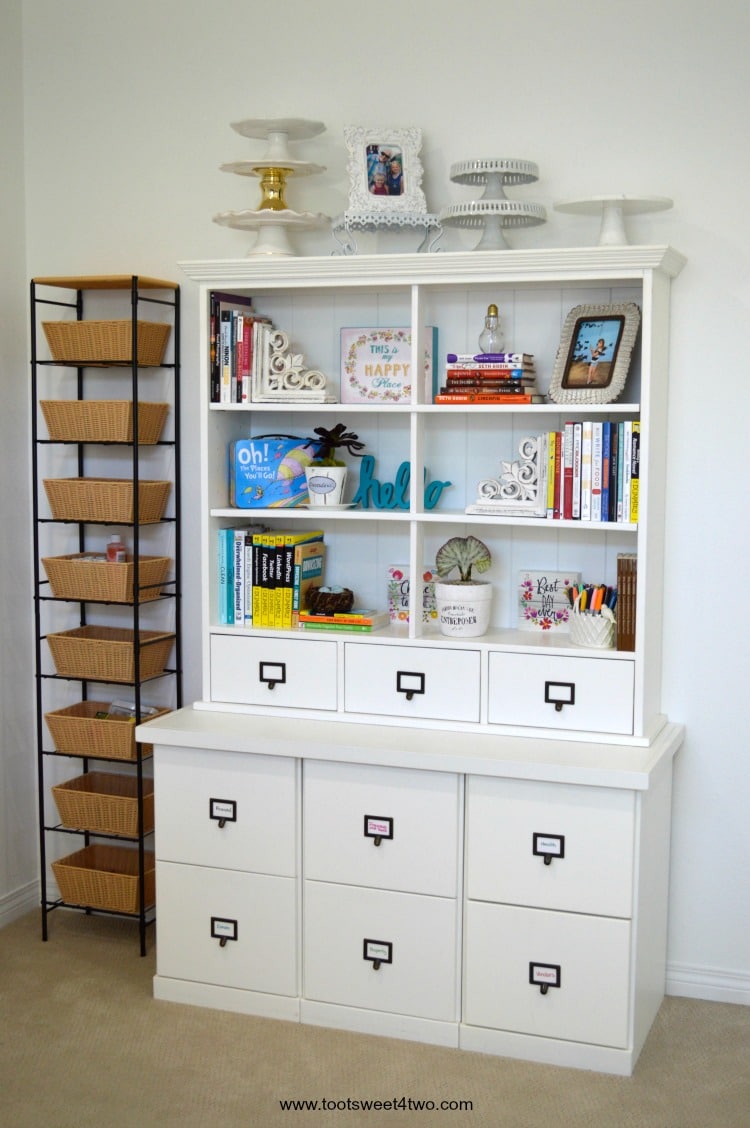
This is the last of the wall space in my food photography home studio. I chose to put a bookshelf/filing cabinet combination that I bought from Ballard Designs years ago on this wall alongside an 8-shelf basket storage unit. Here’s a photo:
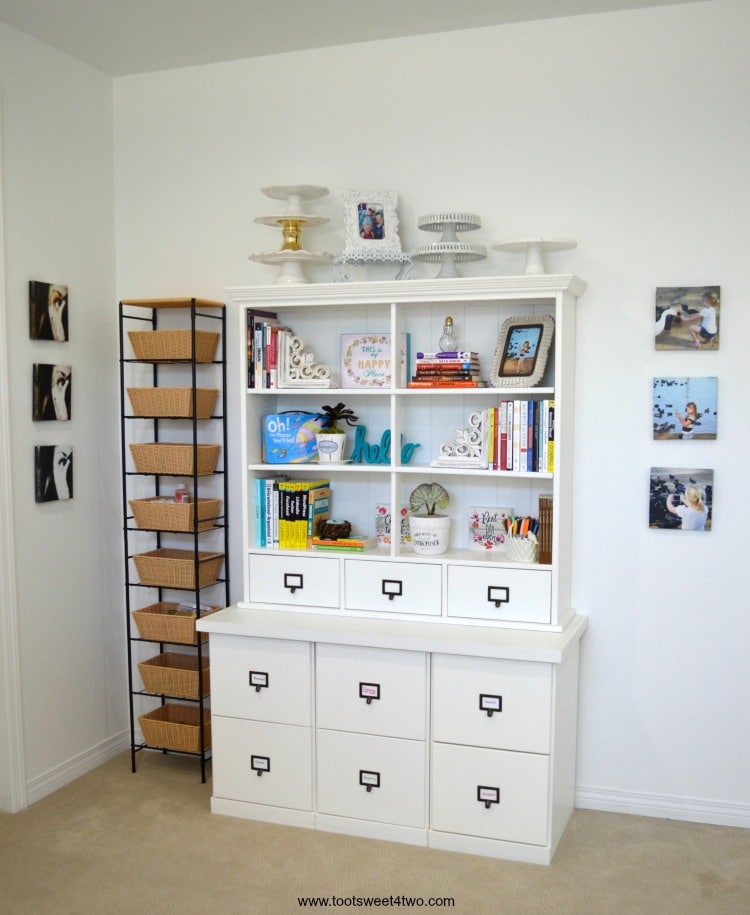
And, I decided to decorate this space with canvas prints made from photos that I’ve taken. And since this is my food photography home studio, I thought these canvas prints should be photography related. All of these were made (designed) on the Canvas on the Cheap website. Didn’t they turn out great? The process of creating and ordering these printed canvases on Canvas on the Cheap is so easy. You can easily turn a blank wall into a wall full of memories!
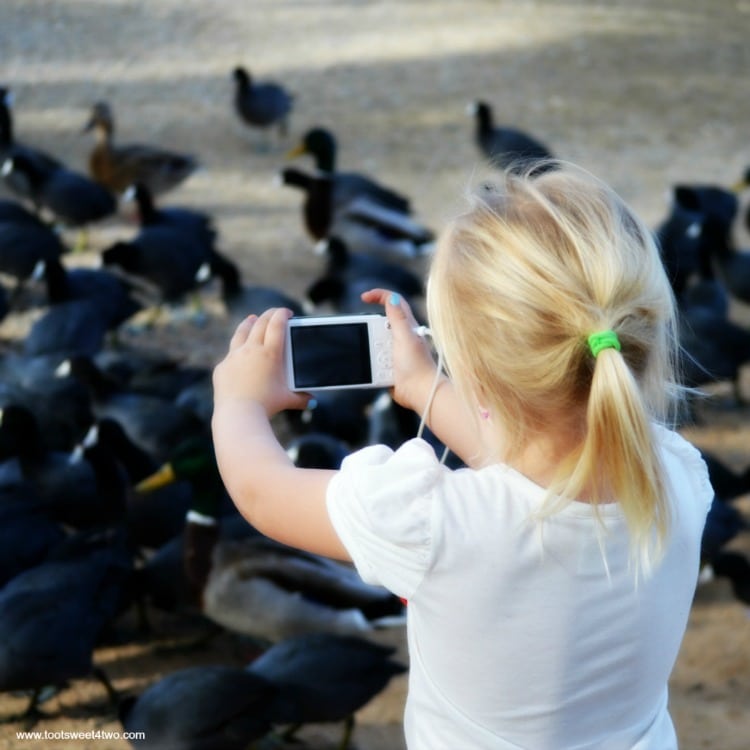
The print canvases on the left side are photos of me taking a picture of myself in a mirror. The canvases on the right are of Princess P and Princess Sweetie Pie (my great-nieces) helping me with a photo-shoot at a local lake that has lots of ducks, geese, and American Coots. Here are some close-ups so you can see the quality of the end product from Canvas on the Cheap:
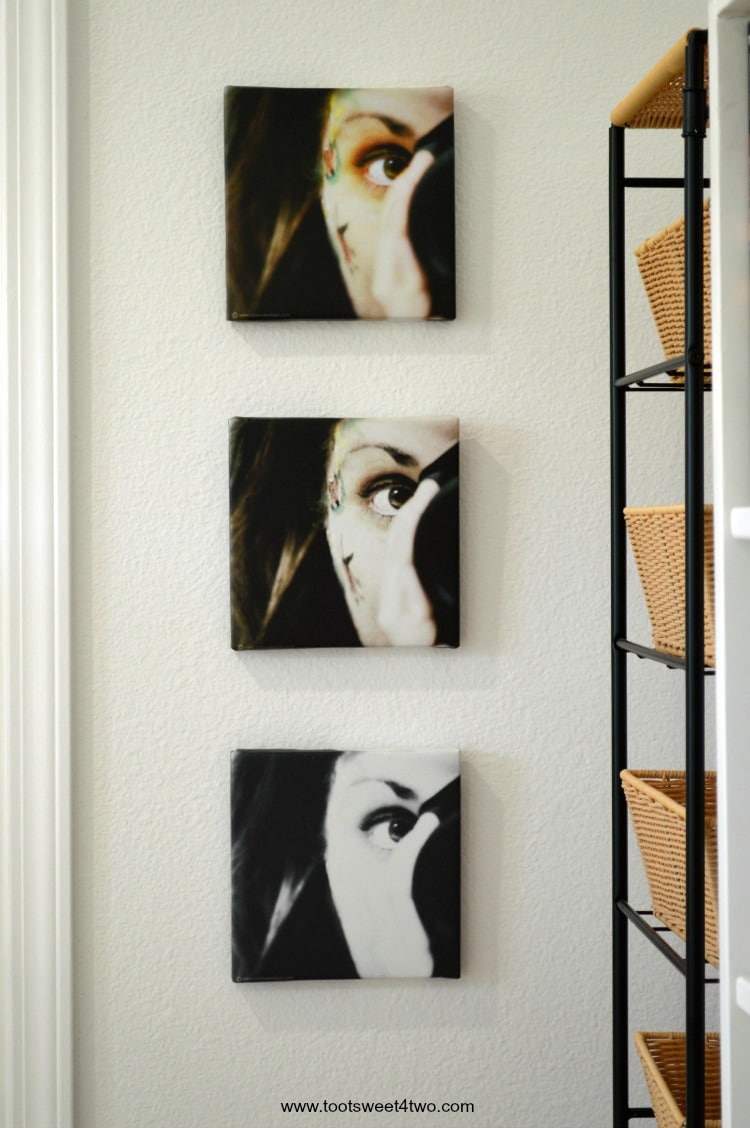
Me and Canvas on the Cheap…I took the photo of myself and edited it three ways in PicMonkey – the top one is called “Fancy Focus,” the middle one is called “Gritty” and the bottom one is called “Silverscreen.”
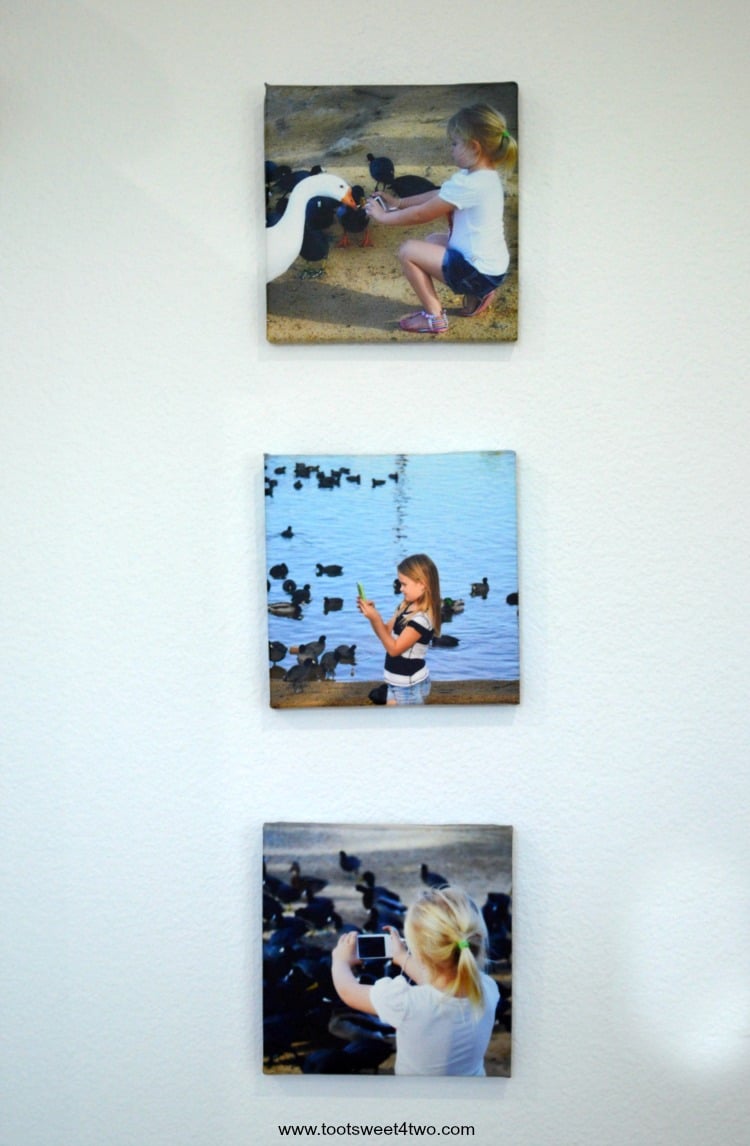
And, the Princesses with the Coots created by Canvas on the Cheap!
Here are the actual photos that I created and then uploaded to the Canvas on the Cheap site:
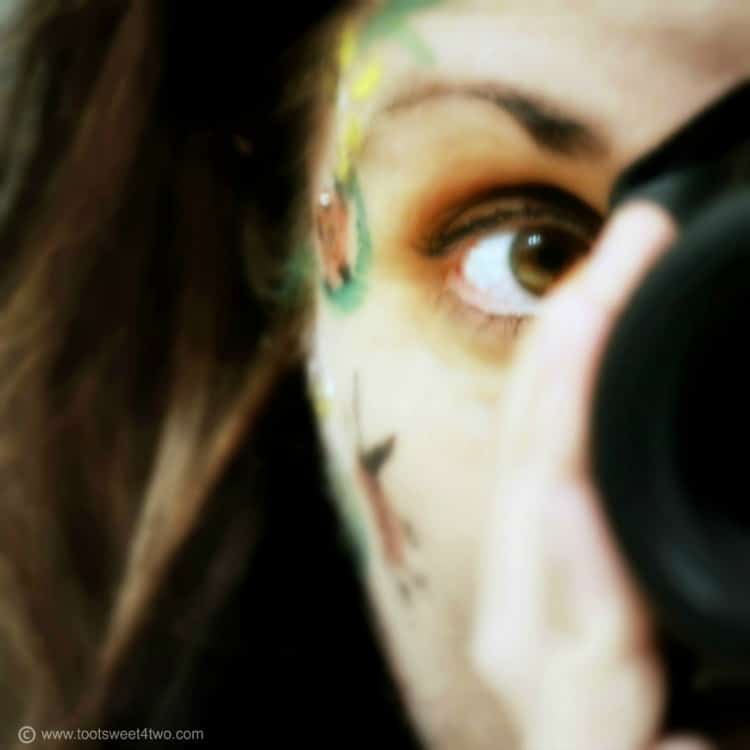
I edit my photos in PicMonkey. This effect is called “Fancy Focus.” No, I don’t have some horrible skin rash on my face – those are ladybugs from a visit to Bates Nut Farm and a face painting booth.
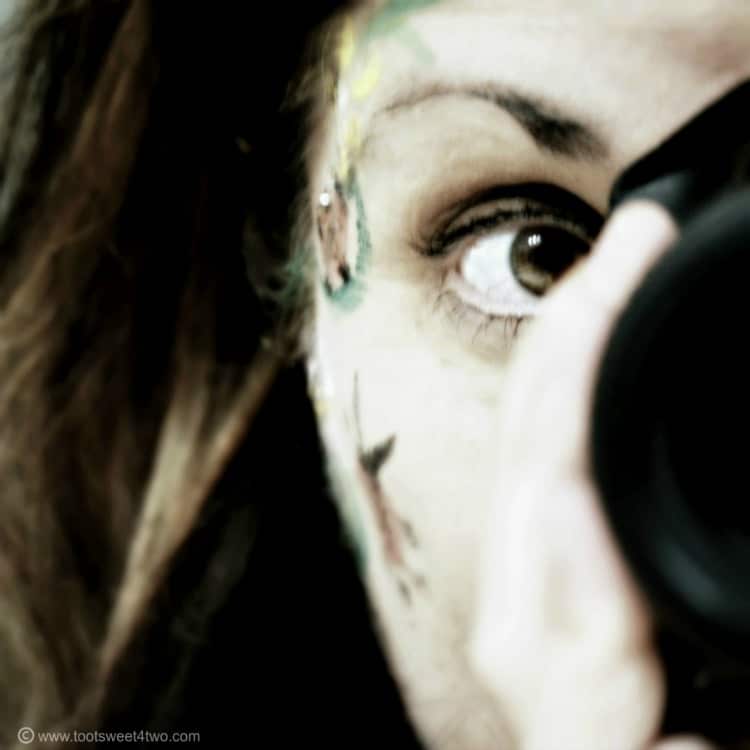
This editing effect on PicMonkey is called “Gritty.”
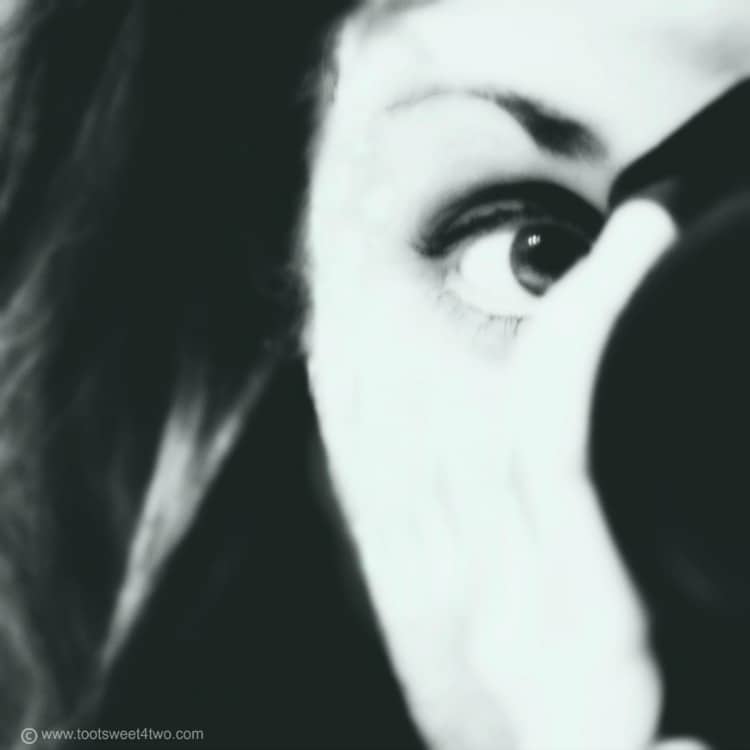
This editing effect on PicMonkey is called “Silverscreen.”
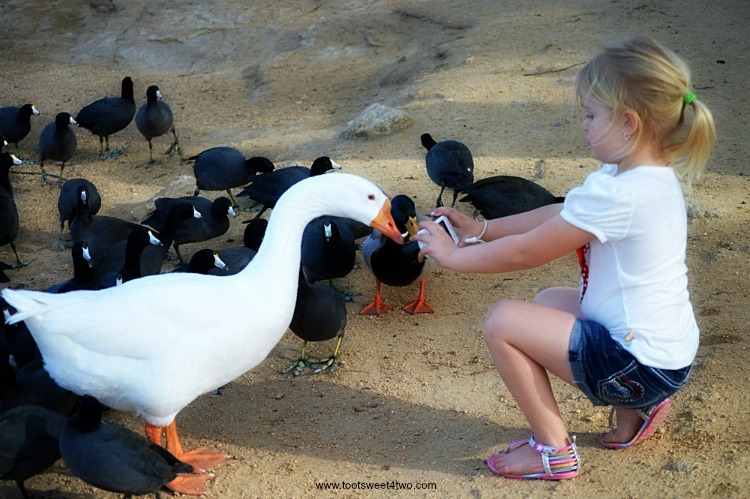
This is the original photo of Princess Sweetie Pie photographing the goose (I think she’s aiming for the goose’s webbed feet).
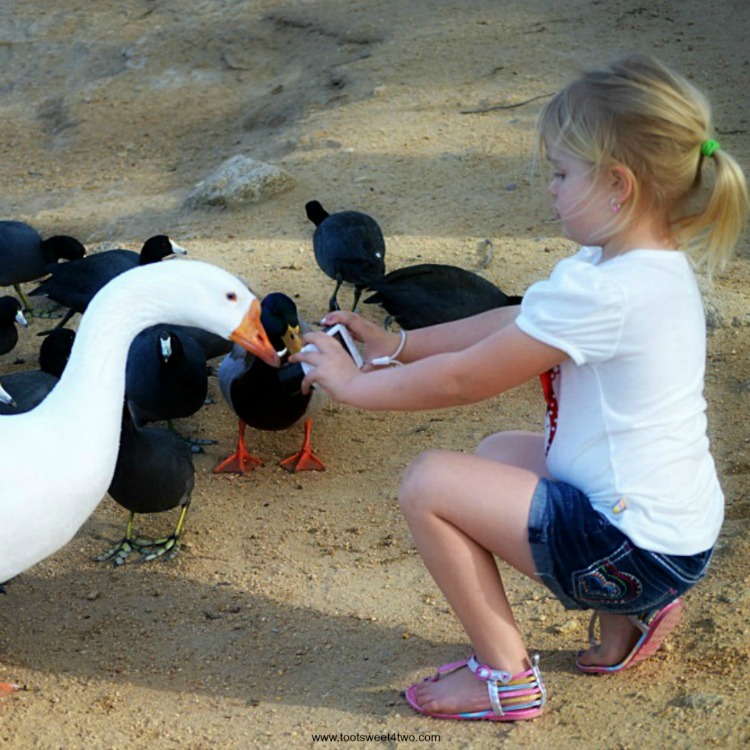
This is the same photo cropped square since I decided to go with square photos for my photo gallery.
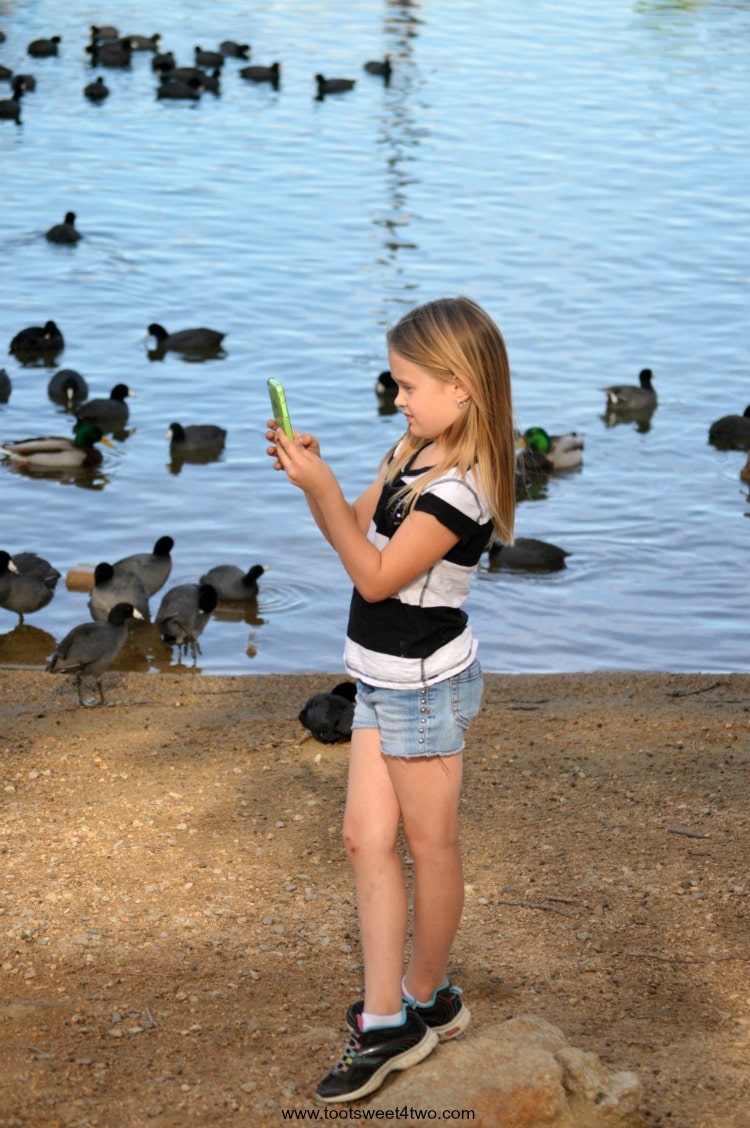
This is the original photo of Princess P aiming her camera at the waterfowl on the sand.
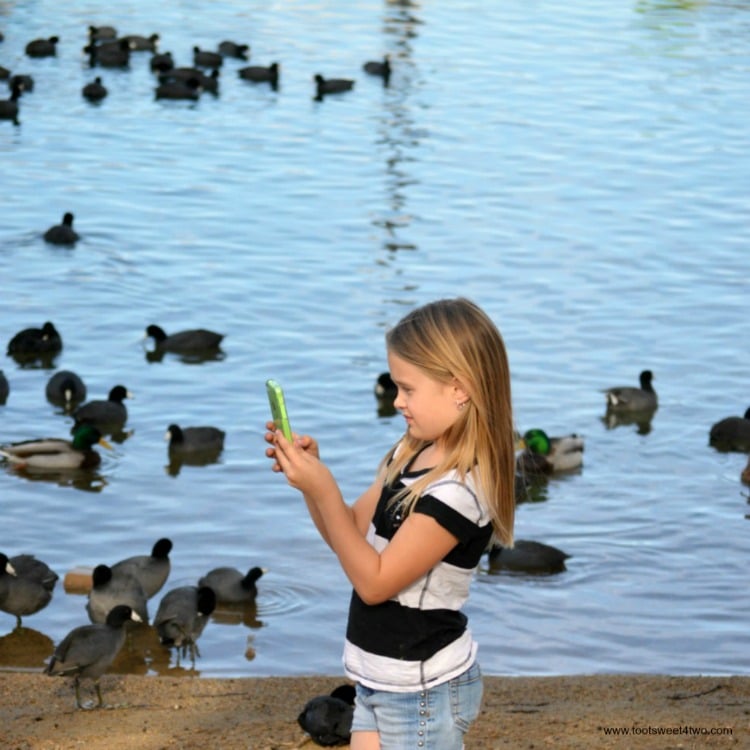
This is the photo cropped square for my gallery wall.
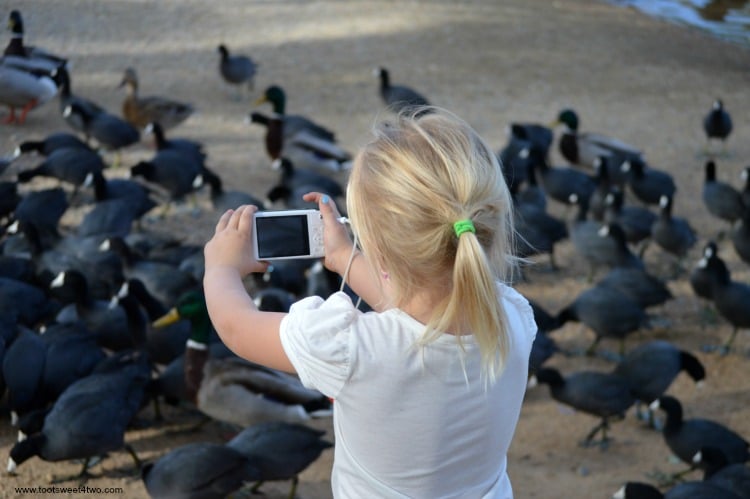
This is the original photo of Princess Sweetie Pie photographing the American Coots. They are such interesting waterfowl with solid black feathers, red eyes, a white beak, and green feet that aren’t webbed.
This is the same photo cropped square for my gallery wall that I created using Canvas on the Cheap. Didn’t they turn out great?

This is a sunflower photo that I also reproduced as a square on Canvas on the Cheap. It, along with the next two, hangs in the bathroom. I took this beautiful photo at Summer’s Past Farm several years ago. The purple in the background is a giant Jacaranda tree.
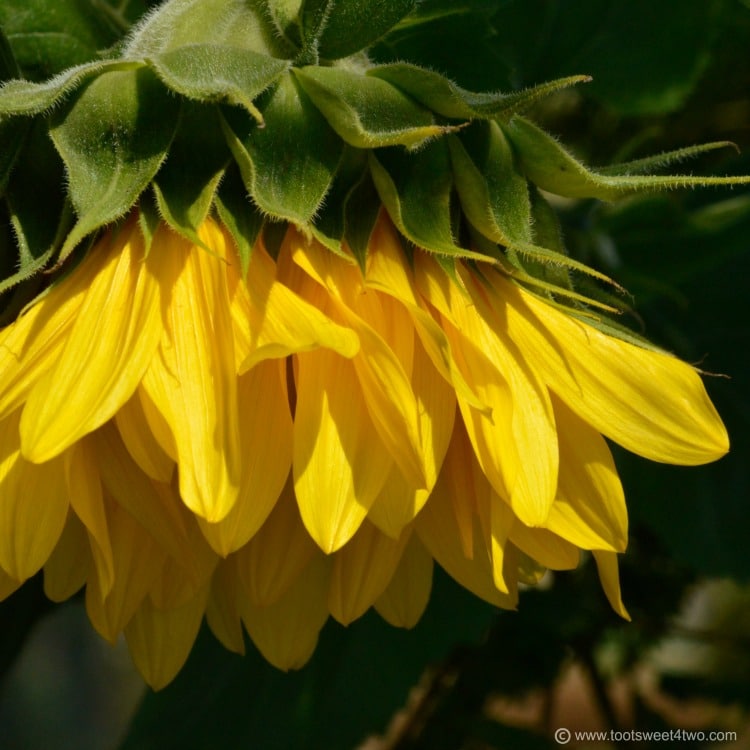
This is a very large sunflower drooping over from the heat. It popped up last summer in our front yard. My husband feeds the birds that live in our yard and the birdseed mixture he uses has sunflower seeds in it, so we’ve had sunflowers pop up three years in a row now.
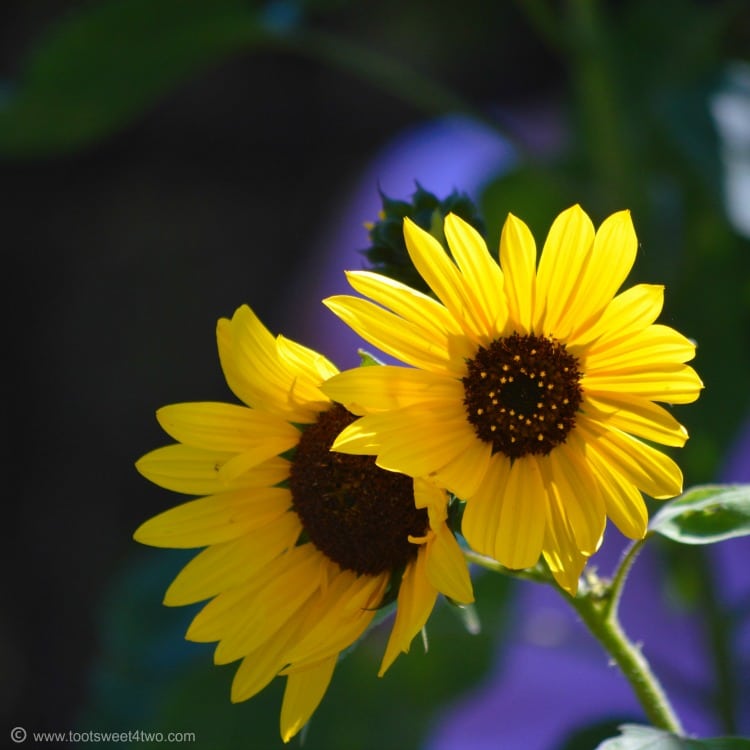
This sunflower, too, is one of the ones that popped up last summer…a gift from the garden fairies.
Books on the Bookshelf in my Food Photography Home Studio
In case you are wondering what books I decided to display in my food photography home studio, here they are:
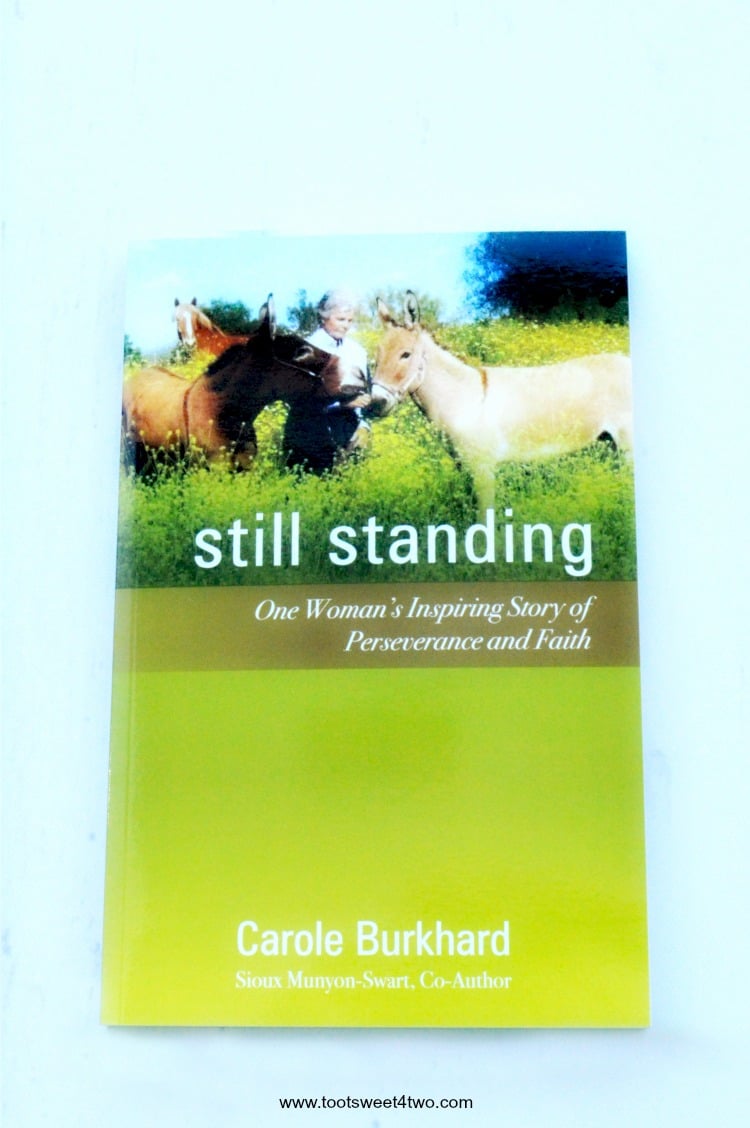
My book! Yes, I’ve written a book! I’m the worst marketing person in the world about sharing that I’ve written a book. It’s been released for about nine months now, but when it was finally released (after two years of writing, editing, and production), my mother had just died, so I was not in the right frame of mind to toot my horn. Anyway, it’s the story of my friend’s near-fatal horse wagon accident and her recovery. The photo above is a soft-cover version, but currently, it is only available as a Kindle book. You can buy it on Amazon here: Still Standing.
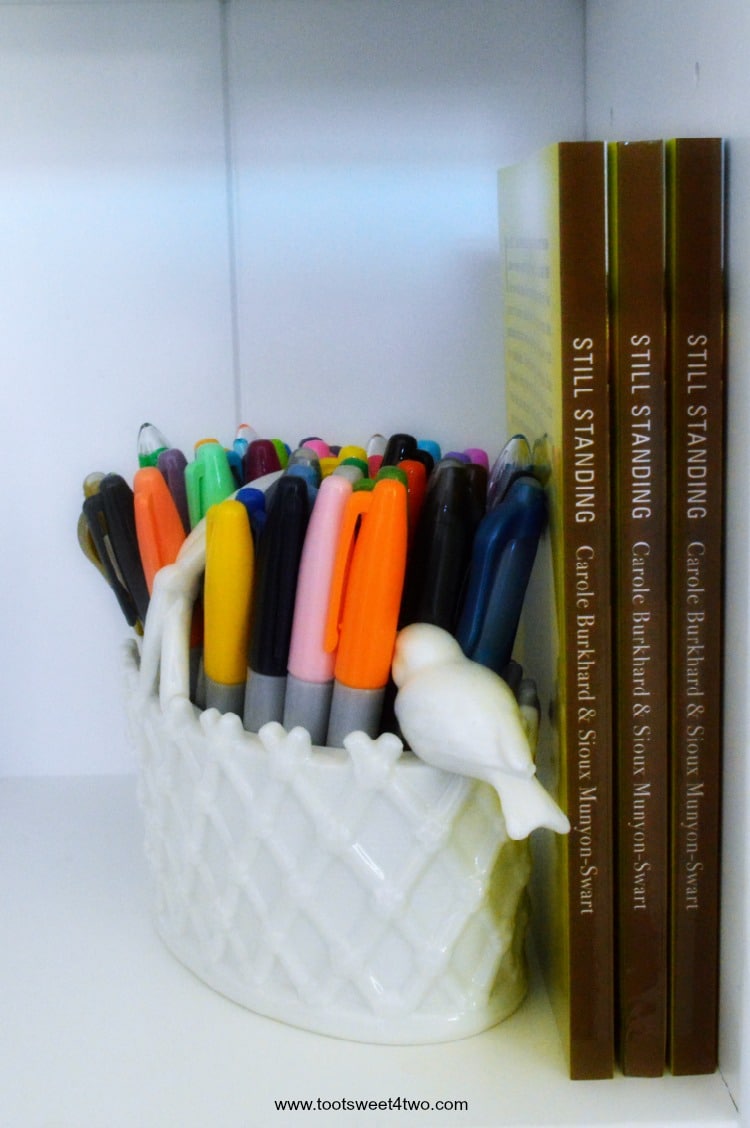
Here’s a really cute white ceramic basket with birds that I’ve filled with colored markers and the only three soft-cover copies of my book that I have in this world!
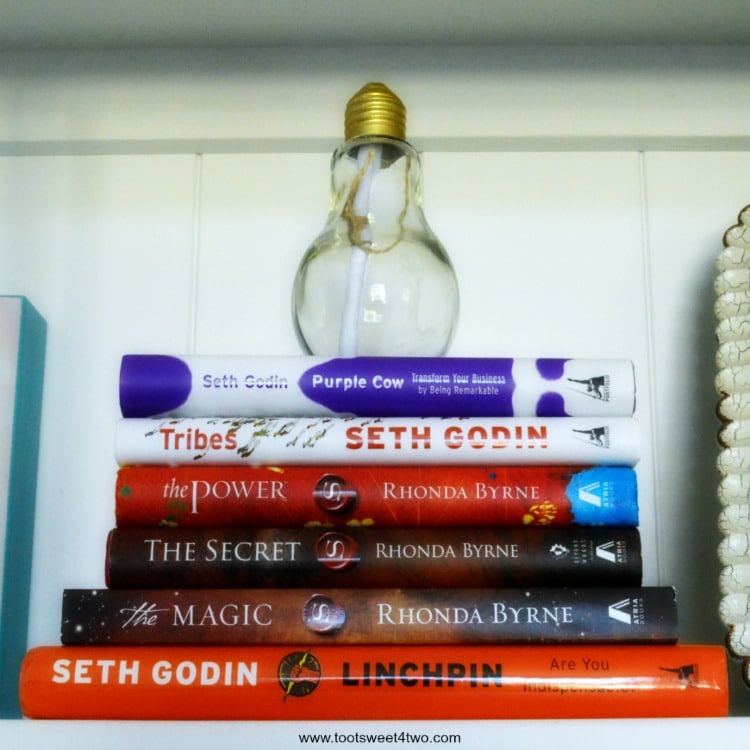
The light bulb with the rolled-up paper inside, with my big, bright idea written on it, I got at Michaels. It has a place of honor on top of a stack of motivational books and marketing books (I have a lot to learn), all available on Amazon:
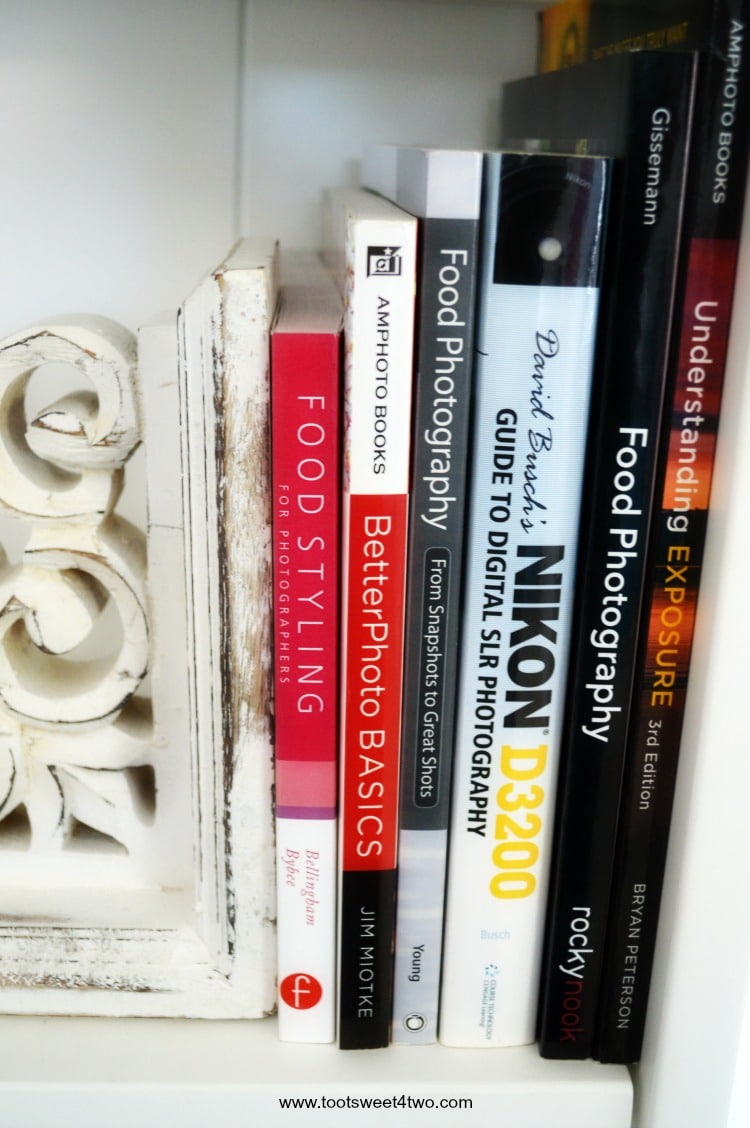
Of course, I have photography books on my bookshelf! I have even more to learn about photography than I do about marketing! My brother-in-law is a professional photographer and I asked him how long it was before he felt he knew everything about photography and he said he’s still learning and he’s been at it for 30 years! Here are links to the photography books on my bookshelf:
Food Styling for Photographers by Linda Bellingham Jean Ann Bybee
Better Photo Basics by Jim Miotke
Food Photography: From Snapshots to Great Shots by Nicole S. Young
Nikon D3200 Guide to Digital SLR Photography by David D. Busch
Food Photography: A Beginner’s Guide to Creating Appetizing Images by Corinna Gissemann
Understanding Exposure: How to Shoot Great Photographs with Any Camera by Bryan Peterson
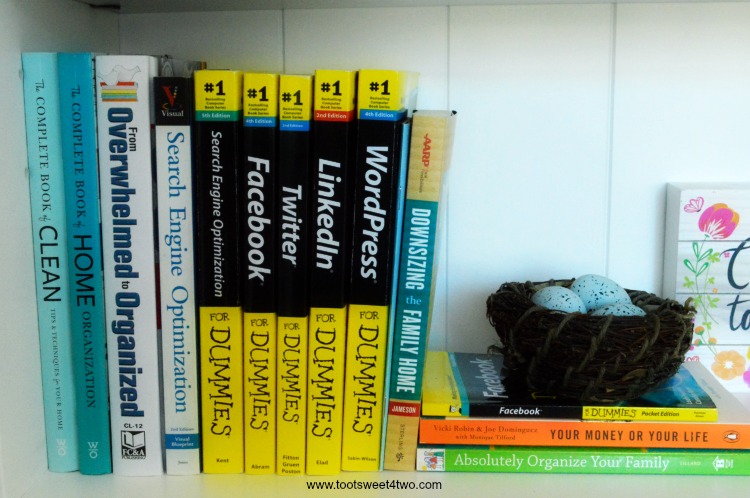
Then there are my home organization books, SEO books, Social Media books, and a WordPress book:
The Complete Book of Clean by Toni Hammersley
The Complete Book of Home Organization by Toni Hammersley
From Overwhelmed to Organized by FC&A
Search Engine Optimization for Dummies by Peter Kent
Facebook for Dummies by Carolyn Abram
Twitter for Dummies by Laura Fitton, Michael E. Gruen, and Leslie Poston
LinkedIn for Dummies by Joel Elad
WordPress for Dummies by Lisa Sabin-Wilson
Downsizing the Family Home by Marni Jameson and Mark Brunetz
Facebook for Dummies Pocket Edition by Carolyn Abram and Leah Pearlman
Your Money or Your Life by Vicki Robin and Joe Dominguez
Absolutely Organize Your Family by Debbie Lillard
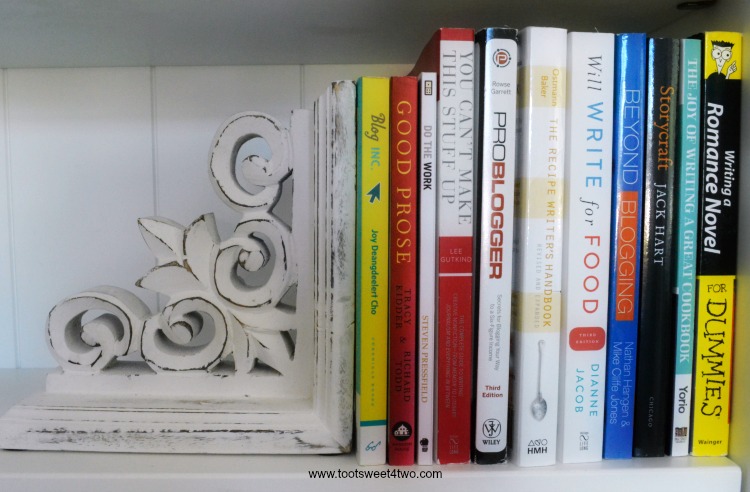
And, my writing books and blogging books:
Blog, Inc. by Joy Deangdeelert Cho
Good Prose: The Art of Nonfiction by Tracy Ridder and Richard Todd
Do the Work: Overcome Resistance and Get Out of Your Own Way by Steven Pressfield
You Can’t Make This Stuff Up by Lee Gutkind
ProBlogger: Secrets for Blogging Your Way to a Six-Figure Income by Darren Rowse and Chris Garrett
The Recipe Writer’s Handbook by Barbara Gibbs Ostmann and Jane L. Baker
Will Write for Food by Dianne Jacob
Beyond Blogging by Nathan Hangen and Mike Cliffe-Jones
The Joy of Writing a Great Cookbook by Kim Yorio
Writing a Romance Novel for Dummies by Leslie Wainger
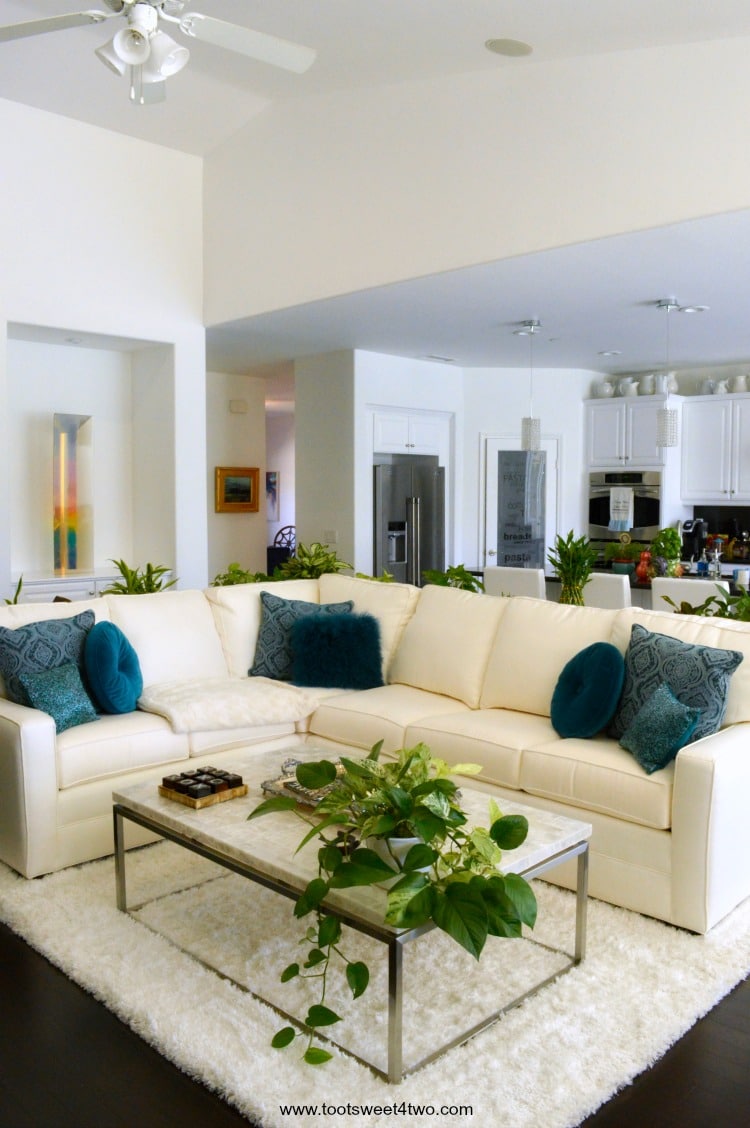
Food Photography Tip #5 – Use Furniture for Surfaces for Food Photography
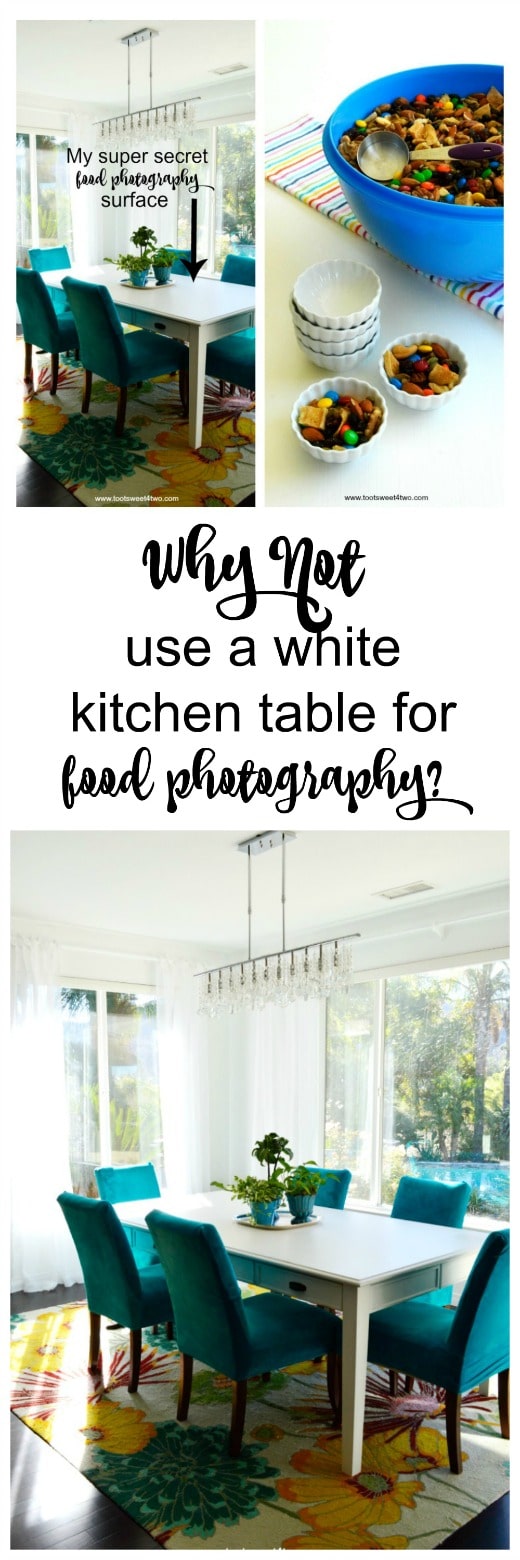
So, if converting an extra room in your house just isn’t something that you are going to be able to do, I have one more tip for you as respects surfaces for creating beautiful food photography: use tables you already have in your home. But, if you don’t have tables that are food photography-worthy, when you are ready to update or replace tables throughout your home, you might want to do what I did: I bought a new white-painted kitchen table (kick that shiny wooden kitchen table to the curb!) and a new coffee table for my great room and a new coffee table for my sitting room, all of which work for food photography backgrounds.
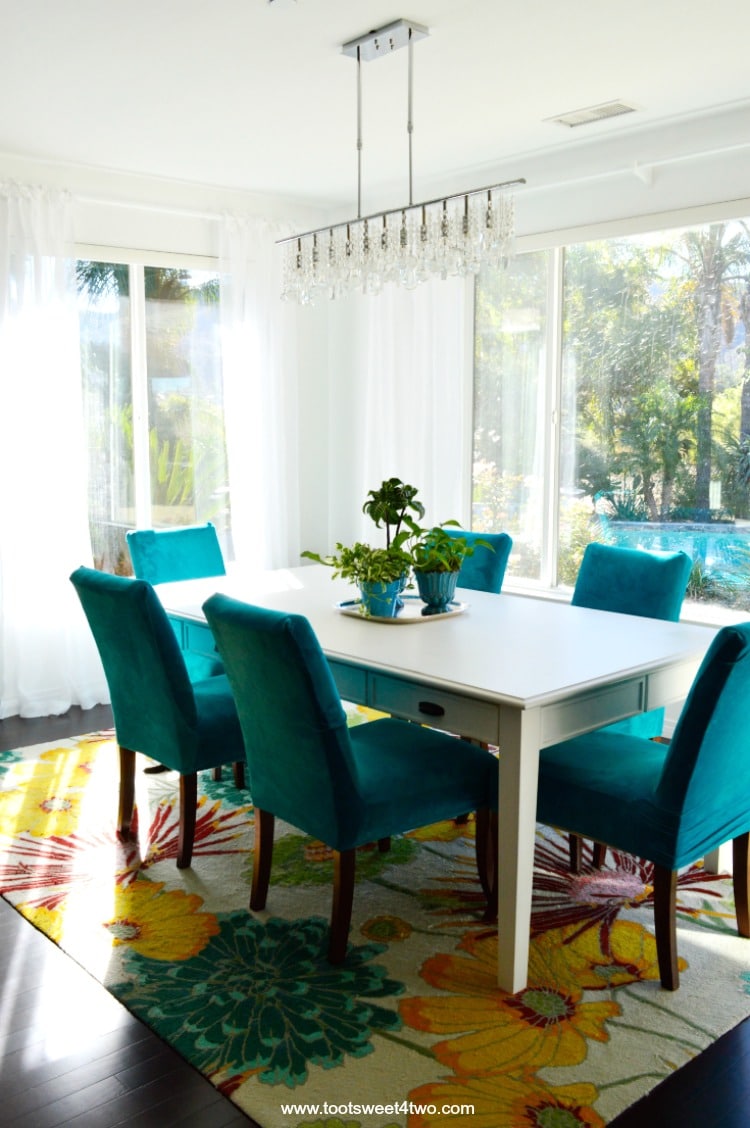
Here’s my new white painted wood kitchen table! This one is by Joanna Gaines and is called her Farmhouse Keeping Dining Table in Jo’s White. I bought it at a local furniture store, and I love it because it has drawers – four on each side for a total of eight! I keep napkins, placemats, silverware, trivets, tea light candles, and such in the drawers. Unfortunately, you have to buy this table from a retail store and not an online store, but if you are looking for inspiration, visit Houzz.
The Parsons-type chairs are ones I already had. They were covered in a velvety-soft sand-colored fabric. I bought these teal blue chair covers on Amazon to refresh them; a really inexpensive way to change up your chairs if you have this style. I bought the area rug from Grandinroad – it’s called Brighton and comes in four different colors.
I bought the sheer linen tie top panel drapes from Ballard Designs and the beautiful chandelier we already had hanging in the space. Anyway, here’s a food photo taken on this new table not yet posted on my blog:
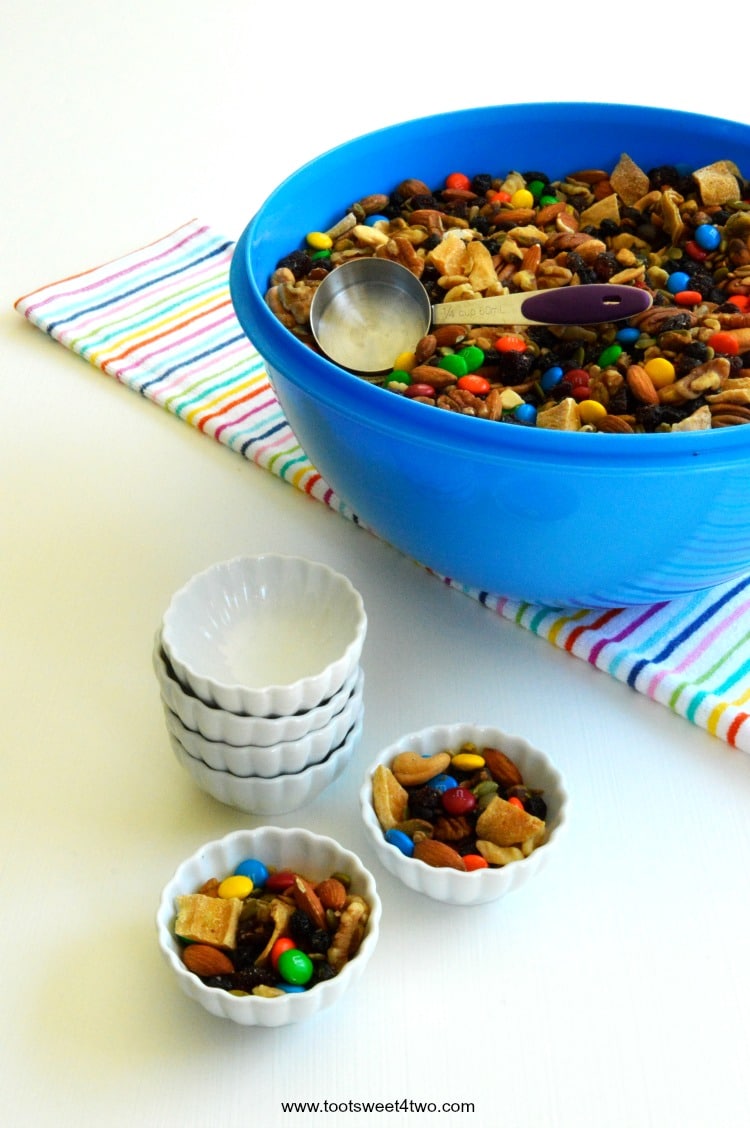
This is a big batch of trail mix I made in a very large Tupperware Thatsa Bowl. Recipe coming soon! Did you know you could buy Tupperware on Amazon? Yes; isn’t that cool?
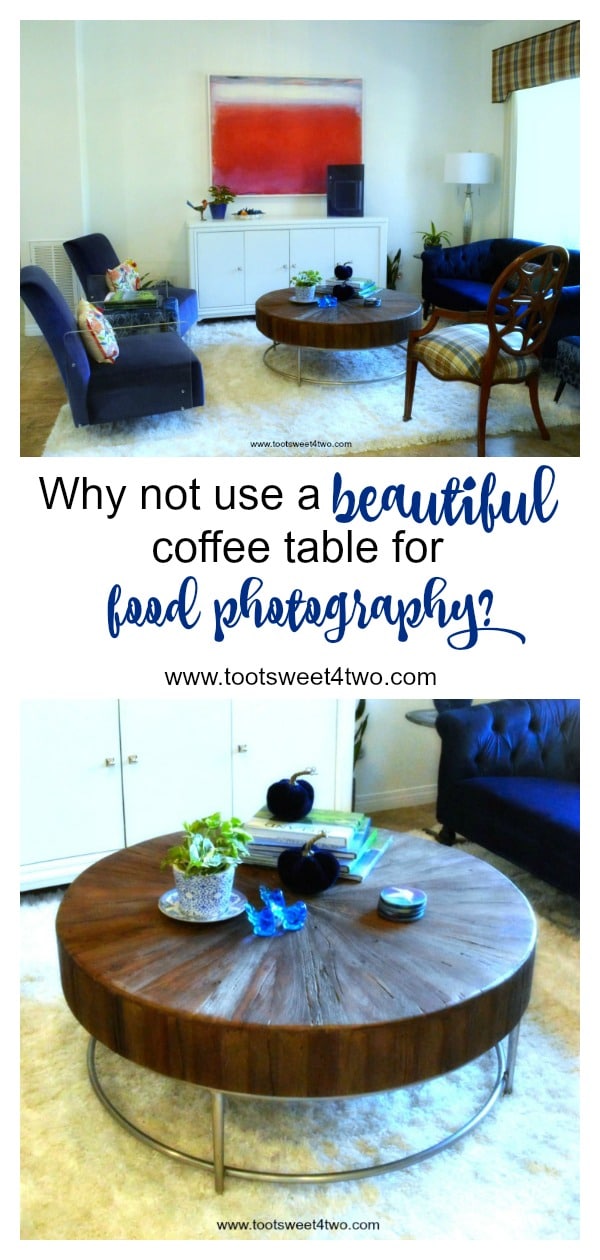
Here’s a new coffee table I bought for my newly decorated sitting room:
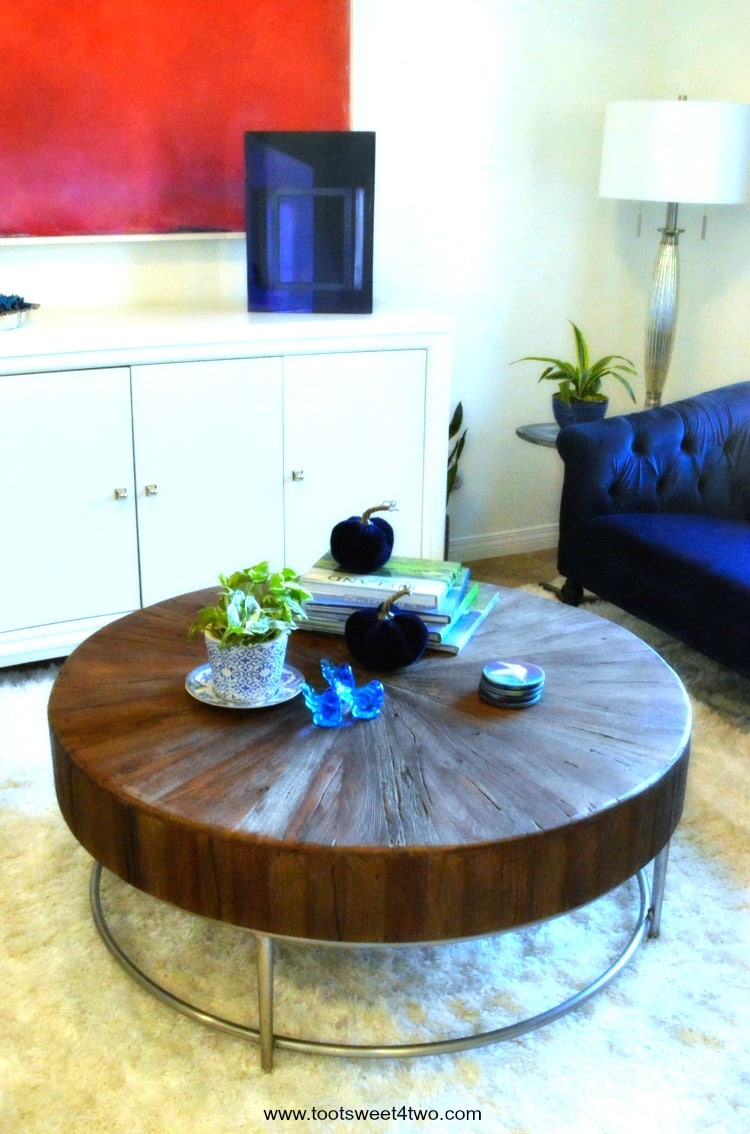
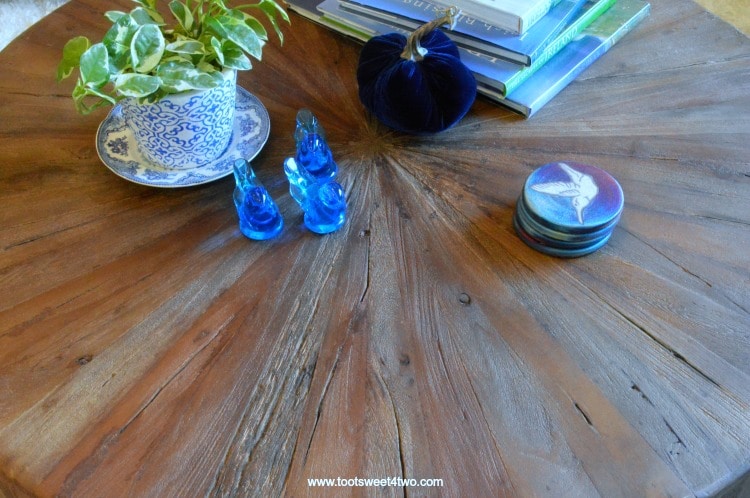
Isn’t it something? It’s made by Hooker Furniture and is called their L’Usine Cocktail Table. I bought mine on Houzz. I haven’t yet photographed a recipe on it, but can’t you see the possibilities? It’s 46″ round, so it’s plenty big enough for food photography. Here’s a close-up of the beautiful wood:
It’s just a very special piece of beautifully made furniture and fits my space perfectly. Here’s a photo of (most of) the room:
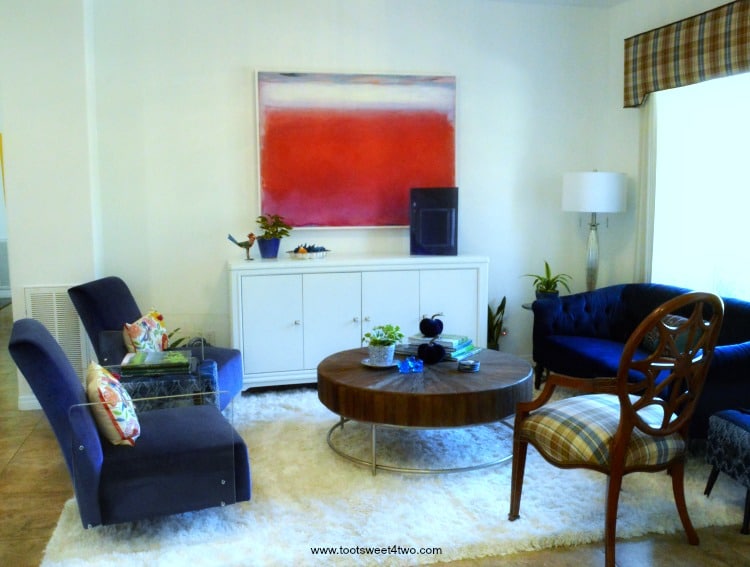
I call this our sitting room because it doesn’t have a television in it, so it’s just a space to recharge without interference. That’s one of my dad’s paintings called Homage to Rothko and it’s available on Great Big Canvas. And one of his acrylic sculptures, the dark blue cube on the right, has a place of honor on the white cabinet (more about the cabinet below). Other than the coffee table, here’s a rundown on the rest of the furniture in this room from left to right:
The two Parsons-type chairs were a find at a local resale shop. I love their acrylic arms – so mid-century modern! While this exact version isn’t something I can refer you to, you can find similar ones on Houzz.
The white cabinet is actually a dining room buffet cabinet. This one is by Thomasville and is called their Manuscript Buffet. I bought it at a local furniture store.
The white shag rug is available on Houzz.
The spiderweb back chair I bought at Ethan Allen years ago and I don’t think it’s available anymore, although you can find similar ones on both Houzz, Wayfair, and Amazon also known as Hepplewhite chairs.
The blue velvet Chesterfield sofa I bought from Wisteria, but you can find other beautiful and similar ones available on Amazon, Houzz, and Wayfair. The lamp in the corner came from Home Goods.
The end tables peeking out between the Parsons-type chairs and at the end of the Chesterfield sofa are actually denim storage ottomans from The Country Door. So cute and they have great storage space inside (I’ve stuffed mine full of photographs that need to be sorted and made into scrapbooks).
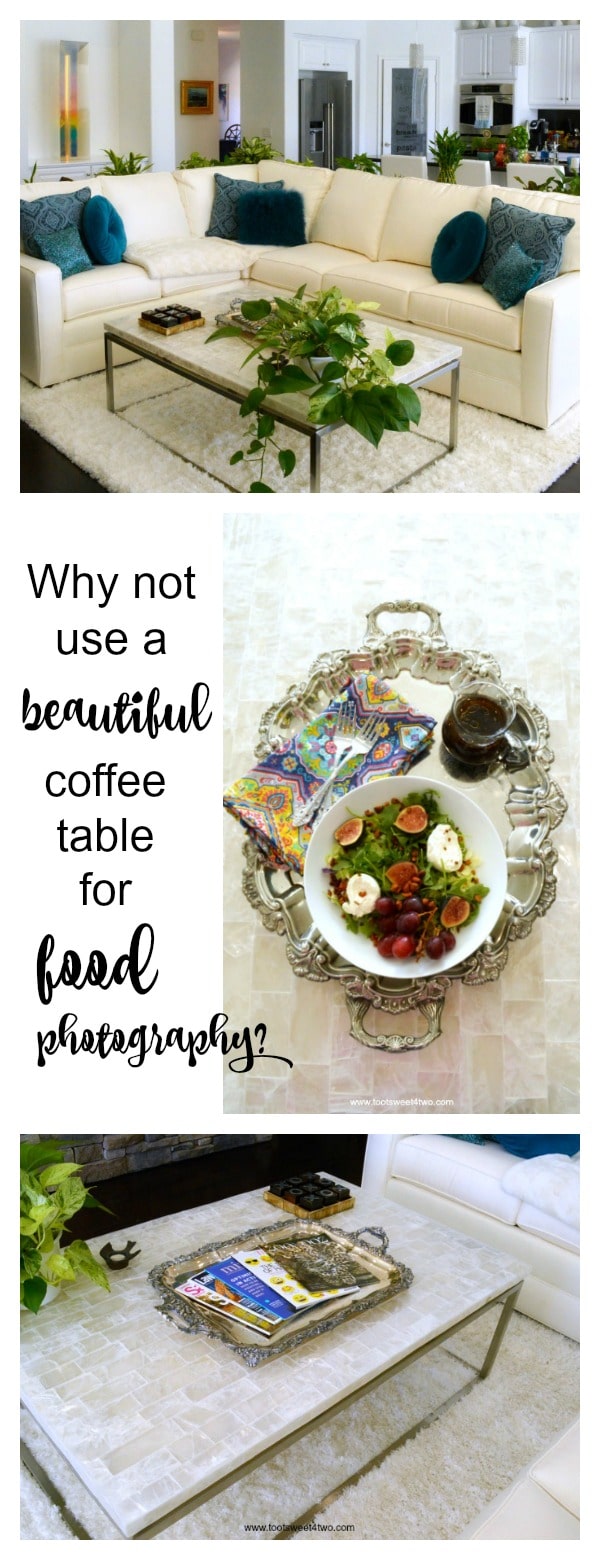
Another great coffee table I bought recently is this one:
It is so stunningly gorgeous! It’s made by Lexington and is called their Marisol Cocktail Table and it is available on Houzz. It has a translucent stone top with crystals measuring 52″ by 34″ and is perfect for food photography. Here it is in action:
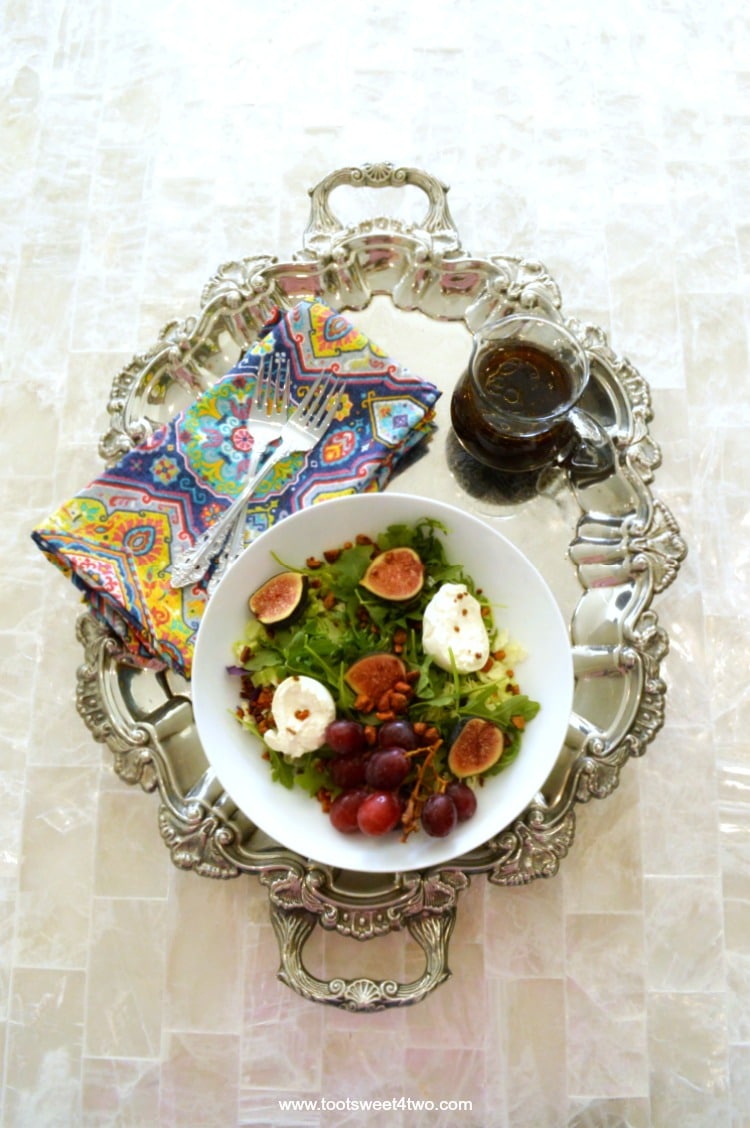
This is a salad not yet on the blog, but I had to share it anyway! Here is this gorgeous cocktail table in our Great Room:
If you’d like to save some of these photos to Pinterest, I’ve created several pinnable collages for you so that you have choices:

So, there you have it: 5 Tips for creating a food photography home studio – some cheap and some not-so-cheap, but practical! I hope I’ve given you lots of ideas and inspired you to take your food photography to the next level!
One last thing before you go…
Check out my super cute doodle video about my food photography home studio! It was so much fun creating this video and it literally took just a few minutes. This video was created on a desktop application called Doodly. It runs on both a PC or a MAC and is loaded with tons of cute images that you click and drag to either a whiteboard (like mine above), blackboard, greenboard or glassboard. If you want to create your own images, you can with their Doodly Smart Draw technology. There’s a selection of male and female hands to choose from (no, that’s not my hand actually drawing this video), and you can choose from their library of background music. You can even create custom voiceovers for your video. Anyway, the abilities are endless and I just had to have it for this blog! So, expect to see more cute doodle videos in the future.
P.S. Get my FREE eCookbook, 5 Easy Toot Sweet Weeknight Dinners, by subscribing to my email – check out the sign-up box at the end of this post!
Tootles,
Other Posts from Toot Sweet 4 Two’s Archives:
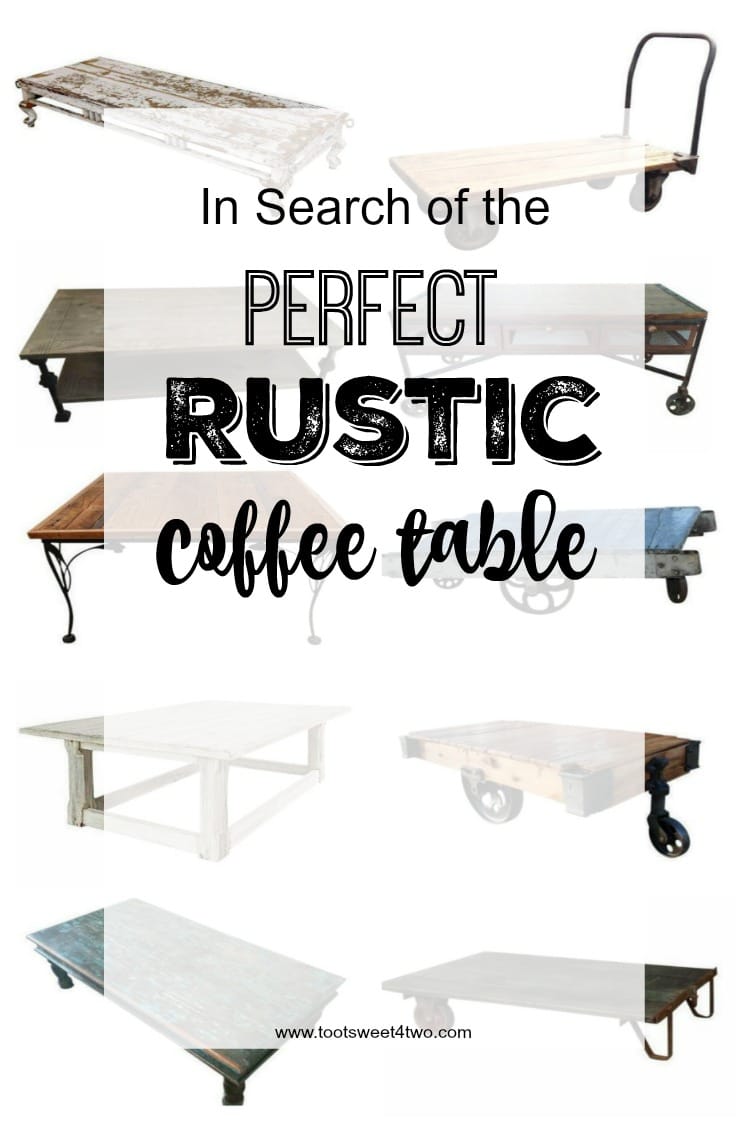
In Search of the Perfect Rustic Coffee Table

3 Cheap and Easy Ideas for Better Food Photography (an oldie, but you can see the shiny wooden kitchen table and Coco!)
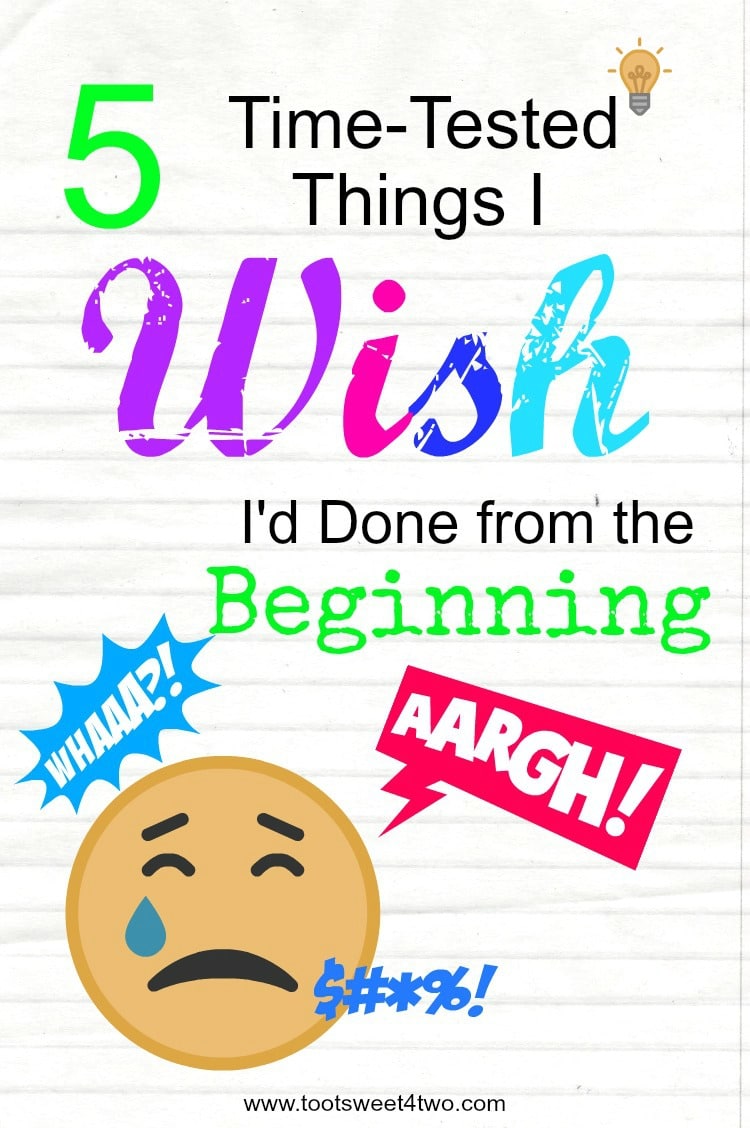
5 Time-Tested Things I Wish I’d Done from the Beginning (of my blogging career)
You Might Also Like:
How to Make Wood Boards for Photography by Liz at Love Grows Wild
10 Tips and Tricks for Taking Better iPhone Photos by Chelsea at Two Twenty One
Basic Backdrop Boards for Photography by Lisa at Celebrate Creativity
Wow these are such great ideas!! And love what you’ve done with that rustic crate!!
Thanks, Laila. That crate still has a place in my heart, so I’m sure I’ll still use it off and on.