This charming FREE printable was created entirely in PicMonkey (this post contains affiliate links. Click here to read my full disclosure policy.).

Here Comes Peter Cottontail
hoppin’ down the bunny trail,
Hippity, hoppin’ Easter’s on its way!
This iconic classic children’s song was first performed by Gene Autry in 1950. Yes, that was even before I was born! {grin}.
Anyway, this song has run through my head for days now, probably because I’ve decorated our dining room table for Easter and it’s full of bunnies, so I decided to try to get it out of my head by creating an Easter card to share with readers! This is a fun and easy way to create something special to share with others. And, it’s really cute, don’t you think?
Here’s what you do:
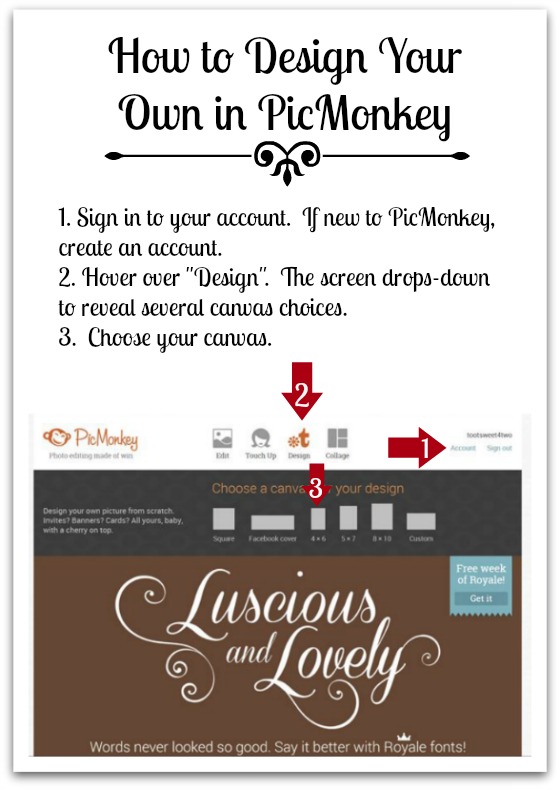
Sign in to PicMonkey.You only need to sign in to PicMonkey if you have a “Royal” account.If you don’t have an account already, you will need to create one. You don’t need to create an account unless you are purchasing the upgraded “Royal” features. See the comment from Brenda at PicMonkey in the comments section. Thanks, Brenda, for setting the record straight {grin}!- Hover over “Design.” A drop-down box appears and asks you to choose a layout.
- For this project, I chose the 4 x 6 layout.
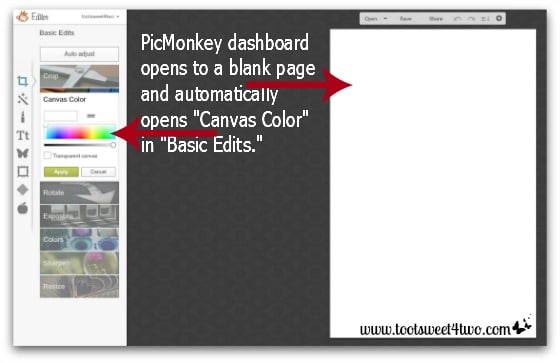
A blank canvas will appear on your PicMonkey dashboard. In addition, PicMonkey automatically opens “Canvas Color” in the “Basic Edits” navigation sidebar on the left side of the dashboard.
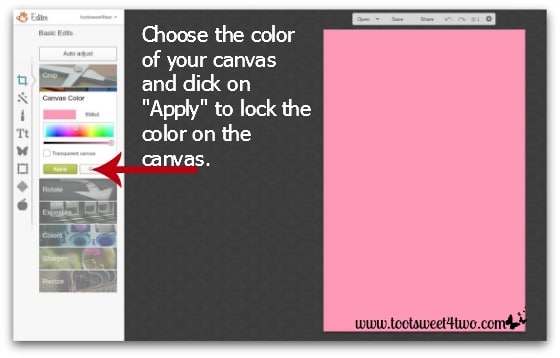
Choose your canvas color by clicking on the wide range of colors in the color bar on the left. I chose a pretty pink for my Here Comes Peter Cottontail project. After you have chosen your color, click on “Apply.”
How to Add Overlays in PicMonkey

Choose a bunny! After all, this project is called “Here Comes Peter Cottontail – A PicMonkey Tutorial” {grin}! To find this cute bunny, click on the butterfly on the sidebar navigation pane. The butterfly represents the “Overlays”. Scroll down the sidebar until you find “Cutimals” and click on that box. The box drops-down to reveal several choices.
When you click on the bunny, PicMonkey automatically places the bunny in the center of your canvas. Note that the bunny has “sizing handles” on four corners plus a handle at the top, which allows you to rotate the bunny. In addition, an “Overlay” edit box appears on the right side of your dashboard.
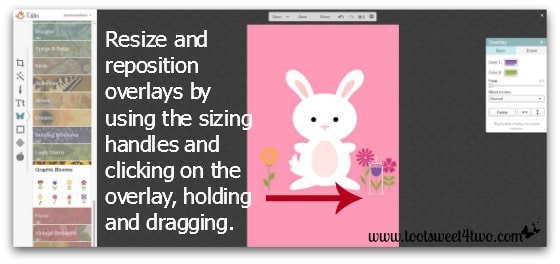
How to Resize an Overlay in PicMonkey
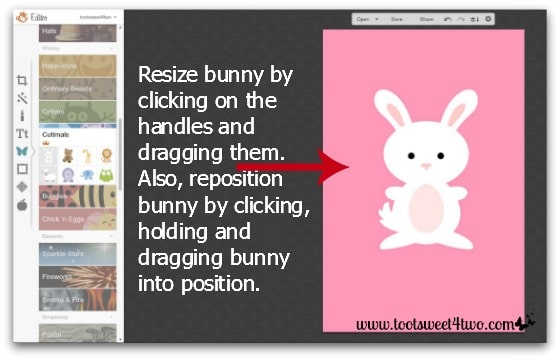
Resize the bunny by clicking on one of the handles and dragging it. Then, reposition your bunny by clicking on the bunny, holding it and dragging the bunny into position. Don’t worry – if you decide later that the bunny is too large, too small or in the wrong position, you can change it.
Add More Overlays
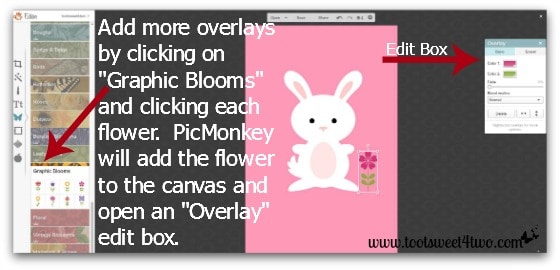
Next, add more overlays. I wanted flowers, so I chose the “Graphic Blooms” overlay box and clicked on a pink flower. Note that PicMonkey opened the “Overlay” edit box on the right side of the dashboard.
I added several more flowers, dragged them into position and resized a few of them.
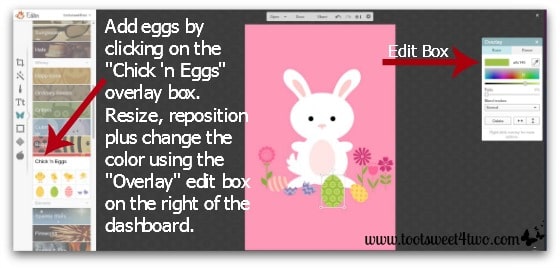
Then I added Easter eggs by clicking on the “Chick ‘n Eggs” overlay box. Again, I resized them by dragging the handles, repositioned them and rotated some of them on their sides. Plus, I decided I wanted everything in shades of pink, so I changed the color on the eggs and flowers by using the “Overlay” edit box on the right side of the dashboard.
How to Add Text in PicMonkey
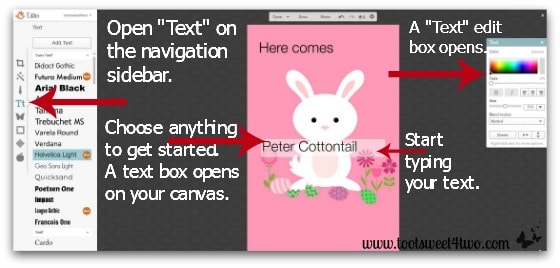
Next, I added text. To add text, open the “Tt”, which stands for “Text” on the left side navigation sidebar. Choose any type of text and click on “Add Text” at the top left side above all the text choices. A text box automatically appears on your canvas and a “Text” edit box opens on the right side of your dashboard. Place your cursor inside the text box and start typing. PicMonkey’s default type color is black.
NOTE: you can change fonts on specific letters and words within one text box. However, sometimes it’s difficult to get the desired “spacing” between each line of text. For this example, I typed “Here comes” in one text box and “Peter Cottontail” in another text box.
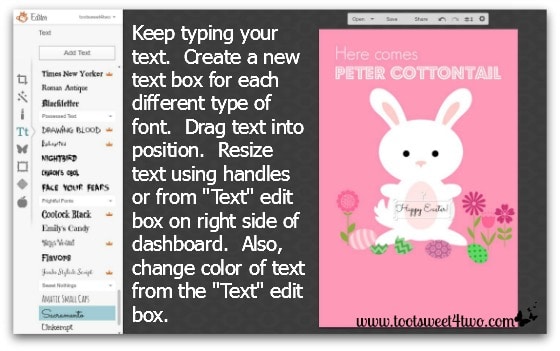
Drag your text into position. Resize your text using the handles or from the “Text” edit box on the right side of the dashboard. Also, change the color of the text by clicking on the text box to “highlight” it and then choose your new color from the “Text” edit box.
Choosing Fonts in PicMonkey
Here are the details of this finished masterpiece:
- “Here comes” is the Geo Sans Light font.
- “Peter Cottontail” is the Budmo Jiggler font.
- “Hoppin’ down the bunny trail” is the Geo Sans Light font.
- “Hippity, hoppin'” is the Geo Sans Light font.
- “Easter’s” is the Emily’s Candy font.
- “on its way!” in the Geo Sans Light font.
- “Happy Easter” on the bunny’s tummy is the Sacramento font.
The triangle at the bottom is a “Garnish” from the “Garnishes” overlay section, which I dragged into position, rotated and colored white.
Once you are happy with your masterpiece, click on the little icon on the top of the dashboard, that when you hover over it says “merge together all overlays and marry them to the photo.” And, don’t forget to “Save” your masterpiece to your computer hard drive.
P.S. “Cutimals” is a Royal feature, which means readers need to upgrade to a paid account to use this overlay. PicMonkey is around $35 annually or a monthly fee of about $5. But, everything else on this Here Comes Peter Cottontail – A PicMonkey Tutorial was done with their free features. If you want to do something similar for Easter, but don’t want to purchase the Royal upgrade, choose the “Chick ‘n Eggs”, which is a free overlay feature.
Hope you and your family have a wonderful week as we prepare for Easter this Sunday!
Tootles,

Related Posts:
(other posts with PicMonkey tutorials)
This is adorable. I love the tutorial on how to make this. I LOVE Pic Monkey and did my blog design with it. Thanks for sharing with Small Victories Sunday linkup last week. Late but pinning to our linkup board and glad you joined us this week too.
Thanks! PicMonkey is the best, isn’t it? More Easter and Spring fun coming soon!
So cute! Thank you for sharing your tutorial on Brag About It!
~Laurie
You’re welcome! I love PicMonkey and always have fun creating these tutorials.
Hi there! Stopping by from Hump Day Happenings. This is so adorable! Thanks for the detailed tutorial!
You’re welcome! Thanks for dropping by. I’m glad the tutorial was useful!
This is so cute! Thanks for sharing. Just one point, though. You don’t need an account to use PicMonkey’s free features. Simply start at step #2 (Hover over Design…) and hop along. An account is only necessary if you want to upgrade to Royale membership.
Cheers! Brenda (PicMonkey Team)
Thanks, Brenda, for the clarification! I’ve been a “Royal” user and lover for so long now, I couldn’t remember whether or not you had to create an account! Thanks for stopping by! Stay tuned for another PicMonkey tutorial!