I love quiche! My versions are easy because I almost always use a frozen pre-made pie crust shell. I buy the packets that have 2 or 3 frozen pie crust shells together and keep them in the freezer for when the urge for a quiche or a pie strikes me.
I’ve shared a few of my quiche and pie creations already on this blog. You can check them out here:
With just a bit of effort, Cheesy Mushroom Quiche comes together quickly. Especially if you have a few of the key ingredients on hand, such as a frozen pre-made pie crust and a can of evaporated milk. As I said above, I usually have a frozen pie crust or two in my freezer and a can of evaporated milk in my pantry.
Plus I always have some type of cheese. The remaining major ingredient, fresh mushrooms, is a little trickier because they are fresh and have a limited shelf life. But, I love mushrooms so I buy them often.
Why am I sharing the details of what I have on-hand at any given time, etc.? Because this quiche recipe is so easy that you can throw the ingredients together and pop it in the oven and voila’, a special breakfast or lunch is on the table for your family or guests with minimal effort! Now that’s “toot sweet” in my book!
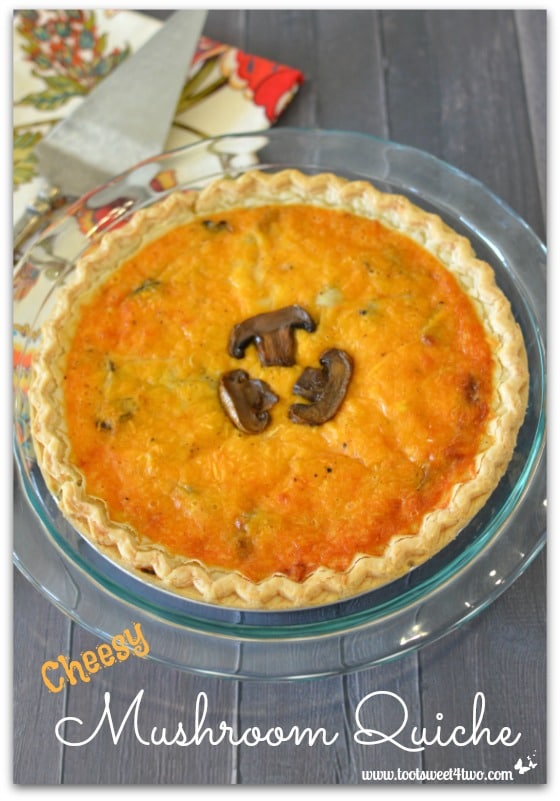
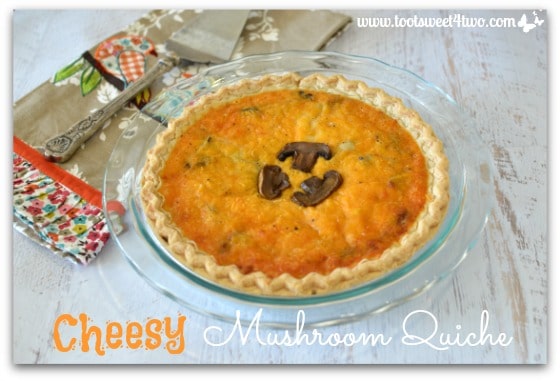
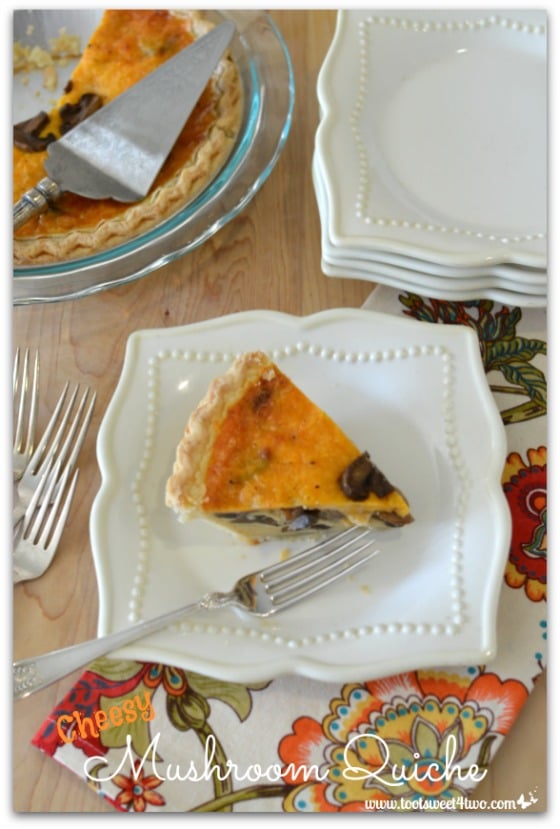
Did you notice that the background in all the above photos is different? No, I didn’t make Cheesy Mushroom Quiche three different times and photographed three different quiches {grin}! They are all the same quiche. I bought a few photography “backgrounds” to try out.
These “backgrounds” are printed on a type of impervious canvas – probably some type of plastic. They are made to look like wood and come in a variety of different textures and colors. I would venture to say that at least 75% of the food photos on the web that have a “wood” background are actually a “faux” wood product.
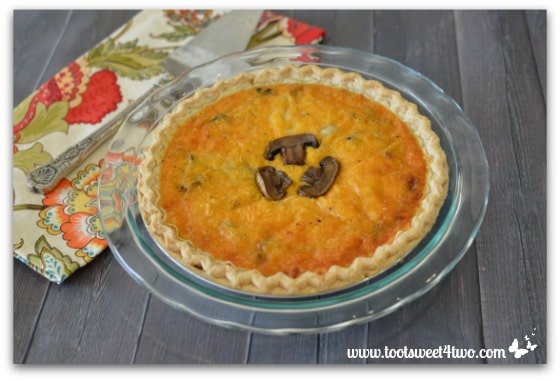
I was totally oblivious to this photography “trick” until I read about it on another blog. So, I thought I’d test the waters and purchased a couple.
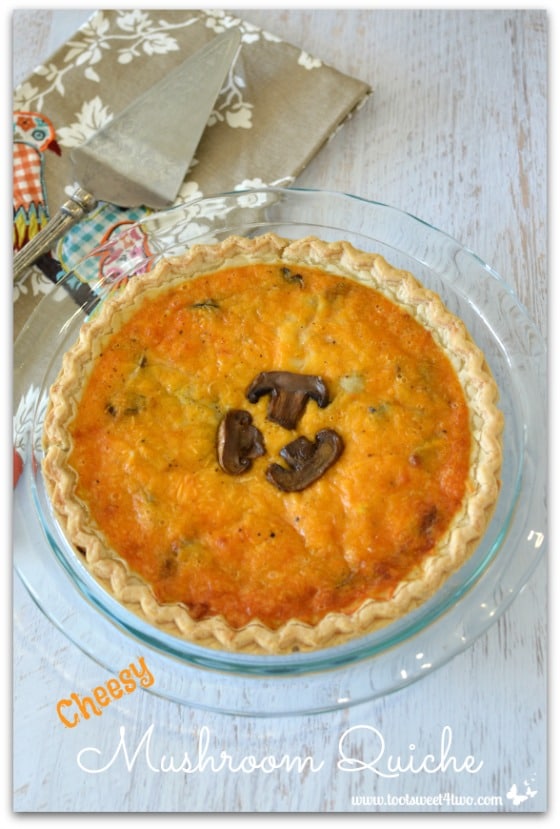
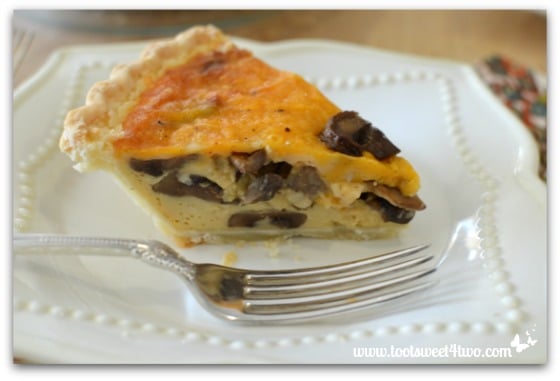
This one and the one above this one are the “faux” wood panels. The one below and in pictures #3 and #4 above are a lovely real wood chopping board that Charlie gifted me last Christmas. He knew my original wood chopping board that I used to take my photos was in sad shape because, well, I used it for chopping {grin}! So, he bought me 3 new, thick chopping boards of various sizes for Christmas!
Such a sweet gesture, but it has totally backfired! I have yet to use those 3 new chopping boards for anything other than photography (I don’t want to ruin them!), and continue to use my old wood chopping board for chopping!
Which background do you like the best? The jury is still out for me. I still like Charlie’s chopping board the best. I think the color is warmer and richer. So far the white faux wood background leaves me a little cold as does the darker background. But what do you think?
Back to the Cheesy Mushroom Quiche…
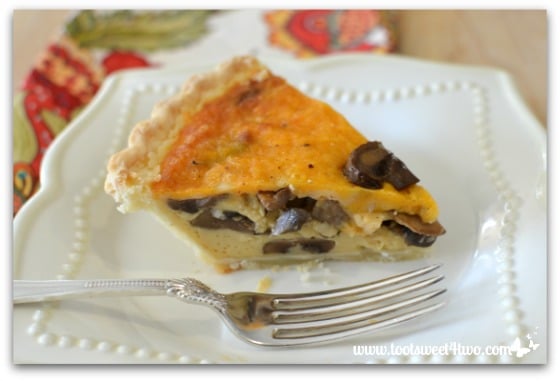
Served warm from the oven, Cheesy Mushroom Quiche is a savory treat. For mushroom lover’s, this recipe checks all the mushroom lover’s boxes:
Meaty texture? Check.
Woodsy smell? Check.
Nutty flavor? Check.
Combined with the cheesy goodness of Cheddar and Swiss cheeses plus the savory saltiness of the pie crust and the creamy texture created by the eggs and milk, Cheesy Mushroom Quiche is a delicious breakfast, brunch or lunch entree’.
Here’s the recipe:
Cheesy Mushroom Quiche

Cheesy, savory, nutty and delicious, this quiche recipe is easy to prepare.
- Prep Time: 10 mins
- Cook Time: 45 mins
- Total Time: 55 mins
- Yield: 6-8 1x
- Category: Breakfast
- Cuisine: American
Ingredients
- 1 frozen 9-inch pie crust
- 1 tablespoon canola oil
- 20 ounces mushrooms, sliced
- 1 cup cheddar cheese, shredded
- 1/2 cup Swiss cheese, shredded
- 1 cup evaporated milk
- 3 eggs
- 1/4 teaspoon ground nutmeg
- 1/2 teaspoon salt
- 1/4 teaspoon ground black pepper
Instructions
- Preheat oven to 350 degrees F.
- Add canola oil to a non-stick skillet and heat to medium.
- Add mushrooms and saute until lightly browned.
- In a small mixing bowl, whisk eggs.
- Add milk, nutmeg, salt and pepper; mix well and set aside.
- In a separate mixing bowl, combine both cheeses and set aside.
- Place frozen pie crust on an aluminum foil lined baking sheet (to prevent overflow and making a mess of your oven!).
- Add cooked mushrooms to the bottom of the pie crust.
- Cover mushrooms with cheese mixture.
- Pour egg and milk mixture over all and place in preheated oven.
- Bake for 20 minutes, then check the quiche; if the crust is browning too quickly, cover the edges with a pie shield.
- Return to oven and cook 20 to 30 minutes more until toothpick inserted in center comes out clean.
- Remove from oven and allow to cool 5 minutes before slicing and serving.
Notes
(1) Be sure to pre-cook the mushrooms. Mushrooms make a lot of water when cooked, so placing raw mushrooms in your quiche will make it watery and mushy. (2) You can make your own pie shield if you don’t have one, using aluminum foil. Twist a length of aluminum foil into a long ribbon and join the two ends together to form a circle the circumference of your pie plate. Gently lay over your browned pie crust to prevent further browning.

Tootles,

Related Posts:
(other breakfast recipes)
- Brown Sugar Bacon
- Cheesy Mexican Omelet
- Coffee Banana Protein Smoothie
- French Toast with Maple Pecan Clusters Crunch
- Garden Vegetable Breakfast Burritos
- Goldenrod Eggs
- Hawaiian Honeymoon Waffles
- Heart in a Hole
- Mini Cinnamon Muffin Melts
- Mom’s Old Fashioned Banana Nut Bread
- Mom’s Old Fashioned Coffee Cake
- Pancetta, Potato and Broccoli Frittata
- Strawberry Protein Smoothie
- Sweetheart Maple and Sage Sausage Patties
- The Casa Bella Swedish Pancake Factory
Wow, I love the look of the new backdrops. I honestly couldn’t tell that it was faux wood. While I do think that there’s something very inviting about the natural wood block that Charlie got you, I’m in love with the others, too. I think your aesthetic works well with the white-washed wood because your props seems right at home with that particular look. I love the contrast of the dark wood backdrop as well. I can’t wait to see more of what you do with your photos – and your food, of course! 🙂
Thanks, Emily, for the feedback! I appreciate your thoughtful, constructive comments and stay tuned for many more food photos to come!