Once I graduated from my iPhone camera to my DSLR, I still continued to take photos right on my countertop. Here are a couple of samples at different times of day (most of my food photographs are created at night while I’m cooking dinner, which is a problem because there is no natural light available and I rely on overhead lighting fixtures):
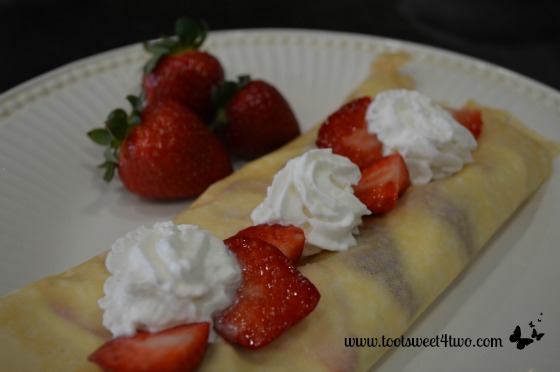
Strawberry Crepes
These are Strawberry Crepes that I made one Saturday morning when my sister, Dawn, was visiting from Yuma. While they look yummy, they weren’t all that good, so until I can perfect the recipe, you won’t see them posted on the blog! But, the picture is pretty good because even though it is taken on my countertop, it’s the morning and the natural light was decent.

Noon Natural Light
The above pictures are flatbed pizzas that I made one day when Tiffany came over to help me with a project. They were delicious and yes, they will eventually be posted on our blog. They were taken around noon to 1:00 p.m., again when our kitchen had relatively good natural light. Notice that I don’t have these flatbread pizzas near the countertop surface? This, too, is one of Kelly’s tips – use non-reflective surfaces to capture your shot. The one on the left is on the baking sheet (non-reflective because of its matte surface) and the one on the right is on a very large cutting board.
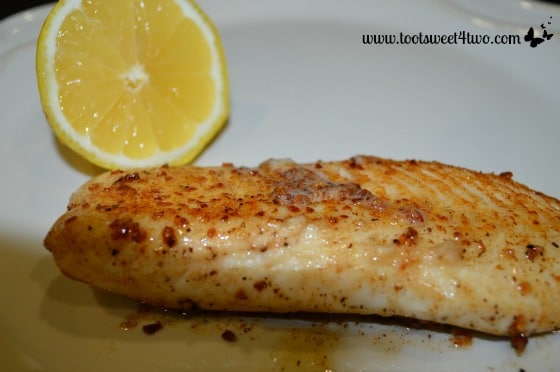
Tilapia in the shadows
The photo above was taken at night, along with the featured picture of tilapia at the very top of the post. This recipe, too, will be featured in an upcoming post. But, I wanted you to notice the difference in the light because of taking these pictures in artificial light. The picture at the top of the post of the garnished tilapia close-up, while a relatively decent photo, makes the white plate seem a pale gray. In the picture above, the shadow was created by my camera lens. I was leaning over the fish trying to get a close-up and because of the artificial light, the shadow appeared.
In order to try to capture better food photographs with natural light (yep, we are STILL on idea #1: Use Natural Light – Cost $Zero!), I need to create a food photography studio! Well, since I can’t run out and buy one or remodel our house to include one (at least not yet), I toured my house to consider my options. Here are my options:
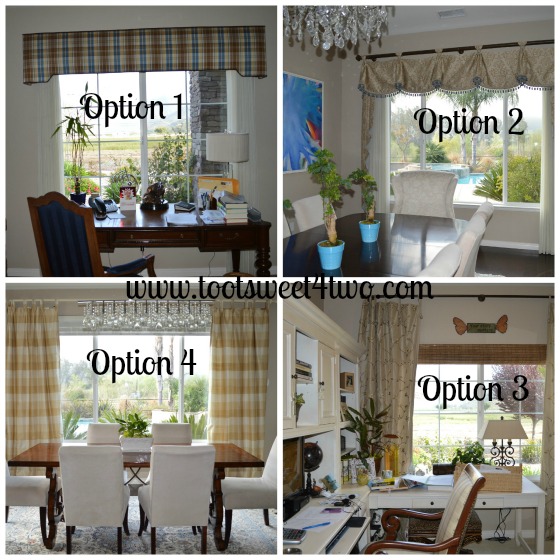
Studio Options
Note: all the above photos were taken with a flash in the daytime. Setting my camera to not flash resulted in dark photos because the lens focused on the windows in each room (the source of light), leaving everything else in the dark!
- Option #1 is Charlie’s Office. Since I’m pretty sure he doesn’t want me to move his stuff on his desk, this really isn’t an option. Plus, it’s around the corner from the kitchen so transporting food back and forth to his desk is an accident waiting to happen!
-
Option #2 is our dining room. While this is close to the kitchen, our dining table is too big to move every time I want to photograph food (which is almost daily, at this point!). And, since I don’t have a folding table (I guess I could buy one; I’ll have to think about that!), I’d have to photograph the food on chairs (which people actually do!). I’m not quite ready to take that chance!
-
Option #3 is my office. And, yes, it’s ALWAYS that messy! I’m a busy girl and the giant basket is full of undone projects and correspondence! Can you see Kelly’s book sitting there on the left (it’s black and yellow – the typical “Dummies” design)? So, cleaning up my messy office to photograph food isn’t going to happen!
-
Option #4 is our kitchen table located in, well – the kitchen! It’s near the window so it’s the winner!
Which now leads me to idea #2 of the 3 Cheap and Easy Ideas for Better Food Photographs, which is:
Cheap and Easy Idea #2 – Use Non-Reflective Surfaces by Raiding Items Around Your Home That You Already Have – Cost $Zero
Here’s what I found that I’ll be testing in the future:
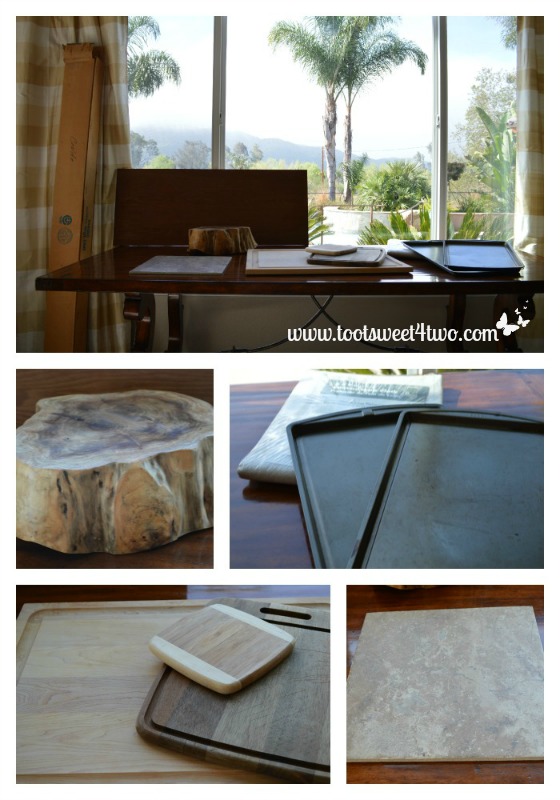
Collage of non-reflective stuff found around my house!
The items above include wooden cutting boards of various sizes, leftover tile from our floor tile project, used baking sheets with a matte surface, a canvas drop cloth still in its wrapper, a beautiful wooden bowl given to me by my sister Gail (turned upside down), a table leaf insert from a table in our garage (its surface isn’t polished to a high sheen like our kitchen table) and the biggest find, at least for me, my father’s projection screen! In my father’s photography days, developing photos into slides was “the thing” and 90% of his photos are on slides. This projection screen will come in handy as a back-drop as well as a light reflector! Plus, every time I use it, I will think of my wonderful father – a win, win!
The story continues on Page 3…
Thanks so much for your kind words about my book and recommending it to your readers! I’m thrilled to have found your blog and look forward to exploring more!
You’re welcome, Kelly. It was much deserved! Your book is excellent and while I read it cover-to-cover, I still learn (re-learn) from it all the time. A very valuable resource to us as we progress through this blog journey! Thanks so much for your comment! I means a lot to us, to me, that you’ve visited our site!
I loved reading this. You are “welcome” for the rooster.. I learned so much from this blog. I can’t believe you cracked those beautiful eggs. What were you thinking? well I mean, I guess you weren’t thinking at this point, haha. Your pictures were great. My vote on the three rooster ones was the one on the right, I liked the lighter blue with the colors in the rooster. PS, your assistant is adorable.
As respects the cracked eggs, I think I just had my head in the clouds – excited about creating a shot with my new “studio” layout! Just a space cadet!